Step by Step guide for bulk updating individual item information for items in the Amazon Handmade category
Article by Bob Estrin
Link to large article on how to sell your artistic products and FAQ on Amazon Handmade: Click Here
Select Topic from Menu:
Updated in 2021
Introduction: Making bulk changes to your Amazon item listings:
When I need to do many changes to a lot of listings of a similar nature, I tend to open as many as 20 listings at a time first in the Manage Inventory screen and then go in to edit those 20 listings repetitively. After those 20 listings are edited, saved, and closed, I then open up the next 20 listings. I keep track of where I left off if I need to continue my edits at a later time. The Manage Inventory screen tends to keep the items in order so I can tell where I left off if I do not try to change the item’s listing order by clicking on one of the heading fields.
I find using the browser Firefox is reasonably fast with some of the other browsers being much slower. You should find the fastest browser for you and use that when doing mass item changes.
I have found using a copy/paste type software speeds up similar changes or wording to a large number of listings.
In 2018, Amazon Handmade has added the ability to bulk edit (change) many selected Handmade fields using the menu option "Inventory" and the "Add Products via Upload" feature. When the number of inventory items is too great to do manually one at a time in the edit mode, you have another option to change those inventory items differently. Be careful when you try bulk editing the first time and try it with only a few items until you are sure you have the procedure correct. You can cause problems on a more massive scale when changing a great number of fields using bulk editing if you do things incorrectly. I have tried it and was able to change different fields such as my title, description, how my products are made as some examples successfully. While this feature can also be used to add new items, since not all fields are available to add, it seems easier to just copy a similar existing listing to create new item listings. You can not add or update the Handmade customizations fields with this tool but most other fields can be used. See the section below for more detailed information about using the bulk upload or "Add Products via Upload" feature.
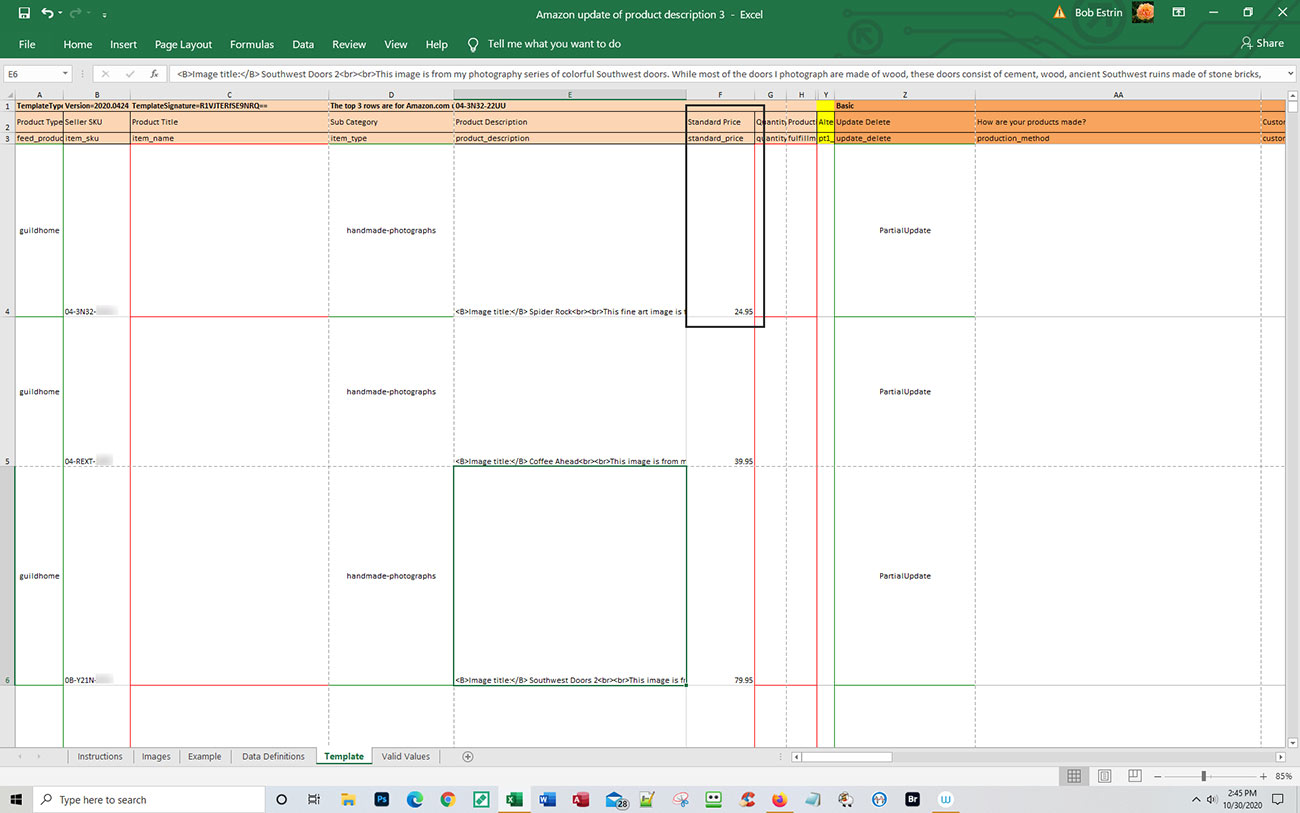
The following bulk update spreadsheet file shows, using bulk method two, a sample of how it would look for the update of the product description, How are your products made?, Your Tax Code and Is Gift Message Available fields. While the step-by-step instructions might seem intimidating below, you upload a spreadsheet file with the field titles and related SKU field information that you want to change. If a specific data field is left blank, the information currently in that field will not be changed.

This article shows three different ways to do bulk updates on Amazon Handmade items.
The first bulk method uses the category listing report and will handle a bulk update on many of the different specific fields in the different Handmade categories and is more flexible. This first method uses a different template for each Handmade sub-category and can handle most fields except for the customization fields. When using the term PartialUpdate in the Update Delete column, the specific item fields will only be changed if you have that specific item field entered for that item SKU in the bulk update spreadsheet. Existing item column heading and data cell information that is not shown in the bulk update spreadsheet will stay the same and not be modified.
Update 10/2021 If you get an error on the bulk update, you may want to check if this is caused by not having the new Brand Name field filled in for the items you are changing.
Note: If I am not updating the Quantity values, I also remove the Quantity column from the update spreadsheet. If you do not do this, you may have sold some seller fulfilled items after you originally ran the Category Listings report and the quantity values uploaded will be from the time you ran the report. These quantites will not match the item quantity for those items that sold after you originally ran the report.A sample of some item fields you can change but many more are available:
1. Title field
2. Description field
3. Price
4. Quantity
5. Production time
6. How are the products made
7. Occasions
8. Style keywords
9. Search terms (keywords)
10. Item color
11. Color map
12. Shipping template
13. Product Tax code
14, Gift message available
15. Various item weights and shipping measurements
16. Various specialty item fields specific to your handmade item category.
17. The new bullet point fields
The second bulk method uses the Inventory reports and only a limited selection of item fields. This method has more steps than the first and third bulk update methods.
Update 10/21 I recently had a problem with the bulk method because I did not have the 'Brand Name' field filled in for my item. This is a new field and Amazon may not have things working correct on it at this time.
The third bulk update method is a more simplified process but is only good for updating a few fields such as the Production Time, pricing, and quantity fields. This third method should work for all Amazon Handmade categories using the same template. This third method will allow more sellers to do bulk updates on the Production Time field.
Important recomendation:
It is highly recommended that you try bulk updating by only doing 1 to 5 SKU numbers at first just to get the procedure down.
It is highly recommended that you try bulk updating by only testing with items that are not your best sellers at first just to get the procedure down.
If you have any issues, it is better to have those issues done on a few SKU items that are not your best sellers and not hundreds of SKU items.
One thing you may want to consider is learning how to do this in advance so you have the knowledge when you may need it. During the busy 4th quarter you may not have as much time to learn a new skill. I have already used the bulk update feature in a variety of ways with some being to capitalize my titles, do global updates to many of my descriptions, and update the How are my products made field. While this feature is not sexy and more utilitarian, if used in a variety of ways, it can increase your sales as it may lead to new wording that may not have been worth changing manually but maybe worth changing using this technique.
If you used the bulk update feature, let me know in the comment section below.
While the length of this article and the number of steps listed seem long and technical, do not let that intimidate you from learning this skill. Once you get the hang of it, it becomes much easier to the point that you can do it without the need for any written step-by-step directions. In the end, this new skill will allow you to save time making many changes at once in record-breaking time compared to doing numerous individual item changes. Once you get used to this, you will be able to adjust your item listing as needed much more efficiently and allow you to do things that other sellers may not be able to do.
See nine different Amazon videos under the video tutorial list on this link page. This shows numerous examples on how to use this feature to add or modify your Amazon items (Click here for more information).Using the Amazon bulk upload feature to do mass changes to existing item listings: This example shown below is the modifying of the Title and Description fields
While this example of bulk upload method 1 shown below shows the steps for changing the Title and Description fields, you can use this same method to add or modify other item fields such as the How are the products made or bullet point fields as a few examples. Many other fields are available to be changed as listed in the bulk update file layout that you can download for your specific categories that your inventory items are in. You can manually hand type a change to an existing item field or once you have your information in the report spreadsheet layout, you can do numerous find and replace commands to change your wording on the whole item field or just a part of a field for numerous items at once. This is a particularly powerful utility and can be used in many ways to adjust existing item field information.
You can see two example file layouts further below. One layout is for the specific category Handmade Products / Home & Kitchen / Artwork / Photography. Another layout is for the specific category Handmade Products / Jewelry / Earrings / Droop and Dangle.
When doing bulk updates on fields that may have a character length limit, you do not want to enter any values over that character length limit. I do not believe the system will notice if you go over the length limit during the bulk update review. As of 2020, look at the length for the title field (200 characters counting spaces), product description field (2000 characters counting spaces), style keyword field (100 characters counting spaces), and the search term keyword field (250 characters counting spaces). I had a problem with adding additional search terms to the end of my spreadsheet search term field causing over 250 characters to be uploaded to many of my items. Only when I went into my items in edit mode, did I see an error message on the search term length being over 250 characters. I requested and ran the category listings report which shows the search term field for all your items. I looked for all my items with longer search term fields over 250 characters and shortened them.
Update: 10/30/20:
I noticed that you now need to fill in the "Standard Price" field even if you are not changing "Standard Price" field. In the sample screen below, I was changing the product description field and received many errors on the bulk update. I filled in the standard price field and it worked again without errors. So it looks like you need to fill out these fields Standard Price, Product Type, Seller SKU, Sub Category, and Update Delete column fields, in addition to the fields you want to update.
Bulk Update Method 1 - Steps to update your Amazon handmade item fields using the category listing report:
Note: Amazon changes the screens which may make some of these instructions out of date.
Important recomendation:
It is highly recommended that you try bulk updating by only doing 1 to 5 SKU numbers at first just to get the procedure down.
It is highly recommended that you try bulk updating by only testing with items that are not your best sellers at first just to get the procedure down.
If you have any issues, it is better to have those issues done on a few SKU items that are not your best sellers and not hundreds of SKU items.
The step-by-step instructions in bulk update method 1 displayed below are shorter and in less detail than the bulk update 2 step-by-step instructions listed later in the article. Using the category listing report (bulk update method 1) saves many steps. You certainly can read the bulk update method 2 since it gives much more of a background on bulk updating.
1. Request and download the category listing report. The instructions on how to request this report from Amazon are easy and listed further down in this article. The category listing report can then be downloaded and already contains the data for your items, in a spreadsheet format, including data not available in other types of Inventory reports such as search terms, bullet point fields, or variation fields as examples.
Note: If you chose to create a report that is not the category listing report (used in bulk method 2 and not bulk method 1 here) then download or save the report file to your local computer. Then call the downloaded file up to view in a spreadsheet program so it is readable and follow the bulk update 2 instructions. You can save many steps if you take the time to request and use the category listing report and use the recommended bulk update method 1.2. Review the category listing report and determine which fields you want to change.
2a. Then remove or delete all vertical columns that you do not want to change. You can delete multiple columns together so this does not take much time. You would delete the top heading column lines as well as the related cell data below. The information in the field columns you delete will not be updated and stay the same as they were before.
Note: Another option is that you could leave all the columns in the category listing report and not delete any of them. If none of the information has really changed from when you last ran the report, it does not really matter since all the extra column data will update to the same information. By not deleting any columns, you reduce making a mistake.
Note: If you can not update or delete any part of the spreadsheet, you may have to find the method to unprotect the spreadsheet, making it changeable, depending on which spreadsheet company you are using.
Note: If you get an error on the upload, you may find that you need to include the Item Quantity field and the Standard Price column fields even if you are not changing these fields when updating other fields. Sometimes I generally just include these two fields when I do bulk updates to avoid these types of Amazon error messages.You want to keep the category listing report's four columns that are required: These fields should already be filled in for you when using the category listing report. You can see these fields in the sample spreadsheet shown below.
a. Update Delete field which will be set to PartialUpdate when updating an existing SKU
b. Seller SKU field requires an item's SKU number
c. Product Type - Information in this field may vary depending on your handmade category. It will probably not be the same as in my below example.
d. Sub Category - Information in this fields may vary depending on your handmade category. It will probably not be the same as in my below example.
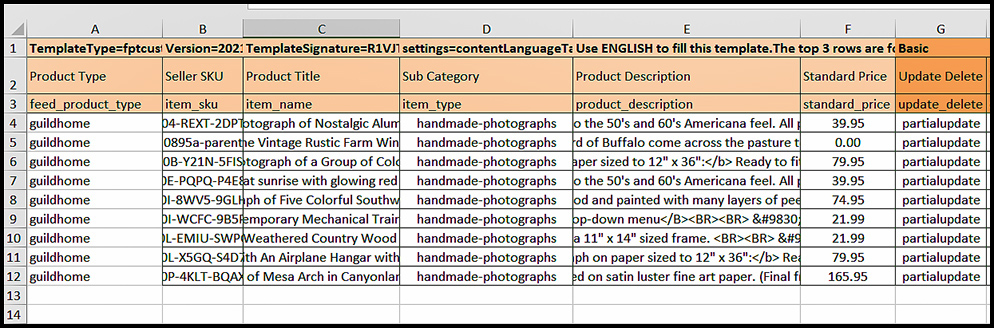
3. At this time you have a category listing report spreadsheet with the five columns listed in part 2 above. You also have all your columns containing the data fields you want to change. In this example, I want to change my Product Title and Product Description fields. I also chose to keep the Standard Price field as it is even though I am not changing it. You can probably remove the Inventory Quantity field unless you are changing/including the Production Time field column.
My category listing report spreadsheet, shown below, now has only eight columns left. You can see in the below example how the report was cut down to only change the columns that I wanted to change. The initial category listing report had many more columns and SKU rows. A sample of a complete category listing report for my category is shown later in the article.
In this example, you see only 9 items being changed in only a few fields to make it easier to follow. It is also possible to do many more field changes and with hundreds of item SKUs at a time. Once you master this bulk updating skill, you can save a lot of time maintenancing your items.
4. You can optionally choose to delete the specific SKU lines that you do not want to change if you want. If you just leave all the lines in, the system will just update those remaining SKUs with the same data information so you will not see any changes after the update unless your item inventory changed since you ran the category listing report and you included the Item Inventory column in your bulk update. I choose to delete all the Sku lines if I am not changing any information for that SKU.
Note: For my items, I can tell the different types of items by price so I sort the SKU lines by price and then delete those SKU's quickly that I know I will not be updating. Everyone will have their own method of deleting the SKUs that they are not modifying any fields for on this bulk update.5. The next step is to change the field values that you want to change. Your fields will vary for your change needs, but in this example, I choose to change the Item Title and Description fields. I use the spreadsheets built-in Find and Replace option and this can be done on only one column at a time or on all columns depending on what you are doing. Let's say that I want to remove a specific HTML from all my description fields. I can highlight just the description column and then go ahead and remove any bold HTML code.
A. Ctrl F Search for "< B>" and replace it with a space. Note: I had to add an extra space before the B or it would not display in this article.
B. Ctrl F Search for "< /B>" and replace it with a space. Note: I had to add an extra space before the /B or it would not display in this article.
C. Also for my description field, I am changing any reference to the specific wording 11" x 14" and changing it to 11 x 14 inches. I have to do only one find / replace for this. I do a replacement on all data cells at once to modify all at one time. I have now removed all references to using the bold HTML code for all of my item description fields in a few minutes. It does not take much more time if you are changing 100 descriptions at once or 10 using the bulk replace option when using the built-in Find/Replace spreadsheet command option. When just changing a few SKUs, it may be better to do those manually one at a time.
D. For my title field, I am changing any reference to the specific wording "Southwest" and changing it to "SW". I have to do only one global find / replace for this.6a. After you made all your changes, you would now do a final review on this bulk update spreadsheet. You want to visually look or use the spreadsheet search tool to find any errors and correct them as needed.
Note: The Add products via Upload screen, shown below, has changed from how it was before.
6b. Save the spreadsheet to another name more descriptive such as bulkupdate-title-description.xlsm. Keep your original category listing report unchanged. Your original category listing report could be used for recovery in case something goes wrong and you want to keep an original copy before the update for this purpose.7. You now can run the bulk update spreadsheet you created, using the feed processing file update to modify your item information.
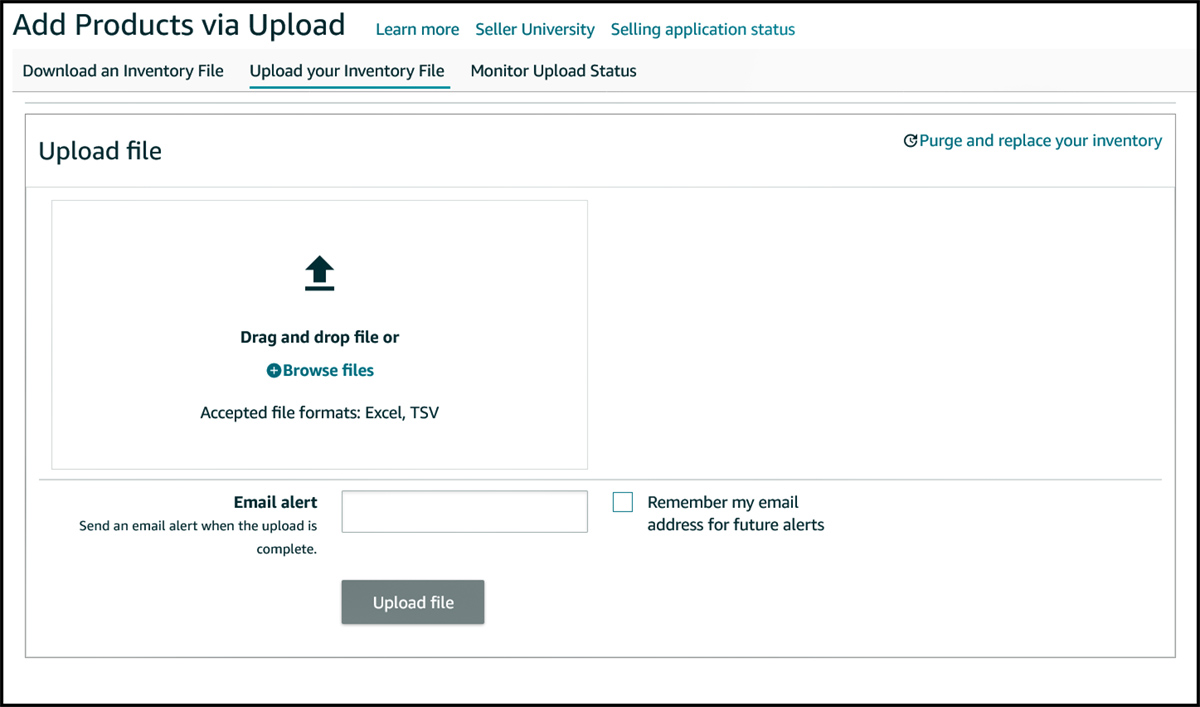
Go to the bulk update screen shown below by going to the main Catalog menu and select 'Add Products Via Upload'. Then select the menu option 'Upload your Inventory File' to show the sample screen below.
On the Add product via Upload screen shown below:
a. Select link 'Browse files' and select your bulk update spreadsheet name or use drag and drop on the screen shown below.
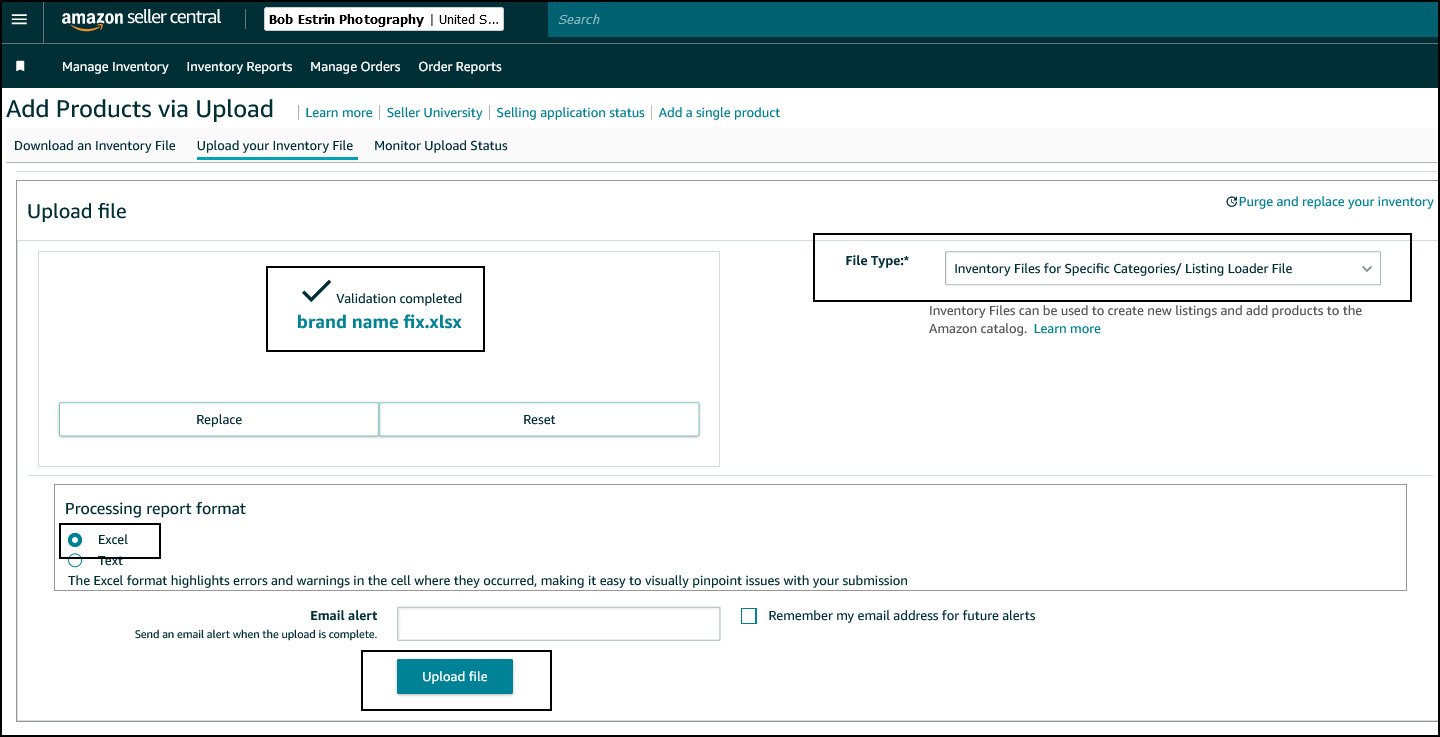
After you enter your update spreadsheet name, the screen will change.
a. Select the File type: Inventory files for specific categories.
b. Select Excel or Text option depending on what your upload file is.
c. Enter optional email address.
d. Press the Upload file button to start the upload.
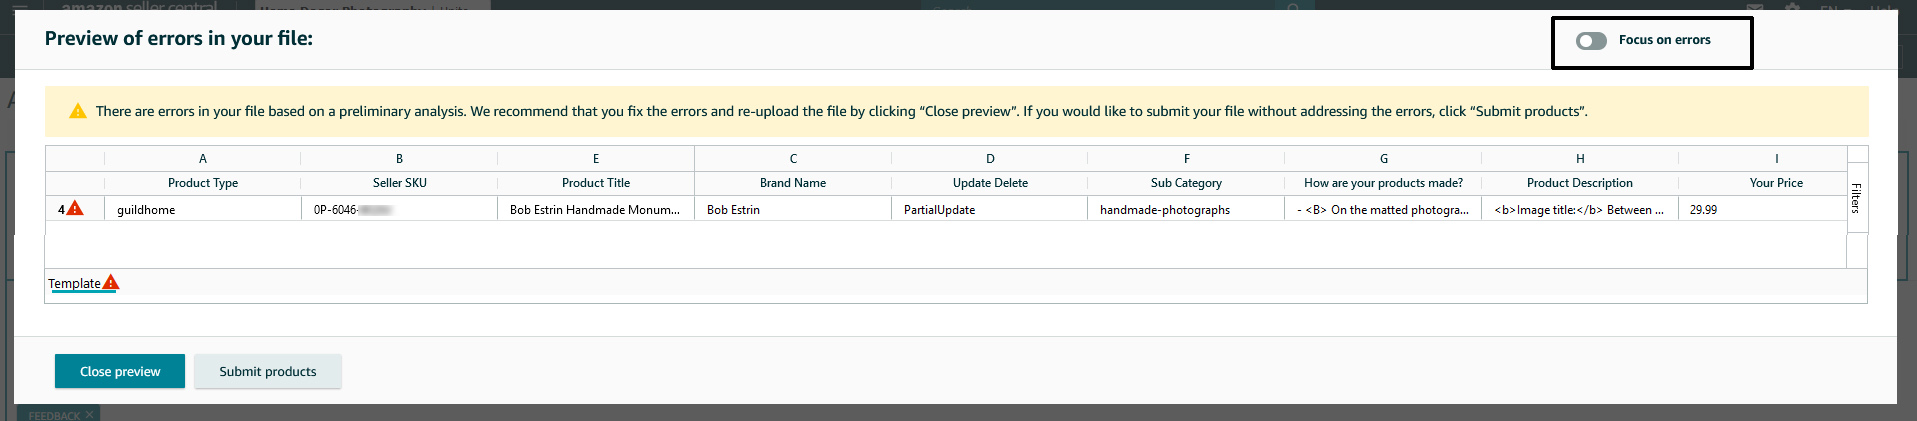
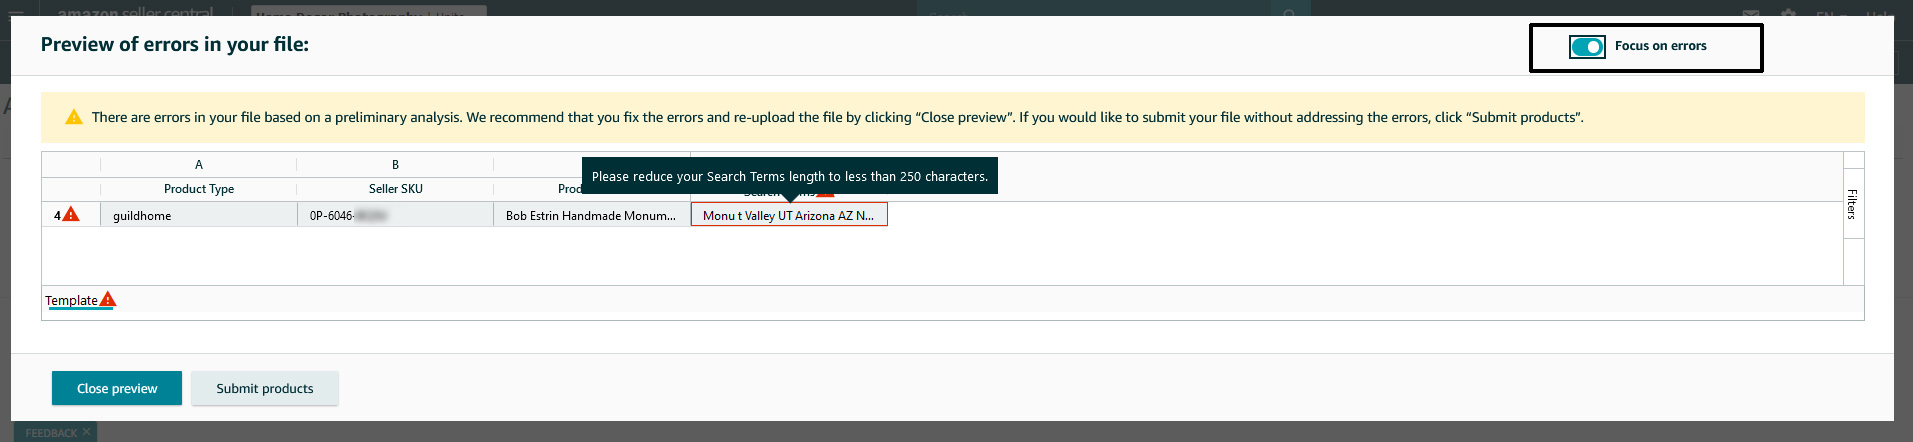
7A. Amazon updated in 2023 a new inventory upload pre-check after you upload your feed inventory file. In the sample screen print below shows just one item update and the screen displays the fields. If you had more items, it would show those also. You will also see the selection to 'Focus on errors' in the upper right of the screen. When you turn this toggle on, you will get another screen also shown below.
If you have no errors, you can then select the 'Submit Products' button on the bottom of the screen.
Below you see an example of an error. In this example, it shows that one of item's search terms was over the maximum 250 characters. You can then just select the 'Close preview' button. Correct all errors and upload the inventory file again.
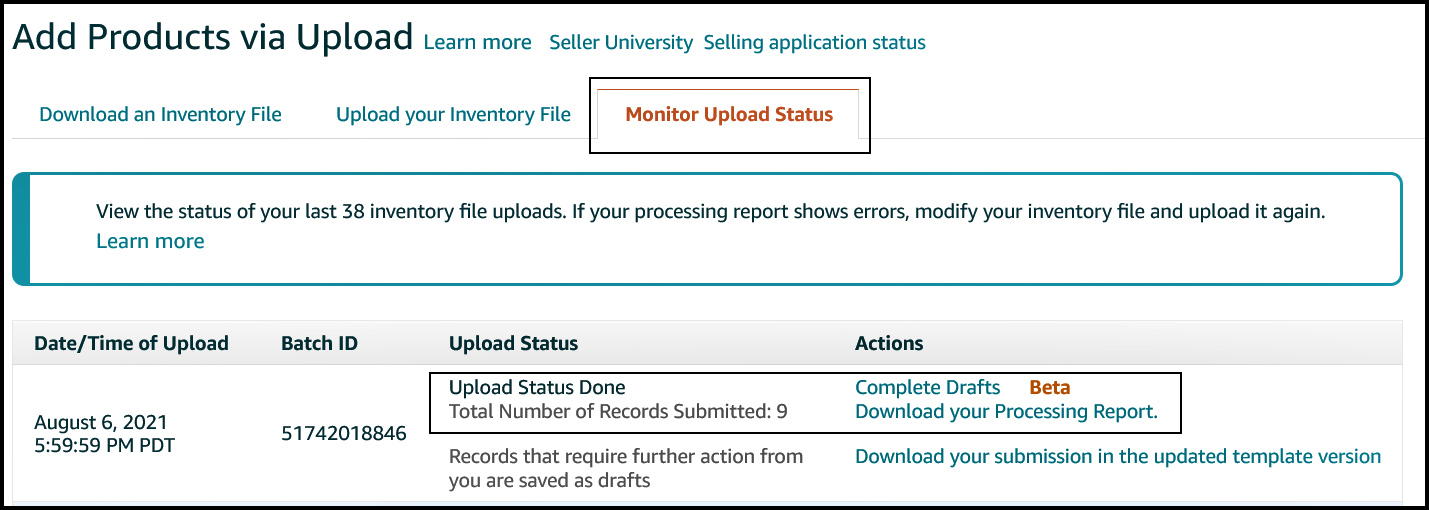
8. Select the menu option 'Monitor upload status' to go to that page. Press PF5 on a PC to refresh the screen. Look for your bulk update in the process shown below under Actions. When the update finishes running, call up the spreadsheet report and check the results of the Feed Processing Summary and look for any errors. This should have updated your items for all items without any errors. If you have any errors, you may need to review those SKU numbers and see if the expected changes were made. If not, you can rerun the bulk update spreadsheet with any corrections needed to avoid the error message and do the upload again.
Shown below is the feed process summary report. You can bring up this report by selecting the Download your Processing Report link shown in the above screen and then bring up the report in a spreadsheet. It does show one error, but in this situation it is okay. That error was on a Parent Variation item that does not have an inventory value greater than zero. Sometimes you do get errors but check the item for a change and it was changed correctly.
Many times, the Amazon system will show an error or multiple errors in the bulk update spreadsheet processing report, but the update on those SKUs with errors seems to be successful most of the time. You may want to review the SKUs with error messages in the edit screen for those updated fields. Many times your changes to the SKUs took effect and the item information is updated despite of any error messages. It is best not to look at the item screen that the customer sees right away since it may not of update your bulk update changes right away.
Since different Amazon Handmade categories have different category listing report spreadsheet layouts (specialty fields) the seller may come up with unique error messages or problems that can not be covered in this article. One option may be to remove entire unneeded columns that you do not need to update to see if that removes the errors. If you are stuck, you can try to reach the Amazon Feed department since that is the name of the group that handles bulk updates.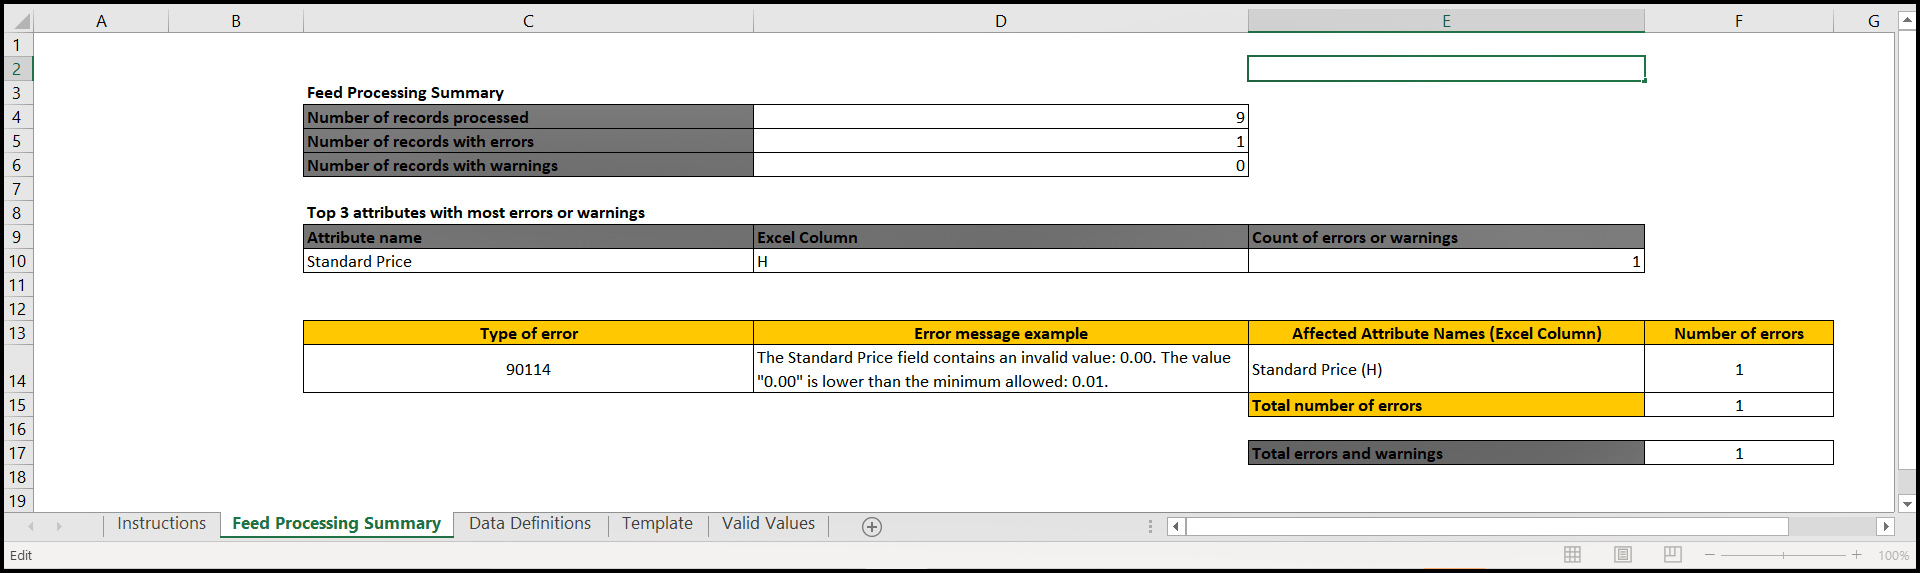
9. Go to Manage Inventory and check random item listings for some SKUs that you bulk update in edit mode to verify that the update worked and no other fields, other than what you changed, are modified.
---------------------------------------------------------------------Below is an example of using the bulk update Method 1 to update the new bullet point fields
Below is the spreadsheet section of the category listing report that shows the five bullet point fields.
Below is a sample of a bulk update spreadsheet I used to add bullet points to some of my listings.
I removed most of the field from my category listing report as shown in the sample spreadsheet below. You need to keep the fields you wish to modify as well as the required four fields Seller SKU, Update delete, Product Type and Sub Category.
Below is a sample of a bulk update spreadsheet I used to add bullet points to some of my listings.
Even though I am not updating the description field, I sometimes leave in the title or description field column so I can see which item I am working on which is more descriptive than only the SKU numbers.

----------------------------------------------------------------------
Recover of your product information when your bulk update goes wrong:
Well this recovery method will be a little different depending if you are using bulk update method 1, 2 or 3.
----------------------------------------------------------------------
There is no need to panic even if you had an bulk update that messed up information on 100's of items.
You basically can skip the steps of creating the original inventory report since you should have the inventory report saved in its original form before making changes to it. You do not want to try to recover item information on a new fresh inventory report, since that report will have the current bad item information.
In bulk method 1 above, you would skip step 5 which has you change the field values that you want to change. You basically want to bulk update the inventory spreadsheet file with the original data which will put back your item information to the same information you had at the time the inventory report was run before your bulk update.
When first learning about bulk updating, you may or will probably run into problems in which your item information has not changed correctly. To know that you can recover from this by using your original inventory report that has not been changed as a backup and use the bulk update process to do a recovery using the original inventory report. The steps to recovery is basically the same as doing a bulk update without changing the spreadsheet cells fields.
Bulk update method 2: Updating a Single or Multiple Fields:
Updated 8/21 bulk update method 2 section to make it easier to follow.
Note: I recommend Bulk update method 1 shown above as it is easier, faster and has less steps to do than Bulk update method 2 shown below. This Bulk update method 2 was how I did it before I had access to the catalog listing report. This section does give some additional information on bulk updates not shown above if you want to read it for informational purposes.
Important recomendation:
It is highly recommended that you try bulk updating by only doing 1 to 5 SKU numbers at first just to get the procedure down.
It is highly recommended that you try bulk updating by only testing with items that are not your best sellers at first just to get the procedure down.
If you have any issues, it is better to have those issues done on a few SKU items that are not your best sellers and not hundreds of SKU items.
General steps I took to update the fields Title, Product Description and Standard Price fields:
Note: While I use the three fields described above for this example, this method can be used to change over 100 fields depending on your Handmade category. Any fields you can find with an associated SKU number on a variety of reports such as the Inventory report or the more robust category listing report shown later in this article can be used to update in bulk.
1. First, create the bulk update spreadsheet. The fields on this spreadsheet will vary depending on which Handmade category you have your items in. If you have multiple Handmade categories, I believe you will need a separate bulk update spreadsheet for each category. If you do not update to the latest template, you will get an error when updating and it might be difficult to figure out why
a. Go to the menu option Inventory / Add files via upload. Then select the Download an Inventory File option.
See Amazon video on how to download your Handmade category template and also add some spreadsheet fields at (Click here for more information).
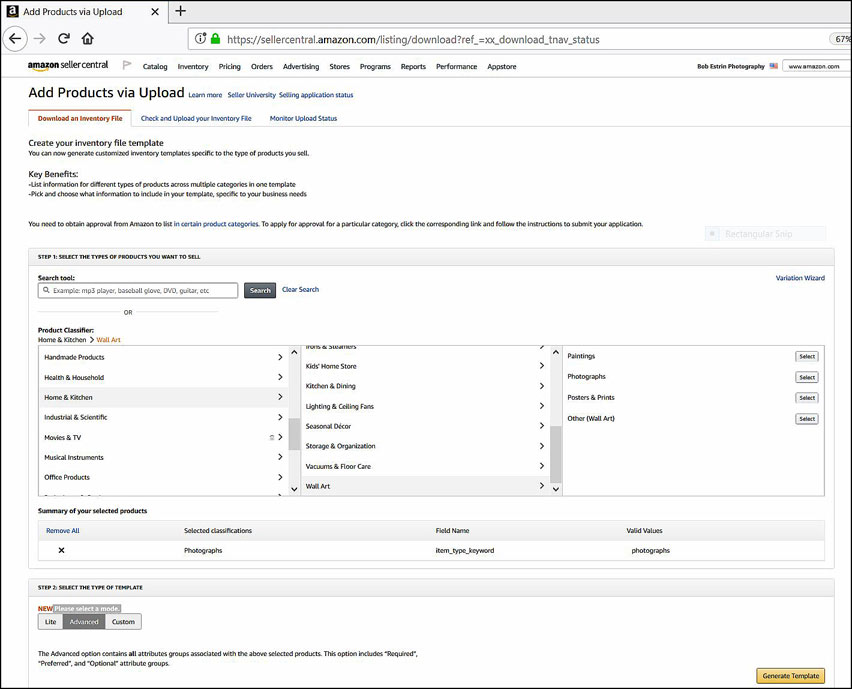
b. Select the different Handmade categories in the group columns to match your product sub-category.
c. Select the type of template in which I chose Advanced since that template had the fields I needed for my changes.
d. Click on the Generate Templates button.
e. After the template is completed, select the link to download the template and save it under a descriptive name.Shown below is the screen to create a blank bulk update spreadsheet file used for a specific category. This spreadsheet layout is later filled in with data to create the bulk update Upload spreadsheet file used to update the item records field changes.
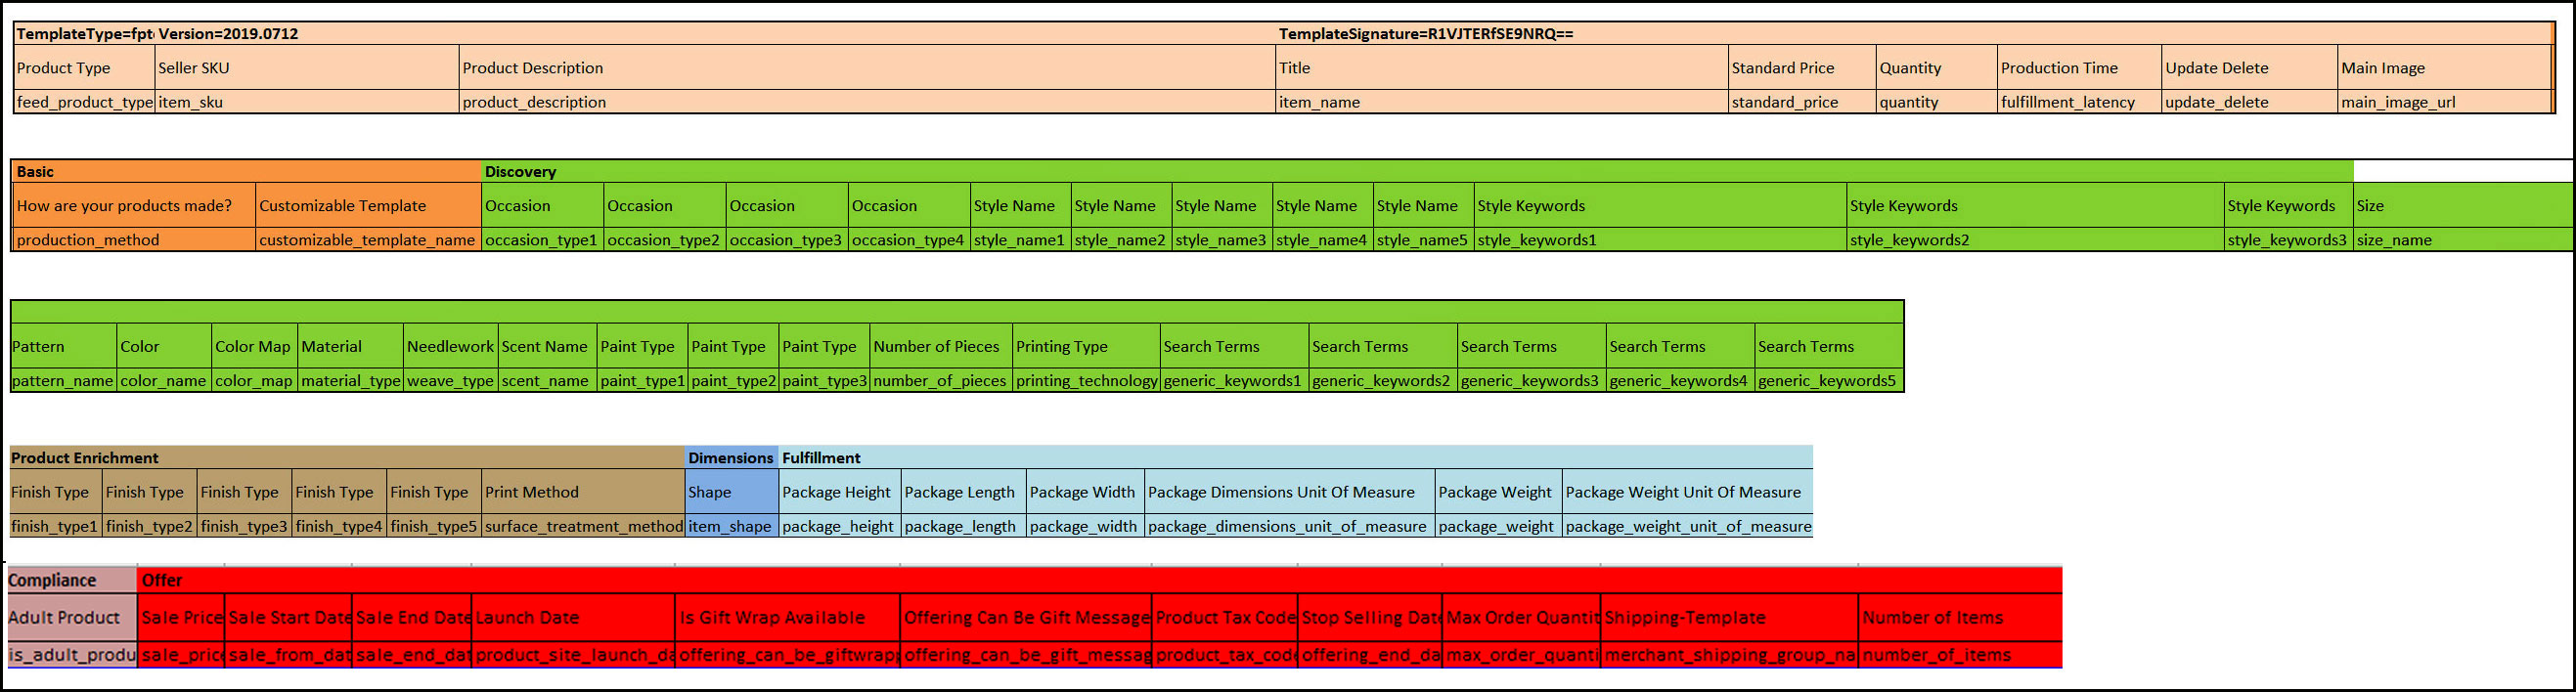
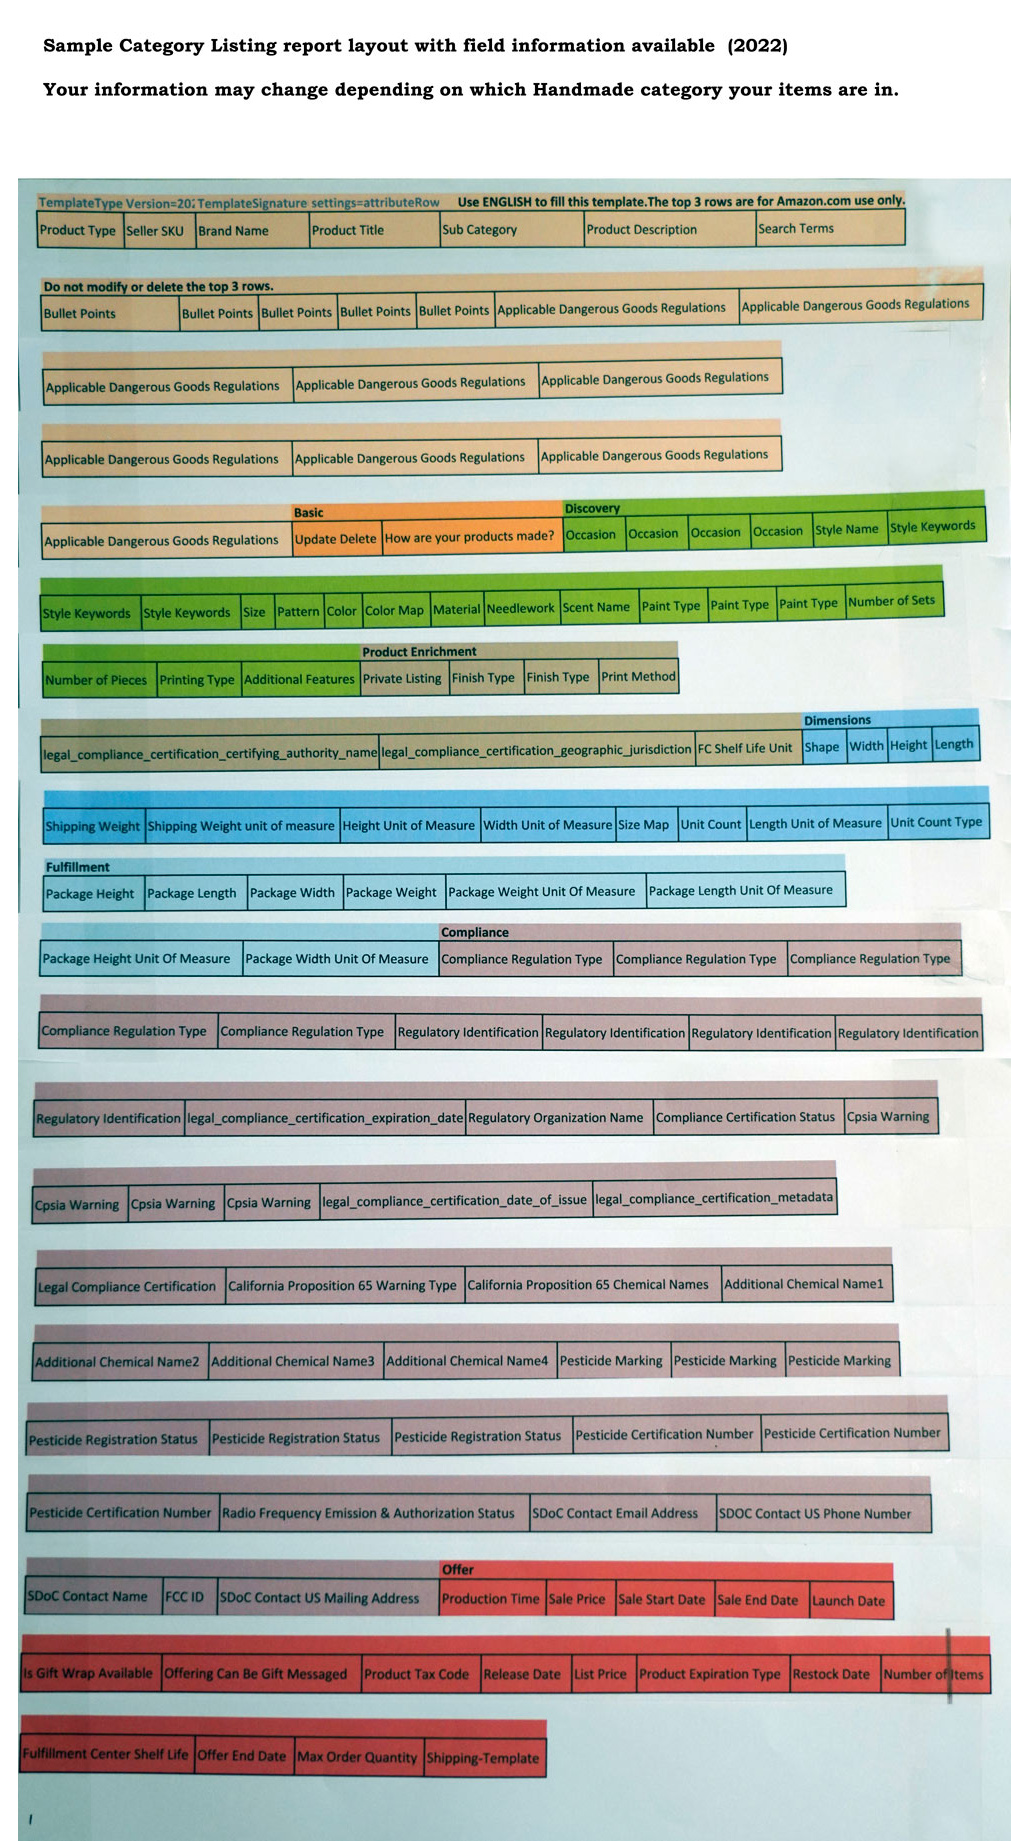
The following spreadsheet is an example layout that shows fields that can be updated for the specific category Handmade Products / Home & Kitchen / Artwork / Photography that I use in my sample.
When you use the above screen to download the inventory file for the specific category you sell in, the spreadsheet layout will look different but the main fields should exist on all the layouts.
2. Go to the main menu and select Inventory, then select Inventory Reports.
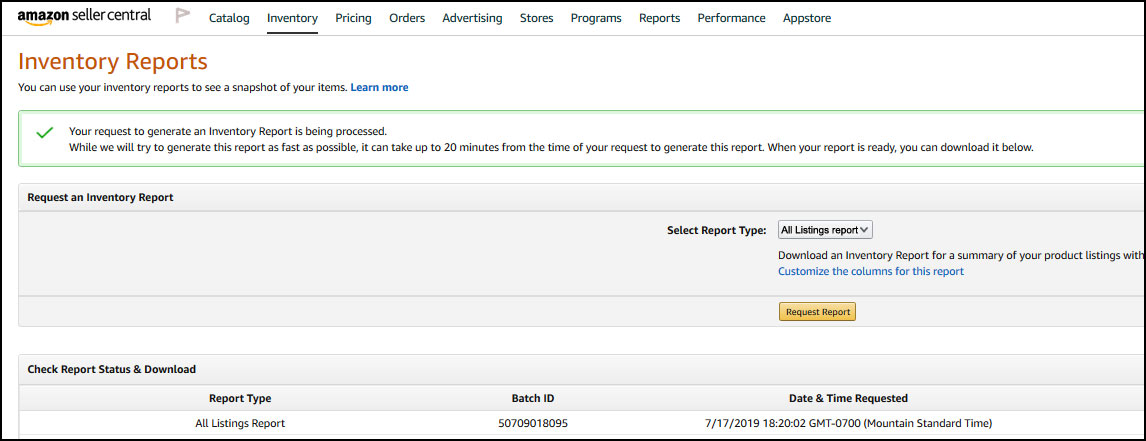
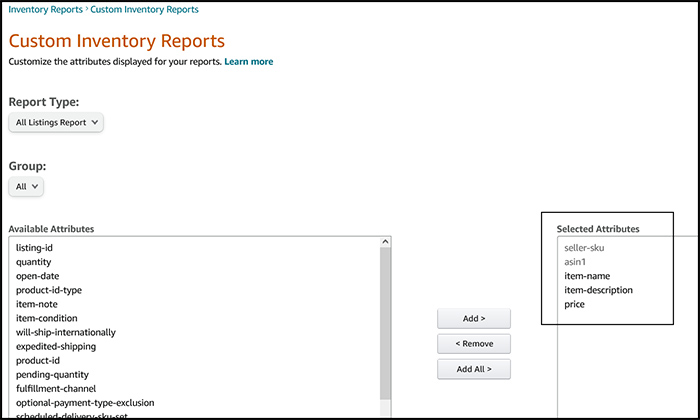
There are numerous report choices. I usually select the report type 'All Listings Report', shown in this example, and then select the link 'Customize the columns for this report'. I then select the specific inventory fields I am interested in and click on the Request report button.
If you do not see the fields listed in the report spreadsheet that you wish to bulk update, you may have to run the category listing report. The category listing report contains additional item fields not available on the regular inventory reports such as the keyword fields or the variation fields. See the bulk update method one above to use this method.
2a. Wait for your report to be created and then download or save the report file to your local computer.
2b. Then use a speadsheet program such as Excel to bring up the downloaded report file to view the information in a spreadsheet program format. The report file may not be that readable unless you do this.See sample All Listings Inventory report below
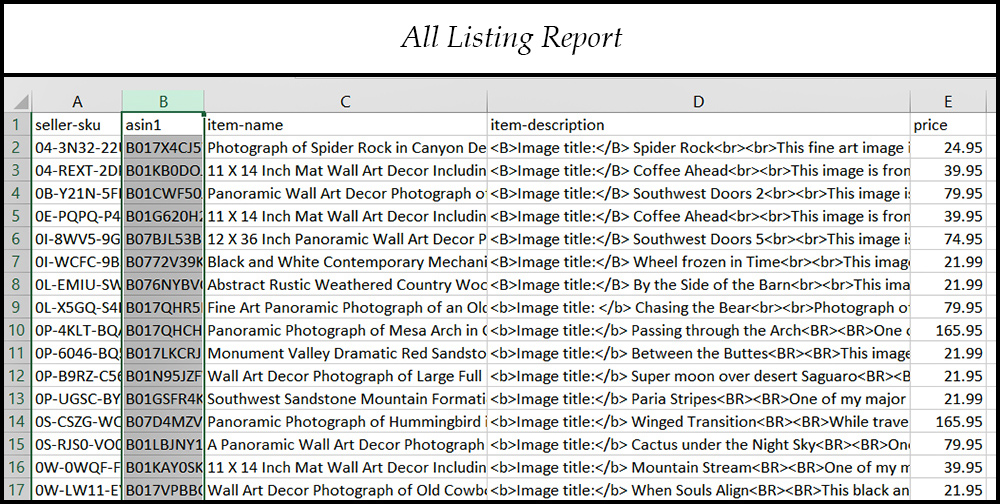
3. The seller will request the creation of the All Listings Report using the screen above. This is originally a text (.txt) file and is called up in a spreadsheet program and the .txt file is converted to an All Listing Report spreadsheet as shown below. You can see the fields seller-SKU and quantity listed below that can be transferred to the bulk update Upload spreadsheet created in step 1.
While I am modifying the title and product description fields in this example, sometimes I display these fields in my spreadsheet even if I am not changing them to help identify which item SKUs I wish to change other fields on.
If you have 300 listings and you only want to change 60 listings belonging to this specific Handmade category, you will end up with 60 listings in this spreadsheet after you are done with it. In this example, I will end up with 16 listings to be changed to keep it simple.
4. For the All Listing Report spreadsheet, I would delete all the SKU item lines (going across) that I was not changing any fields on.
5. For the blank bulk update template, I would delete all the heading columns and below blank data cells (going down) that I was not changing any fields on. You can see in the sample blank bulk update file below that displays all available field columns. This spreadsheet also shows the blank column cells but those are not shown on the sample below due to room restrictions.
Note: If I am not updating the Quantity values, I remove the Quantity column from the update spreadsheet. If you do not do this, you may have sold some seller fulfilled items after you originally ran the All Listine report spreadsheet and the quantity values uploaded will be from the time you ran the report. These quantites will not match the item quantity for those items that sold after you originally ran the report.
Note: The different categories your items may be under may have a different bulk update templates with different fields as shown in the sample below.
In the next image, you can see the bulk update spreadsheet after the deletion on columns no longer needed. The following image only displays the three-column headings and below data cells, for the required fields and the four columns, I moved down from the All Listings Report. So a total of seven columns.
6. In this example, now I have the four columns (A, C, D, and E) that I want to copy from the All Listing report spreadsheet above to the bulk update upload spreadsheet below. I first copy the SKU column and paste it on the bulk update upload spreadsheet. I then copy the Title column and paste it to the bulk update upload spreadsheet. I then copy the Product Description and Standard Price columns. You want to make sure that the column values you copy between the two spreadsheets end up matching the correct SKU fields.
Note: While I am not including the item quantity field in this example if you do include the item quantity field and values in the spreadsheet, any item quantity changes done on the Amazon system due to customer purchases between the time you run the Inventory report and upload the changes your item quantity will go back to the time of the Inventory report date and time. If you need to change your item quantity in a bulk update, you could put your shop in vacation mode between downloading the inventory report and running the bulk update. You then take your shop off of vacation mode, after the bulk update that includes the item quantity field.
Note: If you start to get errors when you run the bulk update procedure on Amazon, try filling in the Standard Price field, even if you do not plan to change any of the pricing values. This may fix your error problem.
6a. For the bulk update upload, you need to enter the Update Delete field which will be set to PartialUpdate.
6b. For the bulk update upload, you need to enter the Product Type and Sub Category fields as needed to match your Handmade category.
For this example, you now have a bulk upload file containing the following columns:
Seller SKU (required)
Update Delete (required)
Product Type (required)
Sub Category (required)
Product Title
Product Description
Standard Price
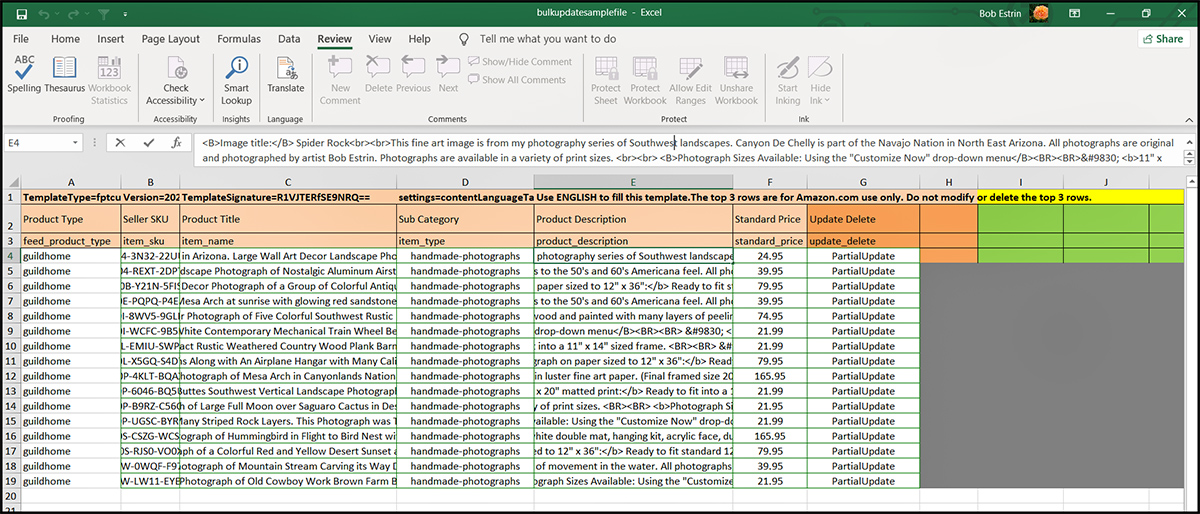
This spreadsheet example is the Handmade category under the bulk update upload file Home & kitchen / Wall Art / Photographs. Your bulk update upload spreadsheet will be different to match the categories that your items are in. I would not mix items from different Handmade categories on the same bulk update upload spreadsheet if the spreadsheet layout is different for the different categories.
The Product Type and the Sub Category may vary for your handmade category.
You would fill in the Product Type field to the appropriate value for your category for each line. This may not be the wording "guildhome" for your category.
You would fill in the Sub Category field if not already populated by the system. This value will change with different subcategories. If you click on the Sub Category box, a popup selection will give you a selection of Sub Categories to choose from or just one to select.You would fill in the Update Delete field to "PartialUpdate" for each line when doing updates to existing listings. Do not leave this Update Delete field blank on any line that has information on or it will erase many of your Sku fields during the bulk update.
7. This is where you now change the Sku data fields you want to change that you moved down from the Listing Report to the Bulk Update file. In this example, you now change any of the SKU data fields for your Title, Product Description, and Standard Price. I use the spreadsheet Find/Replace command to change the values if possible.
Note: As an alternative method, you could have changed the SKU data fields you wanted to change previously in the All Listings Report spreadsheet before you copied the required fields down to the bulk update spreadsheet.
Note: You can see the top three spreadsheet row lines in a different color below. These three lines are used by Amazon and should not be modified in any way or it will cause errors. Actually, you can delete off the second and third titles for a specific field if you also delete all of those related fields cells below. You can start adding your item information starting below these three lines used by Amazon. The bulk update file section below only shows selected item fields used in this example.
Note: In this example I used the Title, Product Description, and Standard Price shown above. But you can substitute many other fields or multiple fields to do a bulk update on.
When doing a bulk update, you can really delete most columns you are not updating without affecting the bulk upload except for the few field columns that are required for all bulk updates such as the Product Type, Seller SKU, Update Delete, and Sub Category. Sometimes the Quantity field is also required for some updates such as if you are adjusting the Production Time field..
---------------------------------------------------
At the bottom of the bulk update file layout you will see some different spreadsheet tabs as shown below. Each tab shows some information about the spreadsheet template that has some useful information in it such as field definitions and also what valid values can go into each field. The information in these tabs is worth checking out.
See Amazon video on these spreadsheet tabs for more information at (Click here for more information).
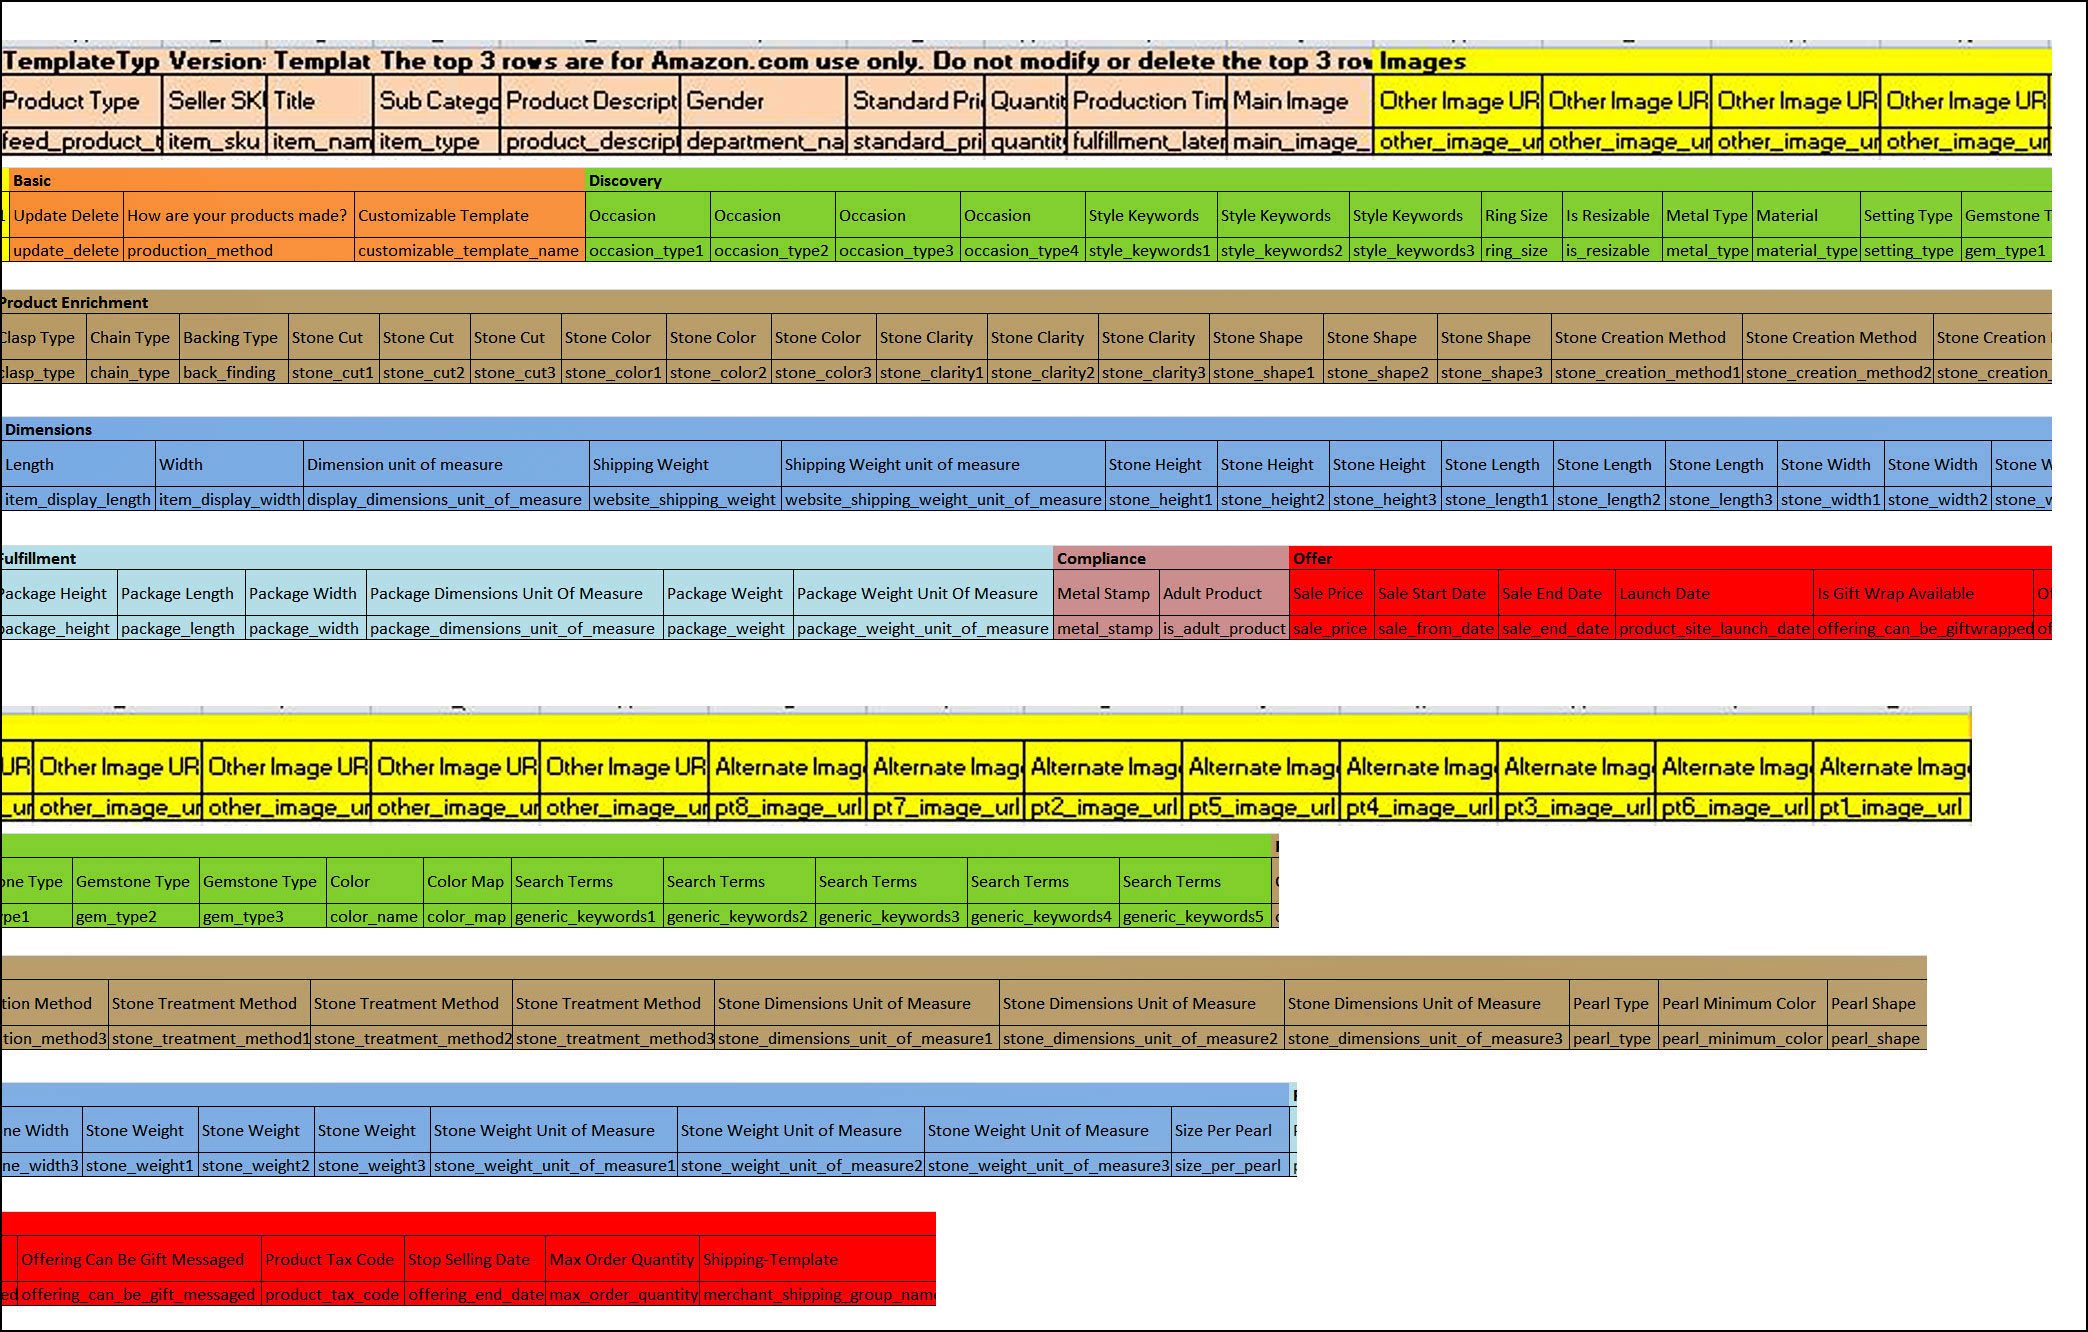
The following shows the other fields that can be filled to update your item listings even though my sample shows just three different fields. This utility is much more powerful and can be used in a variety of ways to update your item listings. The following layout is for the specific category Handmade Products / Home & Kitchen / Artwork / Photography that I use in my sample.
The following layout is for the specific category Handmade Products / Jewelry / Earrings / Droop and Dangle. You can see that it is different from the layout listed above for a different Handmade category. Each specific Handmade category probably has a different layout to meet the specific field requirements of that category. This specific category has many more fields to handle jewelry stone information. I had to break the layout below into two pieces so you would be able to read the different field titles.
8. When you are done with all your field modifications, you would save the bulk update spreadsheet under a different name. In this example, for this example, I will call it bulk update sample file.xlsm.
The bulkupdatesamplefile.xlsm file is the actual file used to upload the bulk changes on Amazon.
9. You would now do a final review on this bulk update spreadsheet. You want to visually look to find any errors and correct them as needed.
Double Check these things and you may save yourself a lot of issues since having these things correct is important:
a. Verify that you entered the SKU numbers and not the ASIN numbers in the Seller SKU column.
b. Verify that you entered the correct Product Type in the Product Type column and fill in the column all the way down to the bottom of your item list.
c. Verify that you entered the correct Sub Category for your specific Handmade category. This field should be filled out all the way down to the bottom of your item list.
d. Verify that you entered the term PartialUpdate in the Update Delete column and fill in the column all the way down to the bottom of your item list. PartialUpdate is used when updating existing items.
e. Verify that you did not go over the character limit in fields, if updated, such as the item title (200 characters), description (2000 characters), and search term fields (250 characters) as the update program may not catch this as an error and fill these fields with too long a value. Amazon will have other checks on these field lengths which could cause problems such as suppress search on these items which is hard to determine unless your sales fall off to the point you notice or you get an error when you edit this specific item.
Note: The Add products via Upload screen, shown below, has changed from how it was before.10. You now can run the bulk update spreadsheet you created, using the feed processing file update to modify your item information.
Go to the bulk update screen shown below by going to the main Catalog menu and select 'Add Products Via Upload'. Then select the menu option 'Upload your Inventory File' to show the sample screen below.
On the Add product via Upload screen shown below:
a. Select link 'Browse files' and select your bulk update spreadsheet name or use drag and drop.
b. Enter optional email address.
c. Press the Upload file button to start the upload.
11. Select the menu option 'Monitor upload status' to go to that page. Press PF5 on a PC to refresh the screen. Look for your bulk update in the process shown below under Actions. This bulk update does take some time to finish. When the update finishes running, call up the spreadsheet report and check the results of the Feed Processing Summary and look for any errors. This should have updated your items for all items without any errors.
You can see the results of the 16 items that were bulk updated.
If you press the 'Download your processing report' link shown in the above screen print, you will get a spreadsheet of the results. The screen shown below is a section of one of the result pages of the bulk update report which shows the error results of the bulk update file after the items are updated. In this example, you see that the 16 item lines were checked with no warning or error messages. If you do have an error, check the spreadsheet results section that shows the errors and related item SKU numbers the error relates to.
Many times, the Amazon system will show an error or multiple errors in the bulk update spreadsheet processing report, but the update on those SKUs with errors seems to be successful most of the time. You may want to review the SKUs with error messages in the edit screen for those updated fields. Many times your changes to the SKUs took effect and the item information is updated despite of any error messages. It is best not to look at the item screen that the customer sees right away since it may not of update your bulk update changes right away.
Since different Amazon Handmade categories have different category listing report spreadsheet layouts (specialty fields) the seller may come up with unique error messages or problems that can not be covered in this article. One option may be to remove entire unneeded columns that you do not need to update to see if that removes the errors. If you are stuck, you can try to reach the Amazon Feed department since that is the name of the group that handles bulk updates.
12. Go to Manage Inventory and check random item listings that you updated in edit mode to verify that the update worked and no other fields, other than what you changed, are modified. In this example, the item title and product description were updated, but you can use this same procedure to change other item fields. The updates should display the changes made right away on your items edit screen. It may take 15 minutes or more for the updates to display on your item listings that display to the customer.
I would check the first item more carefully listed on the top item information row of the bulk update spreadsheet to verify it is okay. I would then check one or more items in the middle of the list and at the end of the list.
Once you do this for a small test batch and you have the procedure down, you can set up again to do a larger batch of changes of additional items.
------------------------------------------------------------------Notes:
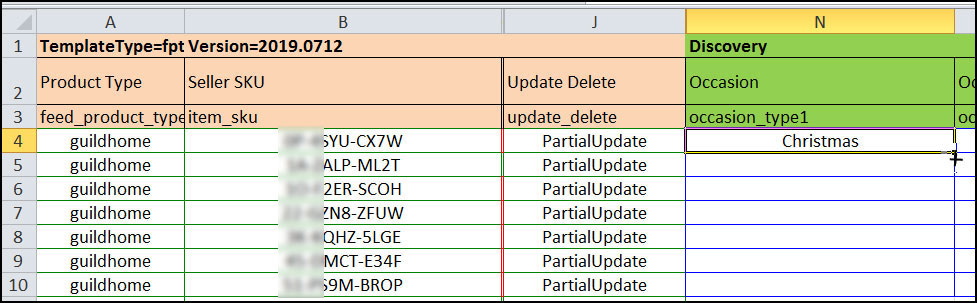
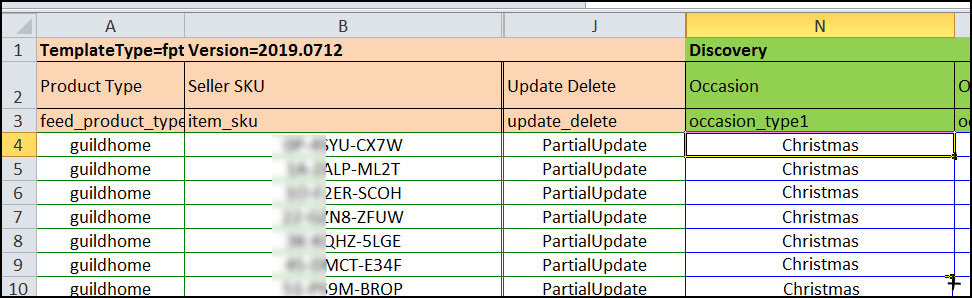
An easy way to copy/duplicate a field down to the last row such as the Product Type, Update Delete or Occasion is to place your cursor in the lower right corner until you get a black plus sign. You then drag the plus sign down the rows. This results in the top value "Christmas" to be seen all in the other fields as shown below. This is a real time saver.
The following shows an example of updating other fields in the bulk update spreadsheet which included the Product Description, How the products are made?, Product Tax Code, and Is Gift Message Available. This bulk upload can be used in a variety of ways to update your item listings. In this example, I am updating four fields in one run, but you can modify one field at a time if you want and do separate runs.
You will see the required column fields for each item line such as the Product Type, Seller SKU, Update Delete, and Sub Category on the sample bulk update spreadsheet below. Also shown below are additional fields in other columns that are to be updated.
Bulk Update of Production Time field - Third Method:
The seller may want to do a bulk upload update change on the Production Time field if you are going on vacation and do not want to put your shop on Vacation Mode. By adding additional Production Time, you would be able to continue getting orders and then start on those orders when you get back from vacation and still get your orders out on time. When you put your shop in vacation mode, you remove your Seller Fulfilled items from Amazon search and from displaying them on Amazon.
You may also want to increase your Production Time, if you are so busy at that time of the year, to extend your Production Time so you have more days to complete your orders and not ship them out late. Extending your Production Time can be used if your area is going to be in a snowstorm or hurricane. You also may want to increase your production times in the holiday time of the fourth quarter since the shipping carriers are going to be slow, as shown in 2020, and this will give the sellers a little more padding on the shipping arrival times by sending the package earlier. Amazon states that items with quicker shipping times will do better in sales so it is best not to add to the Production Time more days than you feel you need.
It may be easier to update the Production Time manually for each item if you only have under 30 main selling items to change. I found out that the Amazon department that handles bulk updates is called the Feed department if you need to request any help from Amazon customer relations.You can now change the Production Time field, for seller fulfilled items, in bulk update instead of calling up each item in edit mode and changing it one at a time. You can also use this same bulk update method to change the Production Time field back to what it was previously.
This section shows the steps to update the item quantity and production time values for item SKUs you wish to change in bulk. You can use this method to update the production time field information. With this method, which uses a simpler template, you will only be able to update the few fields listed on this template.
Important recomendation:
It is highly recommended that you try bulk updating by only doing 1 to 5 SKU numbers at first just to get the procedure down.
It is highly recommended that you try bulk updating by only testing with items that are not your best sellers at first just to get the procedure down.
If you have any issues, it is better to have those issues done on a few SKU items that are not your best sellers and not hundreds of SKU items.
You can also update any of the three Price fields and quantity using this template.
I recommend that you read the previous steps on bulk updating as they will help you understand this method also. I also recommend that you read the disclaimer below since doing bulk updates incorrectly can cause damage to your item information.If you have only had a few production times items to adjust, you can just hand type in the SKU field, quantity, and the handling-time fields into the Price & Quantity Template. The system requires the quantity field as well when you fill out the handling-time field or you will get an error. You would just update the three fields for all items that you wish to change the handling-time field which fills in the Production Time field for those sellers fulfilled items. You would not enter any SKUs that are for FBA items that you send to the Amazon warehouses since the Production Time field is not used for FBA items.
Step by step instructions when updating the production time or any of the fields showing above in the template for many items.
1. You first want to call up the screen that allows you to download the Price and Quantity template which has handling-time (Production Time) as one of the fields at the following link: (Click here for the link).
1a. Once this screen is up, click on the Price & Quantity file template link to bring up the spreadsheet template.
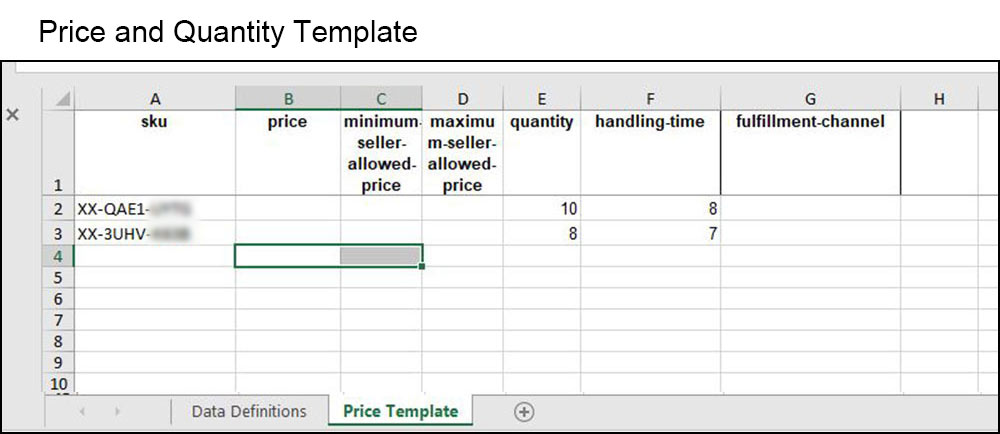
1b. Open the spreadsheet template with your default spreadsheet program such as Excel. See the sample Price and Quantity template below. You may need to click on the Enable Editing or Enable Content button.
1c. Click on the Price Template tab at the bottom of the template and you should see a blank Price & Quantity Template that looks similar to the sample below.
1d. You are now ready to add your item information in the Price & Quantity Template as shown below. This would generally be just the SKU, Quanity and Handling Time values.
There are many sections below that say "Note:", these are just information that may help you if you need more information and not steps required to change the production time. You may want to read the Notes the first time and then skip them the second time.
2. I would run and create your own Catalog Listings Report, a sample of the report shown below. On the menu at the beginning of the article it have the option to go to the instructions to request this Catalog Listing Report from Amazon. This report does not display in your report menu unless you request it. It is easy to request and be done by opening up a Case and just request the report by email without the need to talk to anyone. I would keep this Catalog Listing Report on your hard drive and then open up another copy of this report to modify as needed keeping the orginal Catalog Listing Report unmodified.
Below you will see a few of the fields on this Catalog Listing Report which contain the fields that you will need such as the SKU, Quantity and Handling Time fields. The Handling time is the same as the Production Time. The actual full report contains many more fields.
2a. You may want to optionally put your shop in vacation mode before running this report. By placing your shop in vacation mode for the short time until you update your Production Times, you freeze your item quantity for seller fulfilled items. If you sell an item, when not in vacation mode, the quantity will change.
Running this bulk update would put your quantity back to the quantity before it sold such as the quantity value when the Catalog Listings Report was run, making it inaccurate. You can later take your shop off of vacation mode after you complete your production time bulk update process.
You can also just create the Catalog Listing Report late at night and then run this bulk update using the recently updated Price & Quantity file template at a time when you have very few sales so less risk of item quantity changes such as very late at night. This should not effect any inventory quantities for FBA items.
3. On the Catalog Listing Report spreadsheet, sort the quantity column (Z to A order) which will place all seller fulfilled items, with a quantity > zero, on top and FBA items on the bottom.
4. I would then delete all the FBA item lines from the spreadsheet which would have no quantity and no need to update production time for FBA items. You would then delete all lines that have a quantity of 0. This would be all FBA items and also Parent Variation listings. If you choose to leave the quantity field filled in at time of the update, you will get an error message for each SKU that has a quantity of 0.
4a. You can then optionally delete all the item rows remaining that you do not want to update the production time for.
Note: I find it easier to remove the not needed item rows in the Catalaog Listing report versus doing this in the Price and Quality Template since the Catalog Listing report has more field information. I have my production time set to different price groups, so I can use the sort by price column in the spreadsheet to select better the item rows I need to delete or keep. Your method may vary.
5. You can then copy the entire remaining SKU column from the Catalog Listing Report to the related Price & Quantity template SKU column.
6. You can then copy the entire remaining Quantity column from the Catalog Listing Report to the related Price & Quantity template Quantity column. Even if you are not changing the Quantity values, to make the bulk process work (not give you an error) you need to fill in the Quantity column values on the Price & Quantity template.
7. You can then copy the entire remaining Handling Time column from the Catalog Listing Report to the Handling Time colum in the Price & Quantity template. The Handling Time is the same as the Production Time.
8. Then on the Price & Quantity template, you can just keep the item line SKUs that you want and delete the rest. If this was done previously on the Catalog Listing Report spreadsheet, you will not have to do this step.
9. Then manually add or modify the number of days (Production Time) to the 'Handling-time' column on the related Price & Quantity template for each SKU.
Note: You want to fill all the production time (handling-time) cells or fields for every SKU that shows on the spreadsheet and you are doing this bulk update on. It is best to make sure that all your Production Time fields have a value in them, but is not required. If you leave some production time fields blank for some SKU lines then your production time for those SKUs may be changed to the Amazon system default of one replacing the previously production time value.
9. After reviewing the information you have entered, you will eventually have to save this Price and Quantity template Excel file as a "text (Tab delimited)" file for later updates to Amazon. The file has to be saved as a text file and not an excel file to work. If you are using the spreadsheet program Excel, you will need to know how to save your spreadsheet to a text (Tab delimited) file so it can be compatible with the Amazon bulk upload software.
Note: If you are working in Google Sheets spreadsheet program or another spreadsheet program of your choice, you will need to follow steps to save the file as a "text (Tab delimited) file
If you're using Google Sheets:
From the File menu, select Download as then select Tab-separated values (.tsv, current sheet). This will download the currently selected sheet as a tab-separated.TSV file, inheriting the name of your spreadsheet. Select the Save as... or Save File As... command from your browser's File menu. Name your file, and be sure to specify the file type as a Text File (*.txt) if it gives you the option. Click Save.
If you're using Microsoft Excel:
Open the File menu and select the Save as command.
In the Save as type drop-down box, select the Text (tab delimited) (*.txt) option.
Select the Save button. If you see warning messages pop up, select the OK or Yes button.
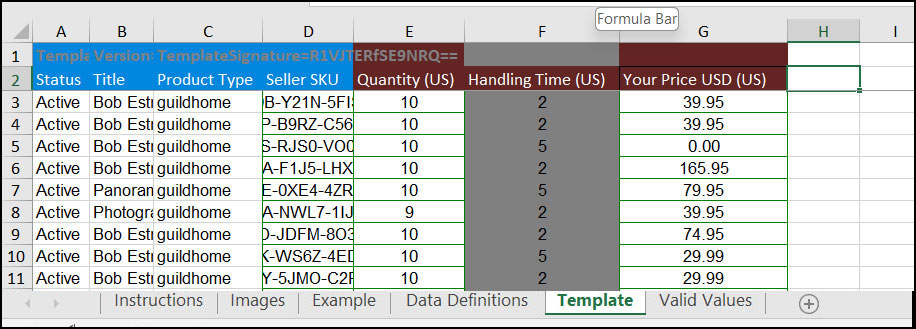
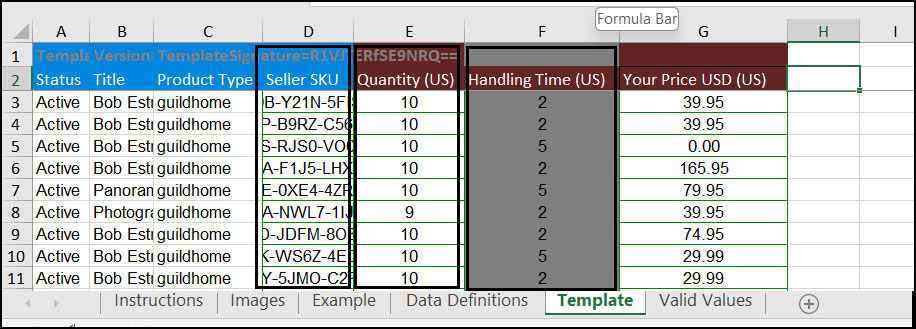
You can see in the next two screen prints how the SKU, Handling Time and Quantity columns are copied from the Catalog Listing report spreadsheet to the Price & Quantity template. You then modify or fill in the Handling Time (Production time) on the Price & Quantity template as needed.
Catalog Listing report section:
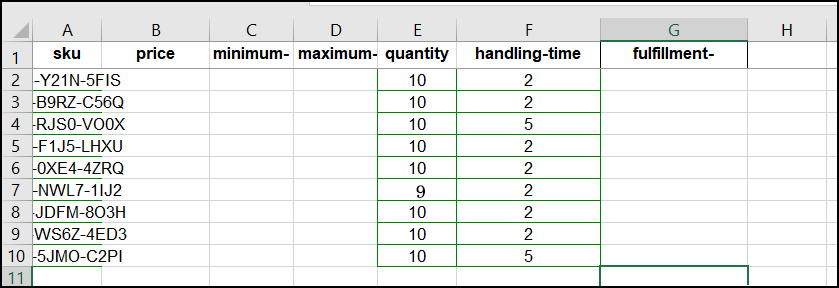
Price & Quantity template:
Note: The Amazon bulk update methods forces the seller to list or fill in the item quantity field in the bulk update template when the Production Time (handling-time) field is filled in, even if you do not need to update this item quantity information.
Note: From the time between when you get your fresh item quantity values from the downloaded inventory report to the time you run the bulk update on the quantity and production time item fields, the item quantity may have changed and not be current. If you sold any seller fulfilled items or had seller fulfilled items in pending mode, this may result in your quantity for those items changing before run the you do the bulk update. This could result in your quantity of those items to not be accurate after the bulk update. If you are a seller who sells a lot in a shorter period, this will affect you more.
Note: Try to limit the time between the downloaded Catalog Inventory report to the time you run the bulk update on the quantity and production time item fields to reduce the chances of loading incorrect or outdated item quantities. If your item quantities are just estimates and not that critically accurate, you can probably just ignore any items sold and how it might adjust your item quantity field in the short time you run this update.
Note: One option is that you could also temporarily place your shop on vacation mode, such as for an hour or less during a non-busy selling time, which would stop sales of your seller fulfilled items during this type of change so that the item quantity does not change. When your shop is on vacation mode, you then run the Catalog Listings Report and adjust the spreadsheet for the Production Time bulk update. After you run the Production Time bulk update, you would then place your shop off of vacation mode. This would simply prevent any of your seller fulfilled items from having the item available quantity changed during your Production Time update process.
Note: If you do not want to place your shop on vacation mode, you can run the Production Time update at midnight or before you go to bed in which your merchant fulfilled quantities with less sales wouldn't change much. You could also manually adjust the quantities for those items sold in that half hour to an hour of preparing the spreadsheet to running the update. You can check your merchant fulfilled orders during the time from when you originally created the report to the time in which your bulk update was completed to update your new order quantity values as needed.10. The next important step is to visually review for any errors on the template. For the first time, you try this I would only change the Production Time for 1 or 2 SKU's only to test the process. Once you have this procedure mastered, you can update as many SKUs as you want at one time.
11. You now need to save this spreadsheet template file. Save this file as a Text file (tab delimited). You will get a few pop-up messages in which you select Yes on. You want to name the file something that says what the file is for such as 'productiontimetest2.txt'. If you save this file in an Excel file format, you will not be able to use it for the update as the upload will give you an error message.
Note: The Add products via Upload screen, shown below, has changed from how it was before. You now can run the bulk update spreadsheet you created, using the feed processing file update to modify your item information.
12. Go to the bulk update screen shown below by going to the main Catalog menu and select 'Add Products Via Upload'. Then select the menu option 'Upload your Inventory File' to show the sample screen below.
On the Add product via Upload / Upload your Inventory file screen shown below:
a. Select link 'Browse files' and select your bulk update spreadsheet name or use drag and drop. Your spreadsheet template name will be a text (tab-delimited) file. In this example, I called my file "productiontimetest2.txt", but I am sure you can come up with a more descriptive name.
b. Enter optional email address.
c. Press the Upload file button to start the upload.
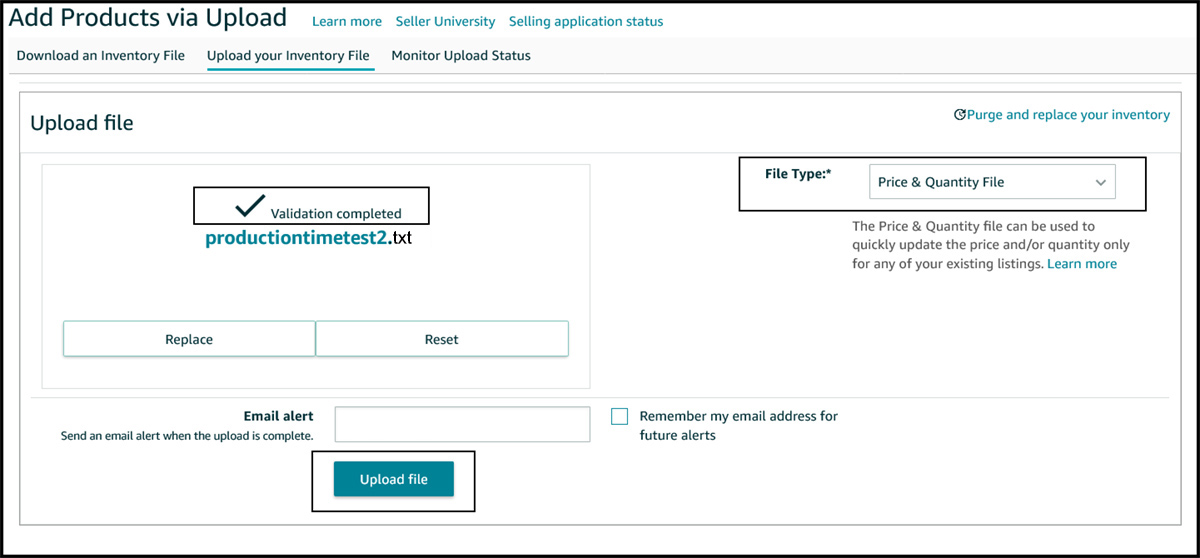
13) You now see this secondary screen shown below.
a. You can see a message that your file shows 'Validation completed'.
b. I selected the File Type as 'Price and Quantity file'.
c. Select 'Upload file' button to upload the file.
14. After you run the upload, you can select the link Monitor Update Status tab option as shown below and you will also see the upload progress. When the file is uploaded, you will have the option to see the upload report. You can save or view the update report by clicking on the Download your processing report link shown below.
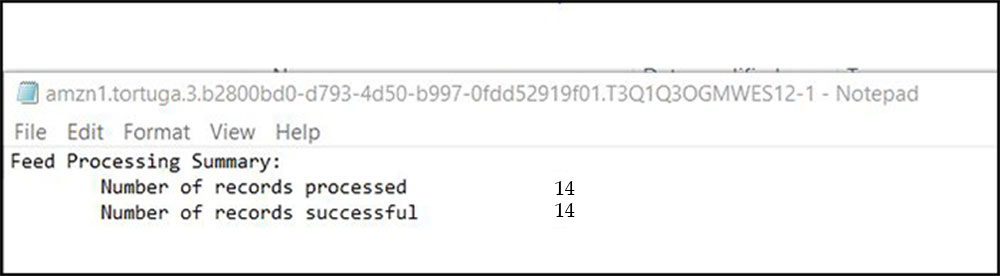
15. Review the processing report. Look for any errors and if all the items have been updated. In my sample update of just 14 SKUs, here is my processing report shown below and it shows that it processed all records successfully.
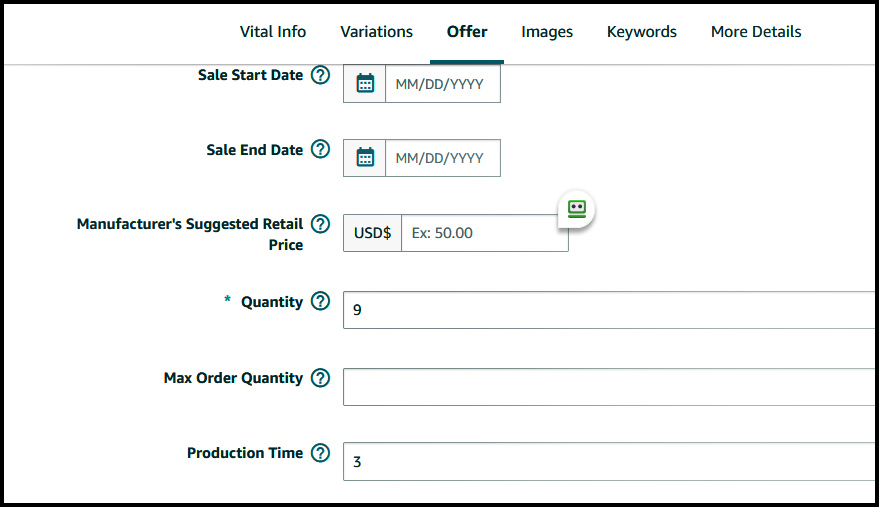
As you can see below, the item Quantity of 9 and the Production time of 3 displayed below matches to one of the SKU numbers added to the Price and Quantity template above.
16. As part of your testing procedure after you do the update, you should call up a sample number of different items looking to see if the fields updated to the correct values and other fields that should not have changed, did not change. At this time, your Production Time field has been updated for all item SKUs requested.
17. If you placed your shop on Vacation Mode earlier, you can now take your shop off of vacation mode.
18. If you plan on changing your production time (handling-time) back at a future date to the way it was before you changed it, you can use the same spreadsheet used above and just change the production time values to what you want. With the production time column updated, you can go back to step 8 above to run the bulk update again.
Warning / Disclaimer:
Doing bulk updates can be complex, technical, and dangerous which could cause harm to many listings at once if something goes wrong. You also need to know how to do basic spreadsheet functions. After reading this example procedure steps, you may decide that this procedure is not for you and make the item changes manually. Handmade did not even have this function for the first three years and sellers did well without it. If you decide to go forward and do this for the first time, you should first test on 1 or 2 items to see how the process works and then test on about 5 - 10 items to see if all the expected changes that were made were done correctly without affecting item fields that should have stayed the same. You also want to verify that your items stayed in the correct category. You also want to verify that your SKU numbers match or line up with the other fields you are changing before you do the update. After your tests, you can run the update on the rest of your items. The more items you are bulk updating, the more careful and double-checking you should do before you do the bulk update.
Amazon is always making changes in which many are not announced to the sellers. I have had to adjust this article in a more major way 3 times already. To help verify that the information in this article is current, it is advised to test your update on only a few SKUs before running your updates on all your SKUs. It is an extra step, but this type of bulk update has more risks than most things on Amazon and it is worth testing your updates on only a few SKUs first to verify it is working.
If you choose to do bulk updates of your item listings, you are taking on the responsibility. My general guidelines here are not meant to cover every type of situation that you may encounter and are meant to give you only a starting reference on how this process works for the bulk update changing of the Production Time field or a variety of other fields in the Handmade category. You need to do your own research before doing bulk updates. Amazon has numerous videos on this bulk update subject. Amazon changes their software and sometimes instructions in written or video form get outdated.
--------------------------------------Note: Very important: If you do not fill in the Update / Delete field and leave it blank, it will erase most of your item information for the SKU items you are trying to update and that would be bad. Make sure you fill it in with either PartialUpdate (Update existing item), Update (Add new item) or Delete (Delete item) for each line, and do not leave this Update / Delete field blank. Amazon will not catch this as an error. I have mostly tested with the PartialUpdate option to update existing item listing information. In most cases, the Update / Delete field would be set to "PartialUpdate" in all cells since you are mostly doing updates to an existing item SKU. You can also fill in the Update / Delete field with "Update" which I used to add a new record by filling in the required fields which resulted in a new item record being created with an SKU and ASIN number filled in.
--------------------------------------If anyone has any problems with the bulk updates or instructions, let me know and I can adjust what I have written. As a general guideline, do not share your item SKU numbers with anyone on an open forum or web where the general public can see them since these are hidden from customer view. ASIN item numbers show up to the customer, so they are not so secret.
The third bulk update method that is used to only change the production time field is not as complicated and has less risk, but caution should always be taken until you are comfortable with the procedure to reduce the risk of having problems.
Now that I said all that, once you get used to the item bulk update procedure from doing it several times, you will find it easier, helpful, and save the seller time in a wide variety of situations. If you try it out the first few times with only a small number of item changes, you reduce your risk while on your learning curve.
Backup and Recovery of some of your fields on bulk upload issue using the Inventory report:
If you have a problem with an upload and you need to do a recovery of previously listed item information, you can see what item information you have in your last Amazon report you have on file. In my case, I use the Inventory report called "All Listings report (custom) which is saved in Seller Central. This lists off some of the item's information along with the related item SKU number. You can use this information to set back the item information you choose to those previous values manually or by using the bulk update process. It is best to run this report before you run any bulk updates so you can recover from your most recent information. Some main fields you can recover from the inventory report are the title, description, inventory number, and price. Now the bulk upload spreadsheet has over 100 fields in it and this Inventory report has only a small number of fields in it. If you are updating more fields that are not available in the Inventory report, you may want to run the category listing report shown below.
Backup and Recovery of many of your fields on bulk upload issue using the Category Listings report:
Category Listings Report: One way to have a spreadsheet file backup of many but not all of your Handmade item information is to run the Category Listings report. This will not show up on the reports menu unless you specifically request the report from Amazon and then it will show up as a report option for 7 days. You can run this report as many times as you want within this 7 days. This report will display additional Handmade item details not available on the other inventory reports such as the Search term keyword field, bullet points, brand name and Variation fields as some examples. You need to call Amazon and request the Category Listings report. The Handmade department may not know about this report and you may have to call Amazon and talk to someone outside of the Handmade department.
The category listing report may also be referred to as the 'reverse feed' if someone you talk to at Amazon is not familiar to the Category Listing Report name.
While you can call Amazon to request this report, I have lately been emailing Amazon using a case request and it does not take long for them to send me a case message reply that the report is ready. I just say "I am requesting that the Category Listings Report be placed in my Inventory Reports menu option."
Step by step instructions to request the category listing report:
1. Open a help case on Amazon - email request is fine for this so you do not have to talk to Amazon seller support. You do not need the handmade department for the request.
2. I just say "I am requesting that the Category Listings Report to be placed in my Inventory Reports menu options".
3. A short time later, you get a response and look at your Inventory menu options and see the Catalog Listing report. The report option stays in your inventory menu for 7 days and then goes away. Use the report as a backup for your item information if ever needed.
4. Find and run the catalog listing report and download the report to your computer drives as it does not store on Amazon forever.
5. You can request this report as needed. One option is to run this report 4 or more times a year just as a regular business backup to have a copy of item information that is never too old.
You can see that the category listing report now shows up in your Inventory report menu as a selection.
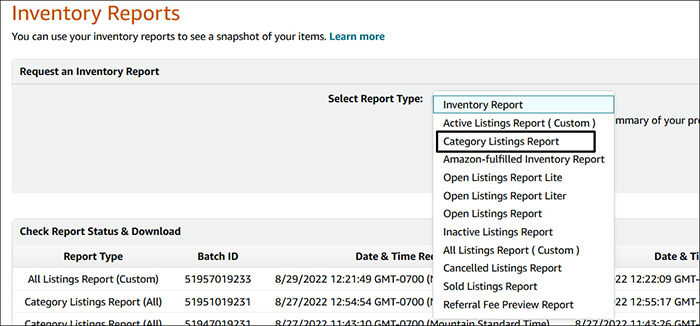
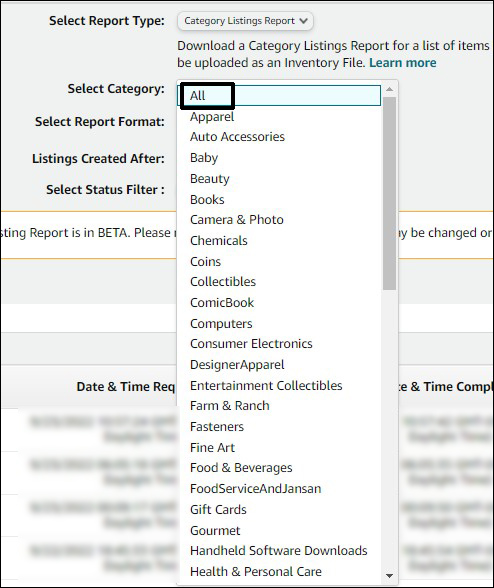
If you have items in multiple categories, you may get a secondary Category Listings report selection with a section of that selection shown below. You can try selecting 'All' and see if that meets your needs.
This report would be good for everyone to run at least once to get a backup of many fields in your handmade listings which could be useful for numerous reasons. If you end up needing to recover from placing bad information on your item listings, having this report which will have much of your item listing information that is not available on other reports would be needed. Basically, if something really goes bad, this report will help you and if you do not run it in advance of your bulk update changes, you may have trouble recovering if the fields you changed are not on the other non-category listing reports you have previously run. It is worth the extra step to request this report option from Amazon and run it every once in a while.
I have not seen other category layouts, but I am pretty sure that each handmade category may have some different title fields across the top. This report can also be used for other than the handmade category.
Once I run the category listings report, I save it (download) to my computer. If I call up the original report and change it, I then save it to a new name to keep the original the same. Also at the end of my 7 days the report is in the inventory report menu, I run it to save the latest version.
Besides backup purposes, this report gives you the information in a spreadsheet format that can be used in this bulk update method to review and modify the item listing field values. You can get an idea of which general fields are in this report by looking at the sample category listing report below. Since your specific category will probably be different, some additional specialty fields for your items may show up in addition to what shows in the sample report below.The information in this Category Listings report, stored in a spreadsheet format, can be used to bring your item information, by data import, to other online platforms not available on other reports. Some of the information such as SKU, item price, title, item description, search term fields, sizes, weights, color, the new variation and bullet point fields, and many others can be used to easily import into other online selling platforms. Also if you get removed from Amazon or just leave Amazon, you will be better off having this information available to you and stored off of Amazon. This backup of your item information can also come in handy if Amazon deletes some of your item information fields by mistake which does happen from time to time and allows you to recover from this. After you create this Catelog Listings report, it is important to download the report to your computer to have a copy off of Amazon. The reports stored on Amazon do not stay stored on Amazon forever.
I noticed that the category listing report does have the Production Time column, but the field data for the item SKUs such as the number of days does not show up in the report. It is important to not bulk upload the Production Time field column when it is full of empty fields. Uploading empty Production Time values will replace your existing Production Times for your items with a new Production Time which I believe is one day and this can cause you shipping on time problems. You can just delete the entire Production Time column in the spreadsheet before you do any bulk updates using the category listing report spreadsheet layout.Some sellers are reporting that after requesting the category listing report and running it, that the report does not display any item information values. I have experienced this myself on the first two times I requested this report and had to request the report again. On my more recent requests, it did display my handmade item information. I am not sure what causes this issue on the report not working sometimes. Perhaps it does not work for all handmade categories or the Amazon rep giving the seller access to the report does not do something correctly for it to work with handmade categories. When requesting the category listing report from Amazon, you may want to mention that this is for a handmade category in case that makes a difference.
The category listings report shown below displays many fields that can be used to backup your item information or used in bulk uploading changes to existing items. Other handmade categories will probably have different specialty fields not seen in this category layout. The Category Listings report does not show the Production Time or the item customization options field values.
It is recomended to run the category listing report when you are done updating your items with the latest information before the seven days runs out for running this report. I advise that you download this category listing report to your personal computer and not just leave it on Amazon.
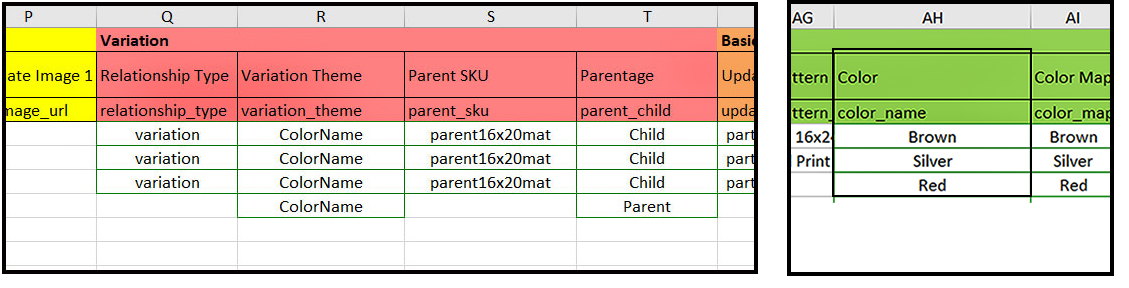
Update: 4/2021 With the adding of the Variations feature to the handmade category, some new variation fields have been added that now display on the Category listings report shown below.
Update: 6/2021 Also added to the report is the new Bullet Code fields as part of the item description.
Update: 10/2021 Also added to the report is the new Brand Name field.
Amazon Handmade Production Time Field:

I would at least give yourself at least two processing days and that’s if you have the items already created or can create them pretty quick. You could put it down as one processing day if you have the item already created and boxed ready to ship out but I would not recommend that. I add a few extra days to my processing time to account for normal business delays happening or I want to take a day off.
Amazon will also ding your metrics if you mail off the item late so it is always better to mail all your items on time or early. If you mail an item late and the item still arrives at the customer early, it is still a late shipped item to Amazon. If you have lower volume sales, it is even more important to not do things to hurt your metrics since it takes longer to fix them with future orders percentage-wise.
Sellers must make sure a tracking number is entered on Amazon if using shipping outside of Amazon. It is easy for Amazon to track as they now require a high percentage of your shipments of packages to have a tracking number.
One thing Amazon frowns on is late deliveries. I do not think your metrics are affected if your package arrives late, just more of a shipping on-time metric. A late arrival could affect your metrics if a customer complains about an issue. As the veteran Amazon marketplace sellers say, " Under-promise and over-deliver." Even if you have some extra time to send out an item, the customer will appreciate the item's shipping and arriving early. When Amazon calculates the customer's package arrival time, Amazon does not count Saturday and Sunday as shipping days. When packages arrive early, you are more likely to get a favorable product review or seller feedback.
Another issue that can cause problems is that Amazon is on West Coast time so if an order comes in at 11 pm Washington State time and it is 1 or 2:00 AM, the next day your time, you will still lose a day in processing time and shipping estimated arrival dates. It may affect you even more if you need to send out the package in an expedited manner. I feel that Amazon should use the U.S. seller’s local time when calculating the order date, but that is not how it works.
Amazon allows sellers to have a processing time going out as far as 30 days. I would pad my processing days a little to give more room during busy times or for other reasons but I feel that Amazon and customers favor items that have a shorter processing time and shorter processing times can increase your orders. I do not recommend that you pad your processing time too much when not needed. If your items are highly customized and it does take some extra processing time, you are better off with a realistic processing time than take a chance of mailing out too many packages late.
In the situation that the Seller Fulfilled order was in pending mode for several days, the processing time starts once the order is complete and out of pending status.
Production time field / Guaranteed shipping:
Although Amazon uses the wording “Production time”, it is really the number of production days the seller needs to send the item out. You can list a longer production time and of course, send it out early to the customer. It is always best to have your production time as few days as possible while leaving an extra day or more to make sure you get your items shipped on time. I have heard that Amazon will favor those listings with a shorter production time. Customer’s favor shorter production times since they always want to get their ordered items faster and sometimes you are competing against other sellers with similar items with a faster production time. You can set this production field up to 30 days but better if some of your items are pre-made and can be set with only a production time of few days.
The Production time is not really connected to the shipping time. Sometimes the customer may confuse this and order faster-expedited shipping and think the item will be sent out right away and arrive much sooner. If you have a production time of 4 days and the customer pays for priority shipping, the order can be mailed within the 4 days of production time, and then the customer will get the package 2-3 days later.
My understanding is that if the seller offers Premium 1 or 2-day shipping (guaranteed shipping) to customers for a specific Seller Fulfilled item and your customer selects this shipping method, your production time does not come into effect and is really overwritten to 0 days. From what I have read, if you are on the east coast, if someone orders before 1 PM (could be different depending on the time of year) you have to ship the same day and after 1 PM you can ship the next day. Handmade sellers should perhaps not offer Premium 1 or 2 days guaranteed shipping on items that they do not have in stock or that cannot be sent out right away. There is a difference between 2 days guaranteed shipping and regular priority 2 or priority 2-3 day shipping. Guaranteed 2-day shipping, which is much more expensive, guarantees that the shipper will get the item to the customer in two days after it is shipped when regular priority shipping may arrive at the customer in 2 days but it is not guaranteed. There is a difference between 1 day guaranteed shipping or what I call overnight shipping and regular priority 2 or priority 2-3 day shipping. Guaranteed overnight shipping, which is very expensive, guarantees that the shipper will get the item to the customer one day after it is shipped when sent before the deadline for overnight shipping for that shipping carrier for that day.
Setting production time field additional days for holidays:
In early December, you may see a message on your Seller Fulfilled item order pages that says “Arrives before Christmas” above the item price. Eventually, this message will change to “Expected to arrive after Christmas”. This message is displayed by Amazon on the item order page well before Christmas even if you feel you can get your Seller Fulfilled items created and shipped out in time to arrive at the customer by Christmas. These messages are probably based on your item's processing time, possibly shipping distance, and the type of quicker shipping methods that are available.
I have found that this “Expected to arrive after Christmas” message just stops or greatly reduces your Seller Fulfilled orders. Customers may purchase a higher percentage of orders from Prime or FBA closer to the holiday deadline and this can hurt your sales if you are only a Seller Fulfilled seller. If you have popular Seller Fulfilled items, you may want to pre-make them ready to ship and then lower your production time for these items to 2 days at the beginning of the Christmas season. You can raise the production time when the holiday season is over or you run out of those ready-made items.
This is just a notice if you have not seen this before that a Seller Fulfilled item even with short production times will have this notice closer to Christmas while the Prime or FBA orders will still have a message “Arrives before Christmas”.
Feel free to enter in comments.
HTML Comment Box is loading comments...
Articles for artist:
1. Selling your art at an art show2. The artist relationship with the alternative art gallery and artist/gallery contracts
3. The artist reception - A social event or a business opportunity
4. Artist printing photography on canvas
5. DIY project on mounting metal prints to the wall
6. Printing photography on different surfaces and presentations
7. Photography career paths for photography students
Articles for artist selling online at Amazon:
1. Selling your art or artisan craft on Amazon
3. Handmade at Amazon - Powerful Bulk editing step by step instructions for your Handmade items
4. How to prove your items are handmade to Amazon
Articles on Web Security:
1. Internet password hints for a more secure internet experience
2. How artist can protect themselves from internet scam orders
Articles for photographers:
1. Cleaning your digital sensor2. Photographing Antelope Canyon, Utah's best slot canyon
www.bobestrin.com
Copyright 2021 Bob Estrin
Feel free to link to this article.Bob Estrin Photography is a participant in the Amazon Services LLC Associates Program, an affiliate advertising program designed to provide a means for sites to earn advertising fees by advertising