These notes on cleaning your digital camera are for your reference only. If you choose to clean your own digital camera, you do it at your own risk. Much is written about how to clean your camera's sensors and everyone has their own opinion and methods that work best for them. The information I am supplying reflect the way I work in which you can use to do further research to make your own sensor cleaning decisions.
Dust on the DSLR cameras sensor has always been a problem and continues to be at this time. Many cameras come with a certain amount of dust on the sensor right from the factory before you even use the camera.
Canon, at this time, officially states to only use the blower brush to clean your Canon camera sensors. This is important since non manufacturing recommended cleaning methods could void certain warranties. This is really impractical since only some dust can be removed by the blower brush. More stubborn dust, dirt or oils that are more difficult to remove will require additional cleaning methods beyond the blower brush. Other camera manufacturers do recommend other cleaning methods, check with your camera manual for further details.
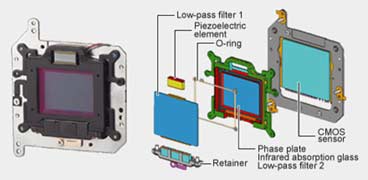
Canon Camera self cleaning digital sensor unit shown above.
I am glad that the camera manufacturers are placing some internal cleaning options on the newer cameras. One is an ultrasonic shaking of the dust off of the sensor covers. These new sensors also are designed to create less static electricity. While I refer to Canon in this article, most of the information refers to most camera manufacturers.
Cleaning your digital camera sensor can be very intimidating the first few times. If you ruin your sensor or its protective glass cover during the process, it usually means an expensive repair. If your digital camera is older, the depreciated camera value may make the repair cost more than the camera is worth. Many people may just want to use the blower brush method to reduce the dust buildup and then pay to have the sensor fully cleaned for them professionally when needed.
If you feel that cleaning your own camera is more than you want to do, you can have it cleaned at a local camera store or repair facility for you. As a reference, Tempe camera, a local camera store in the Phoenix AZ area charges about $35 to clean most camera sensors and slightly more to clean the larger full-frame sensor. It may be an additional cost to clean the other camera parts such as dust that shows up in the viewfinder area or the mirror area. I suggest if the dust that you see thru the viewfinder bothers you, this can be professionally cleaned at the same time since that is a more difficult area to clean yourself.
If you have no local place to have your camera cleaned, another option is to send the camera back to the manufacturer to have it cleaned. I sent my Canon 5d back to the Canon Service Center in Irvine, CA (949-753-4200) once during the warranty period to be cleaned and they did not charge me for the cleaning. My camera came back very clean and I was completely satisfied. One issue with shipping an expensive camera out is that the shipping/insurance cost is very expensive. Having it cleaned locally even if the price is higher than the manufacturer may be less expensive.
Having it done professionally does not mean that they will get any more dust out than you can do yourself but you do transfer some of the risks and avoid spending money on cleaning supplies.
Steps to reduce the dust forming on your sensor:
Beyond cleaning your sensor, part of the solution is to take simple steps to reduce the amount of dust that reaches your sensor in the first place. One can try to avoid changing your lenses in sandy, dusty or windy environments in the first place. It is best to always change your lenses in a clean area.
Keep the rear glass element of your lens clean from dust as well as the rear lens cap. Dust on the rear element will show up in your images more than dust on the front of your lens. Dust from a rear element can also end up on your sensor.
It is recommended to turn off digital cameras when changing lenses. When the camera is on, the sensor carries an electrostatic charge that attracts dust to the sensor.
Another thing you can do is reduce the amount of time that the camera will be exposed without a lens or lens cap on it. This is specifically important when photographing outside. Have the next lens already selected to be placed on the camera when the current lens is removed. This keeps the inside of the camera cleaner and reduces the dust to be transferred at a later time to the sensor area during exposures.
Point the camera facing down when changing lenses; gravity is on your side helping to prevent dust from going inside your camera.
Keep your camera bag clean. With all the other precautions you are taking, do you want to keep placing your camera, lenses, and accessories in a dusty or dirty camera bag.
Resulting dust on an image to related dust on the sensor:
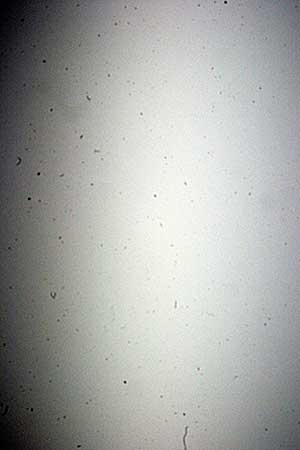
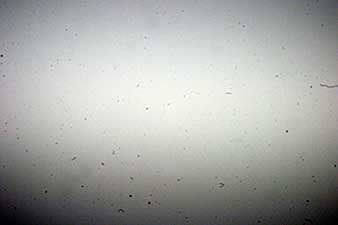
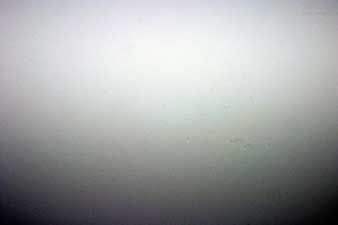
Below is an example of dust accumulated on a sensor after photographing in Monument Valley, AZ for three days under some very unfriendly digital camera conditions. This desert type area was full of dry dusty dirt roads and sand dunes under windy conditions. I was very surprised at the amount of dust that built up so quickly with some of it showing up on my images.
On the left is an image from Monument Valley showing sensor dust matching to the sensor image on the right. This image was taken with an aperture of f16 which would show dust more than an image taken using a larger aperture such as f8.
In this extreme example, the dust does show in the busy areas of the image such as the rock wall or tree, but to a lesser extent. With a more reasonable smaller amount of dust on your sensor, you probably would not be able to see the dust on the busy areas unless you compare side by side with your dust image.
Dust on the sensor before cleaning (left) and after cleaning (right)
How to check if your camera has dust on the sensor:
1. Place a memory card in the camera and set it to JPG mode. It is time savings not to convert from Raw mode.
2. Place your camera at a small aperture of at least f16 with f22 or smaller preferred. You can increase your ISO to allow for a smaller aperture. The smaller the aperture, the more dust will be captured by your sensor and display on the monitor.
3. Place the camera in manual focus and make the shot out of focus. The dust is on the sensor and should still be sharp even if your subject is not. If your subject is out of focus, you will not confuse the showing dust with part of the subject being photographed.
4. Use a wide-angle or normal focal length lens such as 50mm for best results in showing dust.
5. Photograph a subject that is light in color such as a plain white piece of paper, a lightbox, or a featureless blue sky.
6. Load the images to the computer and call them up into a graphics program such as PhotoShop.
7. In PhotoShop you can run the " Automatic Levels" (Shift Ctrl L) command on the image. If you have another viewing program, you can increase the contrast or brightness of the image. This will enhance the display of the dust on the screen making it easier to see.
8. Review the dust areas and determine if you need to clean the sensor. You may notice a darkening of the image corners such as shown above, this is just a result of using the " Automatic Levels" and not related to dust on the sensor.
If you have not cleaned your sensor in a while, you may be surprised at how much dust may show up on the screen. Do not be alarmed since, in reality, you probably did not notice this much dust showing up in your recent images.
When reviewing the dust, the dust showing on your screen is upside down and backward on your actual sensor. This is important if you are trying to clean a specific top or bottom side of your sensor.
After you clean your sensor, you can take another image and bring it up in PhotoShop to see the results of your cleaning. At this time, you can determine if you need to clean the sensor again and with which method. Many times it can take 2-3 attempts to get the majority of the dust off.
It is very difficult to get 100% of the dust off. It tends to gather on the corners or edges of the sensor. Even if a little dust remains, it is not always necessary to clean your sensor again unless you are seeing the dust showing up in your images. Usually, small dust spots on your sensor do not show in busy areas of a printed image. You are more likely to see dust in an evenly lit lighter area such as the sky when using a smaller aperture such as f11 or higher.
On the road, sensor dust test:
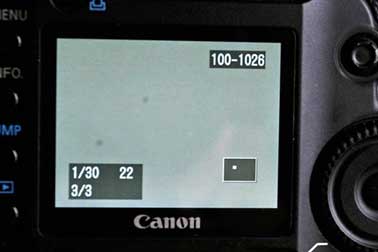
If you want to check your camera sensor for dust and do not have access to a PC you can check for dust right in your LCD viewfinder. The image you photograph for the test is done the same way but you view it on the LCD at the back of the camera.
You can use your image zoom tool to zoom in close and check for any larger dust specs in the different image areas. The example above shows two dust spots on this section of the sensor. This technique might work best with the newer camera's higher resolution LCD screens. I know someone who only uses this method. While I feel you get a better look at the dust on a monitor, this method can be used when necessary or on the road when no computer is available. Using the bulb blower may all you need to clean your sensor.
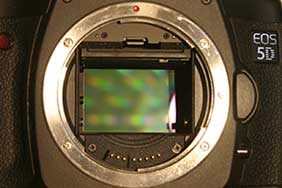
This is a full-frame sensor from a Canon 5D
The Sensor:
Most DSLR sensors are either a CMOS or CCD sensor and come in a few sizes. Most DSLR cameras come with a medium-sized sensor and a few DSLR cameras with a larger 35mm full-frame sensor. The sensor size is important if you are using a sensor swab that comes in multiple sizes for the general sensor sizes. You will want to purchase the proper sensor swab size for your camera and the product description should list what cameras that sensor size is for.
When you clean your sensor, you are cleaning off a protective glass cover that fits over your sensor which is also referred to as a low-pass filter or anti aliasing filter. You should be very careful when cleaning it as if it was the sensor itself. The cover and the sensor are part of the same piece and damaging the protective cover would result in an expensive repair. When I refer to cleaning the sensor, I am referring to cleaning this protective glass cover.
The dust that you see on your images is caused by small shadows that are projected from light passing through the dust on the clear protective glass cover onto the actual digital sensor. Less dust may show up when using a wider aperture since more light is available to go around the dust spot to light up that section of the sensor. With a smaller aperture, the light passing the dust is more focused to produce a harder edge. This is why you test for dust on your sensor by shooting at f16 or f22 and not a wider aperture.
How to open up your camera to expose your sensor:
On Canon cameras, you select from the menu, the "Sensor clean " option. This turns off the charge to the sensor making it less of a dust magnet and opens the protective curtain that will expose the sensor until you manually turn off the power to your camera. You should check your camera manual to determine how to expose your camera's sensor.
One thing to remember is to make sure you have a fully charged battery installed. You do not want to have the sensor curtain shut on you by accident because the battery went dead while you are cleaning the camera. Canon does have a warning message if your battery is too low to clean the sensor. If your camera allows you to plug the camera into an external power supply, that would be another option since I noticed that the sensor clean option drains the batteries.
Never use the Bulb mode to expose your sensor for cleaning.
General cleaning methods:
There are numerous different methods that can be used to clean your sensor and much information is available online for these different methods. I have listed above some additional informative websites as well as sites that sell digital camera cleaning supplies.
I will be showing three different common cleaning methods that I have used and have had success with. I usually start with the blower brush to get the loose dust off. If additional dust remains then I wipe the sensor using a sensor brush to get the majority of the rest of the dust. If I still have remaining dust, I may also use the sensor swab using the Eclipse fluid which is also referred to as the wet method.
When you clean your camera, it should be done in a fairly clean environment. The room should not be full of dust or a pet's hair. I would turn off any ceiling fans and any surface you are working on should be clean. The part of the cleaning tools that will touch the sensor mustn't be put down or touch anything that is not clean. Even the oils of your fingers can be transferred to the sensor.
You should never try to clean your sensor directly with compressed canned air. Canned air is too strong and may spray out invisible liquid propellants which can leave a residue on your sensor.
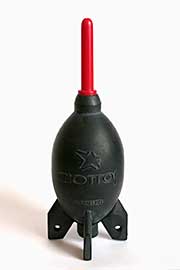
Giottos Rocket Bulb Blower
Bulb Blower:
I use the medium-sized Giottos rocket bulb blower and it seems to put out a sufficient amount of air. This bulb blower also comes in a larger size. I find that the medium size seems to do the job and fits better into my camera bag when I am traveling.
It is better to have the camera facing down if possible to allow the removed dust to exit the sensor area of the camera with the assistance of gravity. This helps with the dust not just flying around in the sensor chamber and then settling back down on the sensor again. With the sensor exposed and the camera facing down, I blow air onto the sensor using the bulb blower. I usually first pump the bulb blower a few times into the air, away from my camera, to get out any dust that may initially come out from the bulb blower so it does not transfer to my sensor. I then pump the blower brush about 6 -10 times on my sensor.
It is very important to not touch the sensor with the bulb blower nozzle directly. I try to stay at least two inches away from the sensor but Canon recommends that you do not go past the lens mount. Since the bulb blower does not touch the sensor directly like other methods, you can feel free to use it numerous times with a low risk of any damage. Be sure to close the curtain cover over the sensor right after you are done. With Canon cameras, turning off the power will do this.
I use the bulb blower as my first method of dust removal. I try to see if I can remove all the dust that I need using this method before any cleaning method that requires the sensor to be touched.
It is time to take another photo to check for dust. At this time, you can determine if you need to use the bulb blower again. I may use the bulb blower numerous times before I try any cleaning method that physically touches the sensor. It has been my experience that it is worth the effort to take extra steps to keep your sensor clean such as listed above under "Steps to reduce the dust forming on your sensor". Once I started doing this, I found that I reduced the times I needed to clean my sensor and that most of my cleanings can be done simply with the blower brush. I know that this paragraph is boring but it is the most important thing I feel I can pass on.
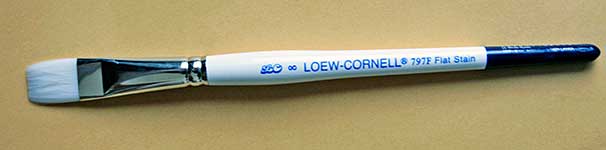
Sensor Brush:
After using the blower brush, I try to remove any remaining dust with a sensor brush. You can purchase brushes on-line at. http://www.copperhillimages.com/shopping/pgm-more_information.php?id=1 . This page has a sensor brush for about $23.00 that has been tested for use in cleaning your sensor. The brush shown above is not from this site.
For cleaning procedures that require physical contact with the sensor, I like to have a light source such as window light lighting directly inside the camera. This lights up the sensor so I can better see where it is to get a better corner to corner coverage. You do not want to expose your sensor directly with a very bright light for a long period of time.
Cleaning Steps:
1. Expose your camera's sensor
2. Using a clean sensor brush, blow your brush bristles with canned air for about 5-10 seconds. This airflow not only helps clean off the brush between swipes but sets up a small static charge. This static charge on the bristles attracts the dust from your sensor during the slow pass and causes the dust to stick to the bristles for removal from the camera. You are not actually trying to brush the dust off of one side of the sensor.
If you are concerned about canned air placing a small amount of propellants on the brush bristles, you can also use the bulb blower to set up the static charge.
3. Using a light touch with the brush, do one slow pass on one side of the sensor.
4. Blow air on the brush bristles again.
5. Do another pass using the brush on the remaining side of the sensor. Do not set the brush down in between cleanings. Anything that touches the sensor should be kept very clean.
6. Close the sensor.
Since you only want your sensor exposed for the shortest amount of time, I recommend only two passes at a time. You can always expose the sensor again and repeat as needed.
7. It is time to take another photo to see if any more dust removal is required. You can repeat this process until you are satisfied or you determine that the remaining dust can not be removed with this method. The remaining dust may require the use of the Sensor Swab.
The advantage of using the sensor brush is that it is reusable many times and is much more cost-effective than using a purchased pre-made one-time use sensor swab. When done with your sensor brush, I would clean it off with dish soap and then distilled water and store it in a sealed clean container that the brush came in between uses. If your brush came with cleaning instructions, then I would follow them.
Warning: If you are using a brush on a full frame camera such as the Canon 5D, you should be careful to not get the brush bristles off the sides of the sensor. This can pick up lubricants on the brush bristles and spread what looks like grease on the sensor. Your camera contains lubricants such as in the mirror chamber and also the shutter component areas. I think part of the problem with the Canon 5D is that due to the sensor being larger, the space between the edge of the sensor and the camera side walls is very small compared to a camera with a smaller sensor. Since I have had this problem and is also reported by others, I will probably use the brush on more of the sensor's center area and clean the edge areas with other methods if required. I have not had this problem with my Canon 10D which has a smaller sensor.
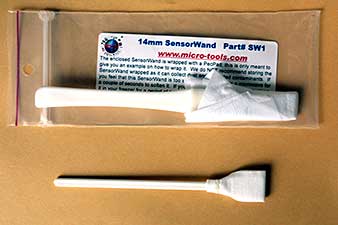
Shown on the top is 14mm size SensorWand wrapped with a Pec Pad.
Shown on the bottom is a medium sized Sensor Swab.
Sensor Wand / Sensor Swabs:
You can buy these Sensor Swabs pre-wrapped at the store. They cost about $35.00 for a box of 12 and it may take 2-3 to clean your sensor. The sensor swabs can only be used for one pass on the sensor for each side. Another option is to make your own sensor swabs with a sensor wand handle and some Pec Pads.
The sensor Swap size you purchase depends on the sensor size and you can use the information below as a guide for your camera:
1.6x sensor size: 22.5 x 15.0 mm, SensorWand size: 14mm for Nikon D1/h/x, D100, D200, D70, D2H, Canon 20D, 30D, 40D and Canon Rebel
1.3x sensor size: 28.7 x 19.1 mm, SensorWand size: 16mm for Fuji S1 & S2, Canon 1D, 1-D Mark II
1.0x sensor size: 36.0 x 24.0 mm, SensorWand size: 18mm for Nikon D3, Canon 1Ds, 5D Full Frame Sensors
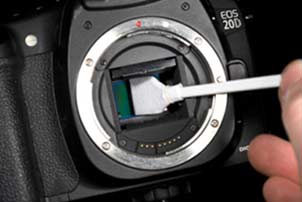
Apply two or three drops of Eclipse fluid to the top edge of the sensor swabs. You can cause problems if you drop too much fluid on the swabs, so more is not necessarily better in this situation. Since the Eclipse fluid evaporates very quickly, you should wipe the sensor right after you apply the fluid.
Position the sensor swab on the very far edge of the sensor such as the lower-left corner. Then gently and evenly wipe from one side of the sensor to the far edge of the other side in one pass. You then turn the brush over, to the clean side. Position the sensor swab on the very far edge of the sensor such as the upper left corner. The remaining side of the sensor will be wiped with one pass in the same manner. These two passes should give full coverage to the sensor.
Due to the crowded quarters in the sensor chamber, you will need to adjust the angle of the swab as you wipe the sensor from one edge to another. This gets easier with additional practice. This process can be repeated with a fresh sensor swab until you are satisfied with the amount of dust removed.
You do not want to reuse the sensor swab, shown above on the bottom, since it is made for one-time use and any piece of dust on the cleaning pad may cause a scratch on the sensor if used again. If you purchase the SensorWand shown on the top above, you are buying the handle but it comes pre-wrapped with one Pec Pad. After each swab use, following the instructions on one of the websites listed below, to place on a new Pec Pad and reuse the swab.
You should not press too hard on the sensor with the sensor swab. It only needs to be enough pressure to keep the sensor swab in contact with the sensor. I would start with light pressure and once you get the feel for it apply normal writing pressure.
Below is a video on using the Sensor Swabs
Eclipse Fluid:
This (Eclipse fluid link) fluid is a high purity methanol used for cleaning your sensors and I would not use any other type of fluid not made for cleaning sensors. This fluid also evaporates quickly without leaving residue on your sensor. Once you apply the Eclipse fluid to your sensor swab, you should use the swab right away so the fluid does not evaporate.
Eclipse fluid is highly flammable and you are not allowed to bring it onto planes. This can be important if you want to clean your sensor when traveling. You are also not supposed to bring canned air on a plane either. When you order this Eclipse fluid from an out of State source, they will need to ship it to you by ground shipping since it is illegal for them to mail this product by air.
If your sensor has some oily or greasy marks on it, I have heard good comments on a product called Smear Away that is a liquid that can be applied to a sensor swab to remove these types of marks if your Eclipse fluid does not work.
Pec Pads:
Many Pec Pads come in a package and they are relatively inexpensive per piece. Once the package is open, I store it in a zip lock sandwich or freezer bag. I remove one Pec Pad and wrap it around a SensorWand. I try to see that the section of the pad that I touch with my fingers during the wrapping of the SensorWand process is not the small part that will actually touch the sensor. The Pec Pads seem bigger than you need but you should not cut them since the cut edges will cause lint to fly around causing more dust for your sensor.
How often to clean your sensor:
I recommend that you only clean your sensor when you need to such when dust is showing up in your images past the point were it is inconvenient to clean up the dust spots by hand in post processing. It is not important to get every little piece of dust off since the small pieces may not even show up in your images even in the sky area.
I give my sensor a general cleaning using a blower brush often and a detailed cleaning about every 3-4 months. It is also cleaned before I go on an extended trip and then trying to keep my camera sensor clean as much as possible while I am away. I bring my blower brush and use it when needed until I return home.
It may also be a good idea to check your sensor for dust before shooting any important function or professional job. You can then decide if a cleaning is required based on your own standards. Some people have a zero tolerance viewpoint and others "not so much".
Let's keep those dust bunnies on the ground where they belong.
Feel free to visit one of my galleries above to see additional
images.
Copyright 2010 Bob Estrin
Feel free to link to this article from your non commercial web site.
Bob Estrin Photography is a participant in the Amazon Services LLC Associates Program, an affiliate advertising program designed to provide a means for sites to earn advertising fees by advertising and linking to amazon.com.