2021 Handmade at Amazon - Guide to the New Handmade Edit Procedure including using Variations with Parent / Child Items and Customization Changes

Mobile Phone fitting format of this article: Click Here.
New 2021 article on how to make your computer more secure and password recommendations - Click here

![]()


Do you know someone else who could benefit from selling their handmade items on Amazon that
would find this information useful? - How about clicking on one of the social share buttons above.
Select Topic from Menu
Variations and the New Edit Screens
Customizations
Other new item edit additions
Miscellaneous Subjects
| How to do a character length check count on the search term field | Cancelling your Amazon Account Steps |
Mobile Phone fitting format of this article: Click Here.
Article by Bob Estrin
So what is a Variation compared to a Handmade Customization?
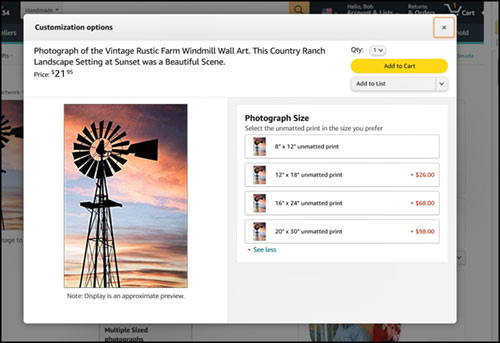
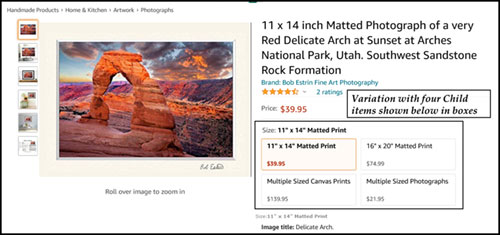
Handmade sellers listing in the handmade category have the customizations feature as shown in the example page with the windmill. This sample page also shows the new optional thumbnail photos associated with the customization options. The marketplace sellers have the ability to use variations and the handmade category did not. Now handmade sellers have been given the feature of using variations shown in the sample page with the red arch. The new variations do not replace the customizations, as it is just a new option. Variations are much more complex than customizations, so if you do not understand what variations are at the end of this section, that would be normal. I advise watching the three Amazon Webinar/Videos listed in the next section below for a more visual presentation.
It is advised when discussing Variations or Customizations such as on a forum, that you do not use the two terms Variations and Customizations as interchangeable since they are quite different.
Most handmade sellers are already familiar with item customizations as they have used them in the past. An item can have a base item configuration and then the customer can select, optionally or not, some item configuration choice to that base item. A seller can have a base or default item of a white hat and then offer the seller a customization option of changing to a yellow, red or blue hat. Customization options did not require separate physical item listings.
Parent / Child Variation Relationship:
Variations (also known as parent-child relationships) are sets of individual physical product listings, each with a separate SKU number, that are related to one another. The new feature variations that have been available to the Marketplace for years are now available for handmade sellers to use. A seller can use variations on a group of items that are related to each other such as in terms of size, color, scent, flavor, etc., and take advantage of having those items connected as variations.
Variations are really a Parent listing and multiple Child items under that parent. Note: I refer to in this article the term 'Parent listing' but the Parent is not really a physical item that the customer can buy, the Parent is really just a header or virtual item that has the separate physical Child items listed under.
If you already have separate SKU items that would work together such as four hat SKUs of different colors, then it is simple to create a Parent listing and then place those four existing items under one Parent listing. Once you place those four items under a Parent listing, the four items could be referred to as Child items. You have then set up a Variation of one Parent listing and four Child items.
Those Child items you place under the Parent listing can be both FBM and FBA items. As before, the FBA Child items can not have customization options, but the FBM Child items can optionally have customization options.
 Many sellers are looking at the new edit menu option 'Variances' and thinking that this is the item customization option they have been working with for years. It is further confusing since this Variation menu edit option only opens up, without an error message, for new items never saved or for existing Parent listings. This Variation menu edit option will not open for an existing regular item which is most of what sellers currently have. For some reason, Amazon now makes us go to another menu option in the Manage Inventory screen to add or change an item's customization.
Customization option:
The sample screen page with the windmill is the way the customer sees the current customization options. Using customizations is nice since you can set up multiple options without the need to set up separate items with their own SKU numbers. This saves a lot of item maintenance by not having multiple item listings and also allow personalization options chosen by the customer to be entered. One issue is that this customization screen is not shown to the customer at first and the customer has to select the 'Customize Now' button first to see this customization page. With customization options, you can not set your inventory levels.
Variation option:
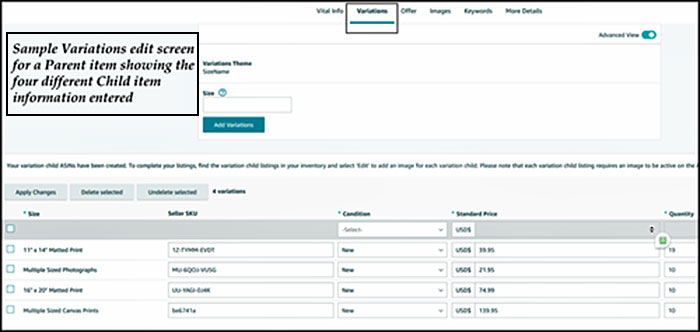
The sample item page shown with the red arch displays one of my art pieces and in four different size option boxes to select from. Each size is a separate Child item SKU. You will also see a sample Variation edit/entry screen shown below filled in to create the Parent listing for the variation. The results of this Variation Parent listing is the item page (variation) showing the red arch that the customer sees with four size options. One advantage to using Variations is that all the item options are displayed on the first item display page and the customer does not have to select any additional 'Customize Now' button. This makes your item listing one step closer to an order. One issue is that you have to have separate item SKUs for each child item, so your maintenance is higher if you change your listing often. With each variation (Child item) having its own SKU number, you can set your separate inventory levels not available with customizations.
When one of your Child items gets selected to be viewed by a customer, on that same item detail page the customer will also be able to see a brief listing of the other Child items to select from. This is in some ways similar to how handmade customization options are in which you can choose from multiple item types from the one item page. When a variation item page is set up, the customer can choose other Child items right from the main item page. With customizations, the customer must first press the 'Customize Now' button, which is an extra step, to see the other purchase options.
 If you have one handmade item as described above with customizations of three additional colored hats, that one item itself cannot be a variation. You need at least two Child items to have a Parent listing / Child items variation relationship. That being said, when you set up a new Parent listing using the variations screen page, you would normally need to enter two or more existing SKU numbers. After the Parent listing is created, the seller can add additional Child items SKUs to the existing Parent listing. An example could be creating new items with the hat color red and blue. The SKUs for the red and blue hats can later be added to an existing Parent listing which already has child item SKUs for yellow and white hats. In the end, this example Parent listings will have four hat child items under it.
The seller can now easily create a Parent listing and then add to that Parent listing four SKUs relating to the different hat-colored items.
So basically with Handmade customizations, you can give the seller different choices of an item under one item SKU listing. With variations, each Child item must be its own individual item SKU. It is up to the seller to determine which items they have and how they might work together to form Parent/Child relationships to take advantage of some of the offerings of using variations. I have listed later in the article, some advantages of using variations but the main one is that all the Child items share the combination of all the Child items Rating, Stars and Reviews under that same Parent listing. The customer will see the accumulation of all the ratings on each Child item displayed to them. Also, since each Child item has its own SKU, you can keep track of the item inventory for each item. This was not possible for customization options.
What items will work together as a Parent-Child Variation:
Not all items need to be converted into a Variation with a Parent listing and Child item relationship. The seller can pick which item may work out better together under a variation. You can use the four general guidelines listed just below. If you already have multiple SKUs of the same item and only the size or color or scent is different, you may be better off placing those separate SKU's under one Parent listing variance.
Some handmade items may be better off just leaving them as one item with multiple customizations. Other handmade items that have multiple customization options may be better splitting up into multiple separate items with a different SKU for each customization option. It is an individual choice.
This is what Amazon says about if your items will work together as a Parent-Child Variation:
- The products are fundamentally the same.
- The products vary only in a few very specific ways.
- Buyers expect to find these products together on a single product page.
- Products could share a single title.
If the products need to have different information within the main title is better not to add them as Variations, however, if you will like to add them, you are welcome to do so. Keep in mind that ratings, stars, and reviews will be shared among the other listings within your Variation.
Below is additional information from Amazon about what products work together for variations. It is up to the seller to determine if their products will work together. Amazon has the ability to adjust your listings or inform the seller to adjust the listings if they feel the items do not work together as a variation.
Here is an additional Amazon page with additional information on Variations:
(Click link here to see Amazon document).
Here is another additional Amazon page with additional information on Variations:
(Click link here to see Amazon document).
---------------------------------
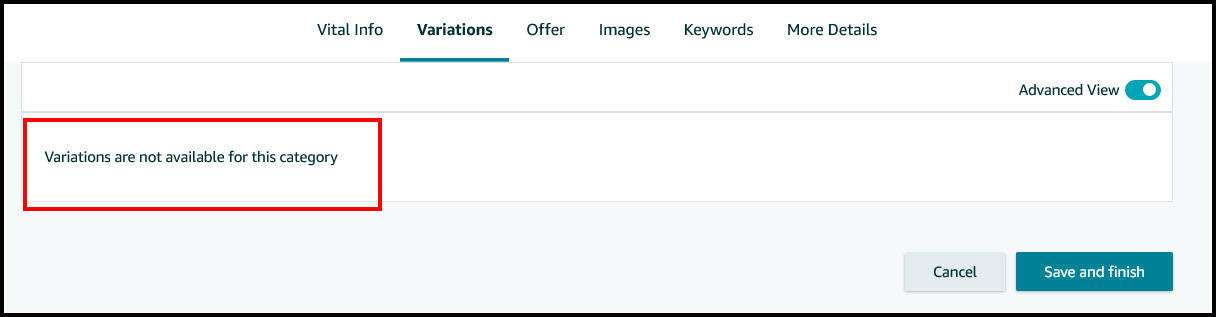
Error message "Variations are not available for this category:
If you get the error message "Variations are not available for this category", that just means that you are trying to view the variation edit page after bringing up to edit an existing non-Parent listing record. It has nothing to do with any category. You can only access the variations edit page when creating new items or editing an existing Parent listing. This variations edit page is only used for Parent listings. More on this error message later in the article.
---------------------------------
Do not expect to fully understand variations from reading just one source. Listed below some videos on variations in which I highly recommend that you watch the first three. This will give you a better understanding of the rest of the article.
This article covers both the new variations and also the new edit screen changes as well as many of the new changes to how customizations work.
Use this guide's first section as a starting point to assist you in entering your first Parent / Child items.
Use this guide's second section to see the many changes made to the customization system.
This list gives sellers some good Amazon created documentation worth checking out and how-to videos on adding Variations to your Amazon listings:
Webinars on Variations - *** I highly suggest that you watch these first two videos so you can better understand this article ***
1. Here is a basic video on Variations: (Click link here to see Webinar).2. Here is a more advanced video on Variations - I suggest you see the first section and ignore the advanced section on Variation bulk updates: (Click link here to see Webinar).
3. For more advance variation sellers in which you may have two variation options such as both Size and Color, you can watch the YouTube video here: (Click link here to see Webinar).
Amazon Documentation on Variations
1. Amazon document worth looking at put out by Amazon on the new handmade Variations: (Click here to read the document)2. Good discussion on the Amazon Handmade forums on Variations (Click here to see forum discussion).
3. Amazon Handmade Variation information: (Click link here to see Amazon document).
4. Variation relationships overview: (Click link here to see Amazon document).
5. Amazon Handmade: List your products: (Click link here to see Amazon document).
6. Amazon: Use Add a Product to create Variations: (Click link here to see Amazon document).
Many new changes have come to the Handmade system in April 2021. Some of the main ones are listed here.
1. The item edit screen has been changed to look more like the item edit screen used by other categories in the Marketplace. The familiar item edit selection shown on this gravestone is gone.
2. The item customization screen has changed. The customization screen is separate from the main item edit screen. You can still add, edit and delete individual item customizations using the updated edit drop-down menu (Shown in Exhibit A).
3. The Manage Inventory edit drop-down menu is different with a few new selections listed.
4. The most dramatic change is the ability to have item Variations. This has been available before, but not for handmade items.
Variation Advantages: Should you give it a try?
Do your own research to determine if Variations are right for you and the type of items you sell. Initially, you may not want to start Variations with your best-selling items.
1. One advantage to using Variations is that a customer can find multiple items of the color, size, material, scents, or additional theme distinctions of your products on a single detail item page. Before Variations on the Marketplace, you would have to have only one item display on a single detail page for each size or color. Note: Handmade sellers did have customization options that produce a similar but not the same operation.
You can also combine two different item descriptions under one Variation theme such as size and color. You can have the customer select on a single detail page by the size of a shirt and then select what color of the shirt. The system will not allow the customer to purchase the item if the seller does not have the shirt in that size and color combination in stock. With handmade customizations, sellers could not keep track of inventory for each customization option. Each Child item, that does not have a customization option for it, has its own inventory quantity under its own ASIN number.
2. One of the advantages of having your items using a Parent/Child Variation relationship is that you can show multiple items (different ASINS) on one item selling page to the customer. The item selling page shows customers other products you sell, even though they did not initially search for them. This helps customers that are looking for one product that you sell to discover additional versions of a single product.
Also, by using a Parent/Child Variation relationship, the SEO for one of the Child items can bring you to the item display page for that specific item, at that time the customer will see that you have all of the Child item choices additionally to look at. This gives the customer a better chance of finding the specific item choice such as size, color, or material on one item display page instead of on different pages or hidden inside your customization options which is an extra step for the customer to review before they press the Add to Cart button. This can result in more sales.
3. The total number of all customer reviews for all Child items displays on each individual Child item selling page. So, if you had a Parent listing and 2 Child items, and one Child had 2 product reviews and the other Child had 3 product reviews, each Child item displayed to the customer will show a quantity and star rating for the 5 product reviews. If you had 20 items under one Variation and each one had an average of 4 product reviews, when each of the 20 Child items displays to the customer, it will show 80 product reviews. When I refer to combined reviews, that would include both product review star ratings and the written product reviews.
My understanding is if a customer searches for a red shirt, I believe it will only bring up a thumbnail in search of one of your Child items under that Parent listing. So, if the search might have brought up more than one of your item's thumbnails during a search before listed with that Parent listing, it would only bring up one now. Of course, if the customer selects your thumbnail, it will bring up the closes one related to the search and show the customer a product page with shirts showing the red shirt and also multiple Child item shirt colors to choose from.
4. Utilizing product Variations on Amazon can help increase sales by giving the seller a higher conversion rate.
5. Variations do not show up to the customer if they're out of stock.
6. You can always remove one of the variations from the Parent listings. Basically, removing one Child item from the Parent listing can be done, and then the item is then just an independent item as before.
Once your Parent listing is completed, you always have the option of going back into that Parent listing and adding additional Child items at a later date.
7. Unique to the handmade category, sellers can have Variations Child item records and those Child item records can optionally have customizations. Handmade sellers can have the best of both.
8. Since Child items under a parent Variation have their own ASIN number, you can have Child items on FBA. Your FBA items can have the advantages of how the Variation item selling pages display the seller's items. Child items can also be merchant fulfilled. You cannot have FBA items if any of the Children also have handmade customizations associated with them.
9. A major advantage of using Variations is that all the individual Children, under the one Parent listing, share the same ratings, stars, reviews, and keyword relevancy that were connected to the ASIN. I could not find out any information on how individual item ranking from good item sales affects the individual Child item or related Child items under the same parent.
I did notice that the sales rank listed in the Manage Inventory screen for each Child item under the one Parent listing was all the same. The sales rank for these four different items in my example had different sales ranks before and now they are the same as seen in the photo just below. I noticed that the item rank given to all the Child records (with a previous rank) was the lowest rank of the Child items associated with that Parent listing. I found this interesting, but I have no idea how this item rank change has any impact on item search ranking for individual Child items. It took a day or two for the sales rank to change, so it does not happen right away.
Variation Update Delays
1. I read it is better to set up your new Parent listing with your Child items and then wait for all the text, variations, photos, and ratings to finish updating to where they show to the customer correctly and match what was saved to the items edit screens. These updates do not happen right away and do not show up all at once. If any of your Child items have ratings, they will eventually merge.2. I have read that you should not edit the listings, move images, etc. until you see that all the items have initially fully updated. These updates may take 3, 6, 12, or 24 hours to actually propagate through the Amazon database and you need to be patient. I feel this is the reason that Amazon seller support wants the sellers to wait at least 24 hours before contacting them on Parent / Child / Variation item listings. I assume they mean 24 hours after your last update to the item.
3. If the seller is making numerous changes on the Parent listing or Child items, then Amazon updating multiple changes at once will cause many delays in updates to how it shows eventually to the customer or seller online and this makes things very confusing to the seller. The changes to the item they made will not display correctly to the customer online for a long time that could be up to 24 hours. From what I have been reading from multiple sellers is that they feel that they don't understand what is happening and what they are doing wrong. When really patience is all that is needed to wait for the updates to propagate throughout Amazon to update the items so they show to the customer with the latest updates. This makes it very inefficient for the seller, but this is also out of the seller's control.
4. I noticed the last thing that updates are the combination of the ranking number that displays in the Manage Inventory screen and that seems to take days to combine. I know one time, this update took about 3-4 days.
5. I have also read that the combining of the Child items ratings, stars, product reviews are determined by the Amazon algorithm bot and it may not happen if the bot feels the items are not related or similar enough to be part of the same variation. In this case, the ratings, stars, product reviews will stay the same for that Child item and that Child item will not show the combination ratings of the other Child items. I had recently added two new items and then added them with four other items that have been around longer on Amazon to a parent listing. When ranking combined, only the four older items had the combined rank and the two newer items did not have any rank associated with it. I have read that sales history is merged regardless. I would not worry about this issue of not combining ratings unless it starts happening to you first. Since variation updates take sometimes 24 hours or more from your last update, give your listing time before you decide that one or more of your child items ratings did not combine.
Variation Changes: How to create Parent / Child items:
Here is a step by step summary of one way of creating a new Parent listing / Child item Variations:
Note: This step by step does not cover every condition and was only intended to give a guide once you have read more about creating a Parent listing / Child item variation in the article below. The following steps not only create the Parent listings but changed the regular items to Child items after they are associated to the Parent listing. Let me know in the comment section at the end of the article if this worked for you or which step you had problems with. Many of these general steps are for creating an entire Parent record. The steps to fill out the Variation screen are just a section of the following steps.Note: Before I create a Parent listing and deal with creating variations, I save all of my ASIN item information by running the 'Category Listing report' which shows up in the Inventory Reports menu for seven days after you request it from Amazon. You can read how to request this report here Request category listing report / Bulk Upload Instructions. This saves my items information in a spreadsheet report before I did my Variations in case I need to go back and see my older item information if needed. This step to run the Category listing report is optional, many of you will find out you need this information when creating variations with child items, when the Child item detail information is overwritten or blanked out by the Parent listing creation.
1. Determine which existing items you wish to be part of a Variation and take note of the SKUs.
Note: Some preliminary decisions need to be made before you create your Parent listings. The seller needs to determine which existing items are simular enough to be considered by Amazon to be a valid part of a Parent/Child relationship. The seller should also pre-determine which Parent Variation theme will be used. The instruction below assume that you have the items already created to add to the Parent listing.
Note: While the seller can create a Parent listing before the soon to be Child items are created by filling out the Parent listing fields without initially filling out the Child item SKU numbers, it is recommended at first to have the items already available with their SKU numbers to add as Child items while first creating the Parent listing. The seller can always add additional Child items to an existing Parent listing at a later time.
2. Create a new Parent listing:
Take one of those existing items you are going to have as a Child item for this Parent listing and in the edit drop-down menu, select copy listing. This starts a new item with the same data that may match to a certain point of many of your Child items chosen to be under this Parent listing. When you use this method of creating a Parent listing, you will have to adjust all the fields as needed since many of them will be filled out from the copy. Update: This used to work but Amazon did something to cause error messages on creating the Parent listing this way. You can try this method first and see if Amazon fixed their problem. If it does not work, you can create the new Parent listing with the method below.
You also have the option of creating a new Parent listing from scratch and then fill in all the needed fields manually to create the Parent listing. You create a new Parent listing by finding the main menu 'Catalog' and then selecting the 'Add Products' menu option. You then select your category and finally fill out the new item edit screens including the Variation section with your child item information. When you save the Parent listing, this will add your chosen existing items as Child items to your Parent listing.
Note: If you call up an existing item in edit mode and try to go to the edit Variations screen, you will just get an error message "Variations are not available for this category". To create a Parent listing, you have to start a new item from scratch or go into a copy of an existing item that has not been saved yet to create a new Parent listing. The Variations page can only be used in the creation of a new Parent listings or modifying an existing Parent listing. The new Variation edit screen has nothing to do with going into an item's customization options.
3. You are now in edit mode and you will now fill in the edit page fields to create a Parent listing. Click on Advanced View to see the full page menu.
I highly recommend that you look at the different edit pages live when you read these notes. You can fill out the fields on the different edit screens as required to create a new Parent listing. You should fill out all the edit screens first before saving and only save in the end to create your Parent listing. This is more important on creating Parent listings to only save once if you can.
4. Select edit menu 'Vital Info' and adjust fields as needed. You may want to make the title and description more generic to fit all the Child items. When the system creates the titles on your Child items under this Parent listing, it will take your Parent listing title and add the variation difference to the end such as size or color. Example Generic title here (8 x 10 inches). You can always adjust the Child item titles, descriptions, and other fields as needed later.
5. Select edit menu 'Offer'. Fill in the SKU name for the Parent listing of your name choosing. Leaving this SKU field blank will cause the system to create a Parent listing SKU for you. One option is to place the name "-parent" to the end of your SKU name so it is obvious that this listing is a Parent listing and not a regular child item. Then fill or adjust all the Offer fields as needed.
For Handmade category listings, I would put in a Production Time value here on the Parent listing 'Offer' edit screen or the system may put a 1 day Production time on all the Child items under this Parent listing. This has caused me problems and is unique to this field. I think if you do not fill in the Production Time field on the Parent listing, it defaults to Production Days of 1 on all the Child item listings under that parent even if the Production Time field was previously filled in on the Child item with a higher value. I highly recommend that you check the Production Time on all Child Items after any Parent listing update.
6. Select edit menu 'Images' and optionally place just one photo in the first area. It does not matter which Child item photo you choose but the photo should be first image compatible. The firt photo is not required for Parent listings, I just add one so I can see a reference photo during editing.
7. Select edit menu 'Keywords' and adjust the displaying fields as needed.
8. Select edit menu 'More Details' and fill in or adjust the displaying fields as needed. Remember that all or most of these fields will overwrite the same fields on each Child item you have listed under this Parent listing. If you leave any of the 'More Detail' fields blank, the system may blank out any of these same fields on each Child item even if that field was filled in on the Child item previously. Each different Handmade category may display different fields here specific to your category.
9. So far, most of this is the same as creating a new item listing from a copy except for the one photo in step 6 and the SKU number in step 5.
10. Select the edit menu 'Variations'. What makes a Parent listing is filling out the Variations edit page. If you get an error message calling up the Variations page, it just means you are not on an existing Parent listing or new item (Not yet saved). You are probably on an existing item (Non-Parent). The Variance page can only be filled out for Parent listings. To fill out the Variations page, you must start a new item from scratch or start with a new item creation from copying an existing similar item.
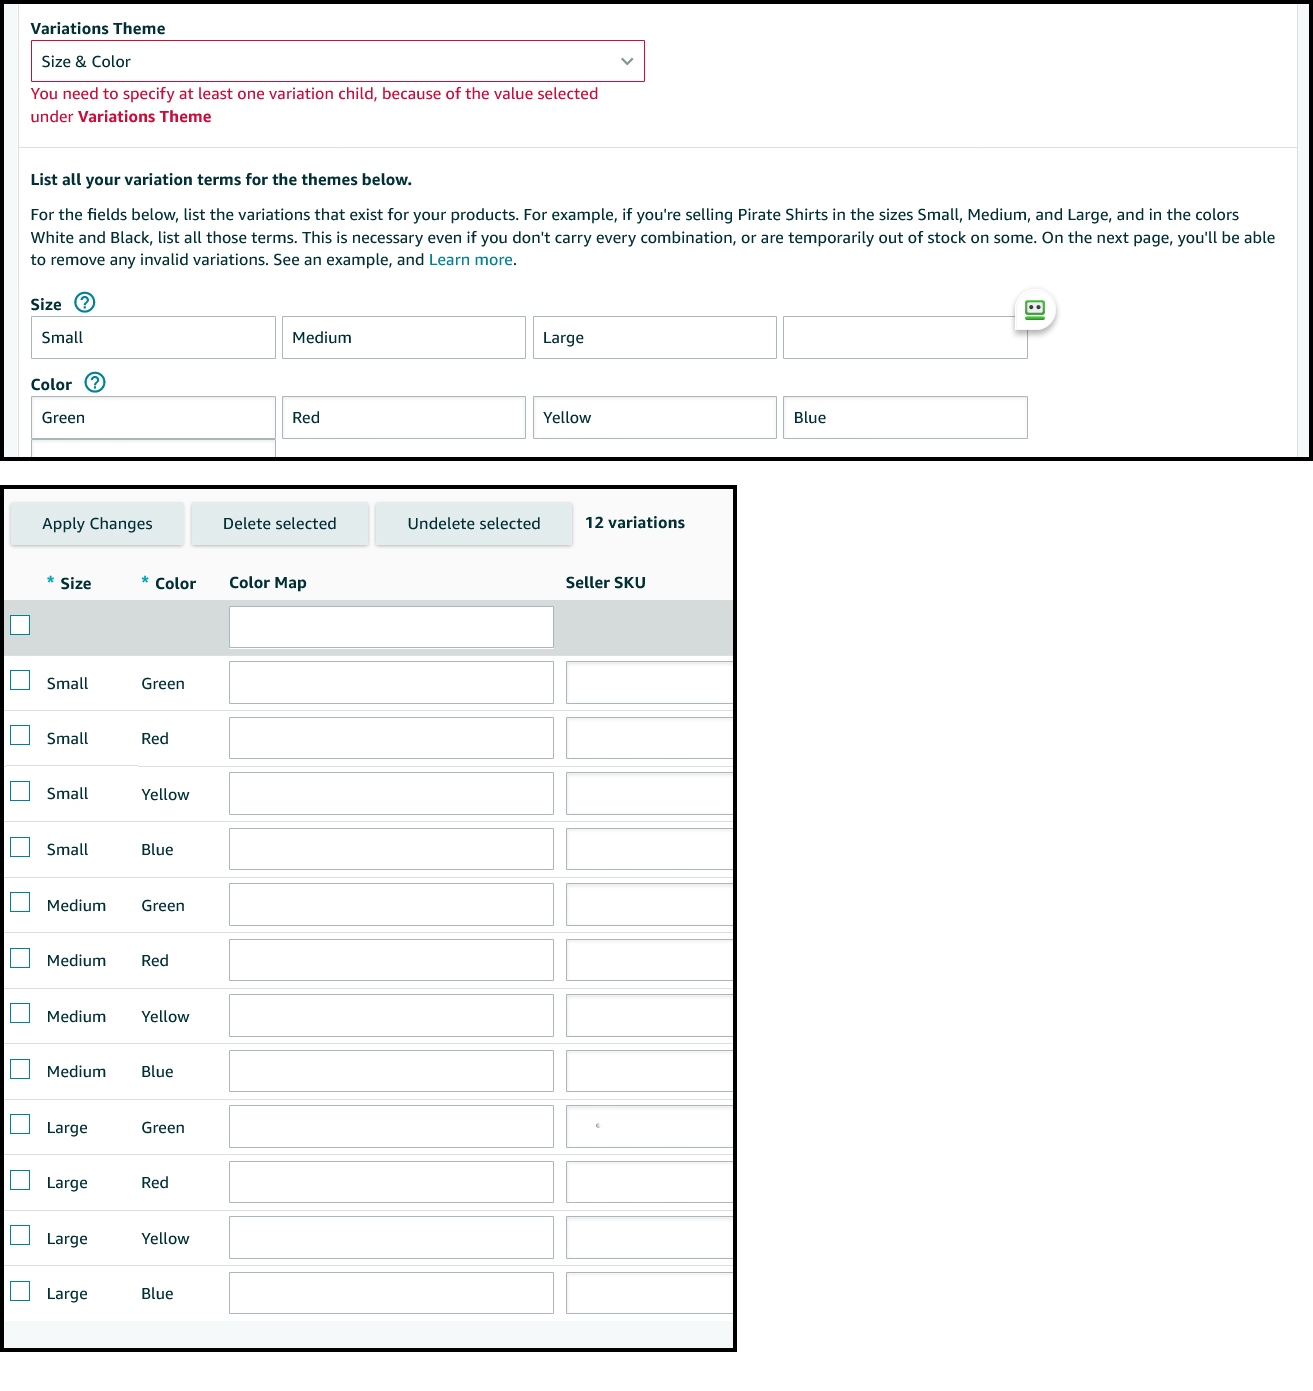
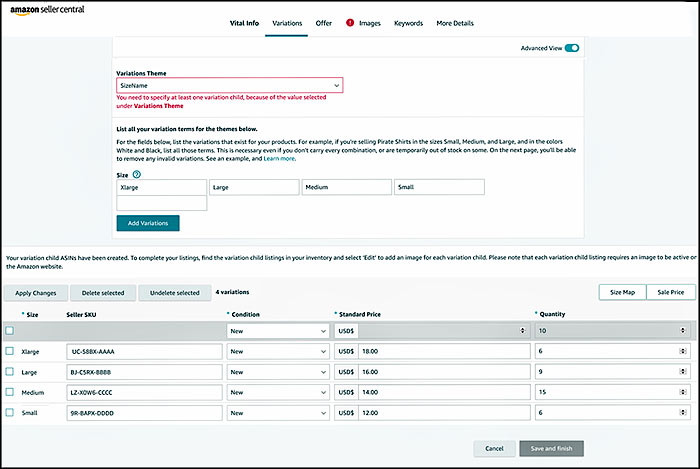 11. See more detail later in the article on how to fill out this Variations page but you first need to pick a Variation theme. For many of the same types of listings, you will probably use the same Variation theme over and over again. In this example, I am choosing the Variation theme "SizeName" from the drop-down menu as shown in the sample Variations screen. Since each category will have different choices of variations themes, your variation themes available may not be exactly the same as in my examples.
12. You will now see an empty box appear that says "Size" in this example. Fill the Size field in with your first item size such as XLarge and then another empty box shows up. Fill out all your sizes in the boxes such as Large, Medium, and Small. Each size should represent a single Child item SKU. Make sure what you fill in these boxes is short and descriptive for your Child items as this information is shown to the customer. When done filling the boxes, press the Add Variations button. Note: For each different Variation theme, you may have a different box name to fill out other than size.
13. In this sample, on the lower section of the Variations edit screen, you will now see four rows to fill out. The first column is already filled out with your sizes entered previously.
Note: The first column relates to the Variation theme selected above. Because this example Variation theme is 'SizeName', the first column heading is called 'Size'. If you had chosen another Variation theme such as 'ColorName', the first column heading would be called 'Color' with color names, previously filled out on this Variation page, listed below in the first column.
14. Fill out the second column with the SKU numbers of all the existing Child items you want to be listed under this Parent listing. I just copy/paste the SKUs over from the Manage Inventory page, opened in a separate tab, to make sure I got the entire number correctly. Be careful to place the correct SKU number next to the matching first column wording.
After you enter an SKU number, a separate pop-up box will display that shows the SKU item photo and two selection buttons on the bottom as "Return to form" and "Yes, this is my product". I just select the "Return to form" button option which takes me back to the Variations edit page. This only shows up once and not for any additional SKU numbers entered.
15. Now fill out the Condition from the drop-down menu, Standard Price, and Quantity on the next three columns. If the Child item SKU is an FBA item, you do not have to fill out the quantity. For FBA items, the system will automatically update your FBA inventory in the quantity field.
16. If other Variation themes have additional columns to fill out, fill them out now.
17. When all the Variation edit pages are completed, you can press the Save and Finish button. You can still go to the other menu edit options and review first since you do not lose your different edit changes when you go to other edit pages. If you do go to the other edit pages, you may want to press the 'Apply Changes' button on the Variations page to be safe. You must press the Save and Finish button once before exiting the edit menu.
When creating a new Parent listing, I would fill out all the edit pages and then just save the new Parent listing once at the end. The reason for this one save is that the updates take a long time to show to the customer for Variations and creating multiple updates to your Parent listings or Child items will increase the time it takes to show your final changes to the customer.
Just like a regular item, you can go back in and edit a Parent listing later if you want.
18. Wait for 5 - 15 minutes and then view the Manage Inventory page to see if the Parent listing with the multiple Child items is listed. You may have to find the Parent listing and click on the ">" symbol to display the Child items now under that Parent listing.
19. Even if it looks like the information has been saved in Manage Inventory, the item listings that show up for the customer could take up to 24 hours to display correctly. You may see some of the information display to the customer very quickly but over time, additional information will show that matches how it will look eventually. You may think you entered something incorrectly, but it is just a long delay for all the information to propagate to all the right places for the customer to see. You may have to wait a day or longer for all the combinations of all the ratings, stars, ranking, and product reviews to combine to show to the customer for each Child item.
20. You will now need to go into each Child listing and adjust any detailed information fields that have been blanked out or overwritten from what was entered or not entered on the Parent listing. This is the only hard part and most time-consuming. This is why I generally start the creation of the Parent listing by doing a copy of one of my Child item listings under that Parent so that many of the Parent listing fields are filled out similar to what I want as stated in step 2 above. Do a special check to verify that the Production Time value is correct. I basically go into the Child items with the attitude that even though I did not ask for my Child item fields to be wiped out or overlayed with different information when I asked that Child item to be part of a Parent relationship, those fields may have been changed and I need to verify that they end up as I wanted and usually contain the same information before the Parent/Child relationship.
You may need to verify all this child information and change the title, description, keywords, tax code, production time, item sizes, how your products are made, Bullet Point fields, and other fields as needed to display to the customer as you want. This is more difficult because your changes to the Child items may not display to the customer to verify what you entered for hours or until the next day. I recommend that after 24 hours after your last change, you go into each Item child displayed to the customer and do one last verification that everything is how you wanted. I highly recommend that you read the section below called "Variations: Very Important and Should Read".
Converting one ASIN with customizations to a Parent listing with multiple Child items under the Parent:
Sometimes the seller may want to convert a single ASIN with limited customizations to seperate multiple ASIN's eliminating the customizations. The purpose of creating all seperate ASIN's for different customization options is to create Parent / Child Variation listings. A single ASIN for a hat with three customization color options can be made into three different ASIN listings with no customization options. Each hat listing ASIN will be for one color available. A Parent listing will be created and all three hat color ASIN's will be placed under that one Parent listing. The ranking and comments for all three item colors will be shared from the original ASIN.
If an item has numerous customization options such as color and size, a new ASIN would need to be created for each option available. If you had 6 colors and 3 different sizes, this would lead to the creation / need of 18 different ASIN's. In this situation, the seller may decide to keep the single ASIN as it is and not convert the listing to a Parent / Child varient.
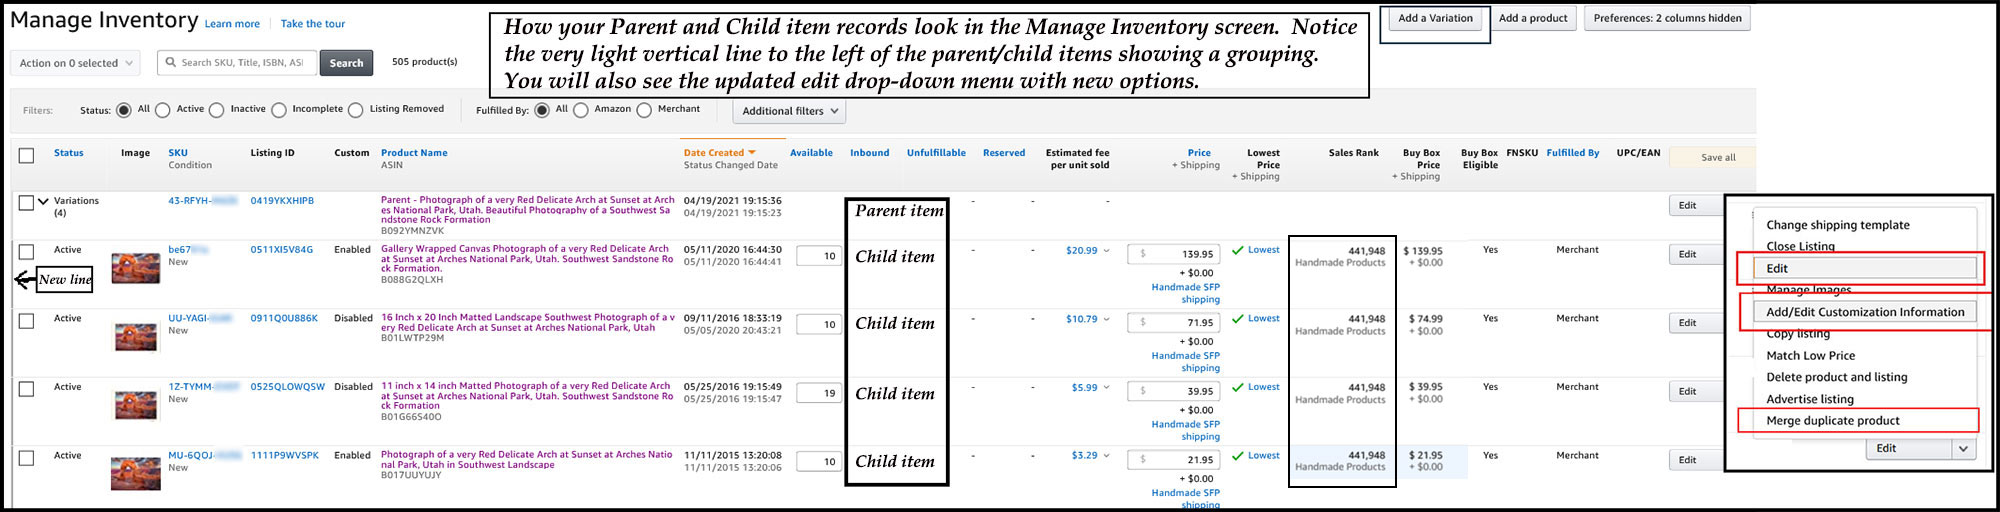
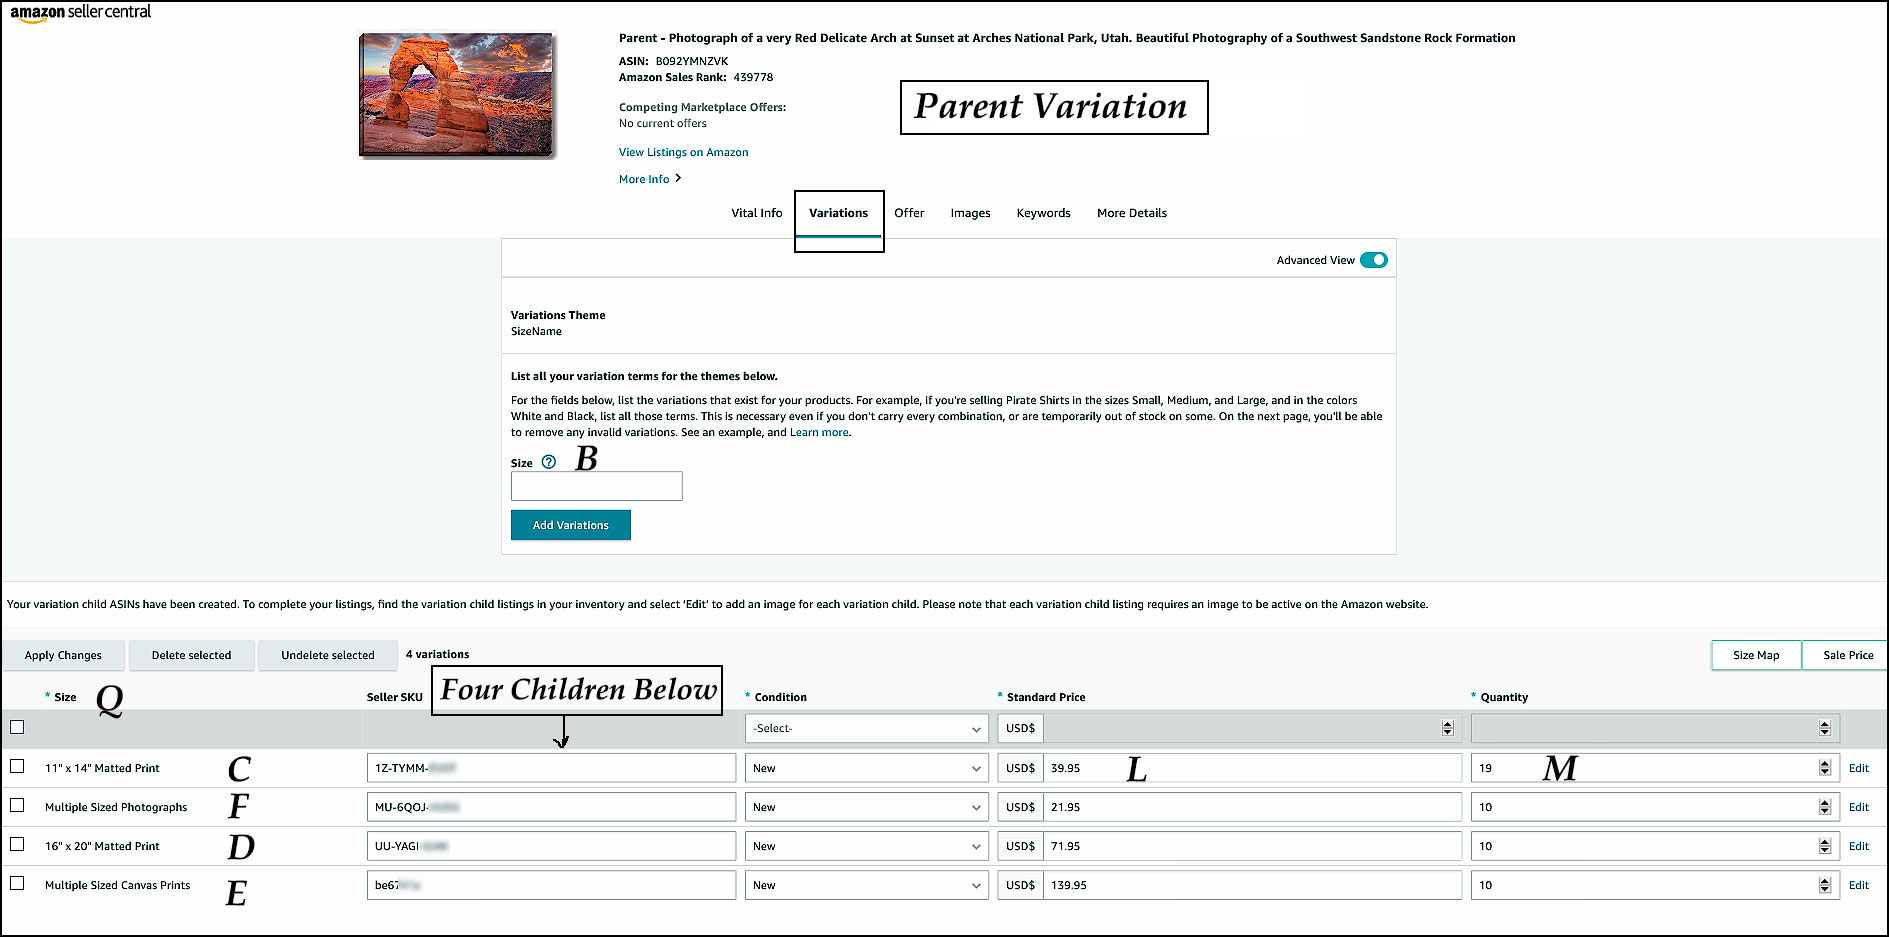
Managed Inventory screen showing one Parent and four Child items
1: This first screen shows the Managed Inventory screen. If you have a new Variation Parent listing, you will see it with its related Child-level items shown directly under the Parent listing. The Parent listing has its own ASIN number but it is not a selling item itself. I think about the Parent listing as more of a header record for the related Child ASIN items. Each Child-level item has its own ASIN number and is an actual item that shows to the customer. Since each Child item has its own ASIN, you can keep separate inventory quantities for each item even if it is another size or color showing on the item selling page with other similar items. This does not happen if the Child item has customizations in which may have different quantities in stock for different colors or sizes as part of a customization option.
Each Child-level item can optionally have customizations set up for it. In my example shown here, I have a Parent listing with four Child items. Two of the Child items have no customizations (Matted prints) and two of the Child items do have customizations for different sizes (canvas prints) and (Individual photographs).
You can have Variations which are a Parent and one or more Child items with no customizations. You can also have Variations which is a Parent and one or more Child items with some Child items having a customization option.
On the screen, on the left side, you will see a down-facing arrow next to the word Variations and the displayed Child items just below. The Manage Inventory screen may display a right-facing arrow '>' and the seller can select this arrow to visually display the Child item listings below the Parent listings.
If one of the Child items is out of stock, that item may show to the customer, but the customer will not be able to purchase that Child item that is out of stock. The other Child items on the page with stock available will still be available for the customer to purchase.
You can also see on the Manage Inventory screen the updated edit drop-down menu. The edit selection option will take you to a new edit item area. Also new on this drop-down menu is a method to add or change existing item customizations.
When first starting with Variations, you may want to use some of your less important items before doing anything with your best-selling items.
On the Manage Inventory screen next to the 'Status' is a radio button you can fill out to display the 'Incomplete' listings. When you select this, the page only lists out the Variation Parent listings. I have no idea why this is but I do not feel that this means that the Variation listings or the Child items are not correct or incomplete.
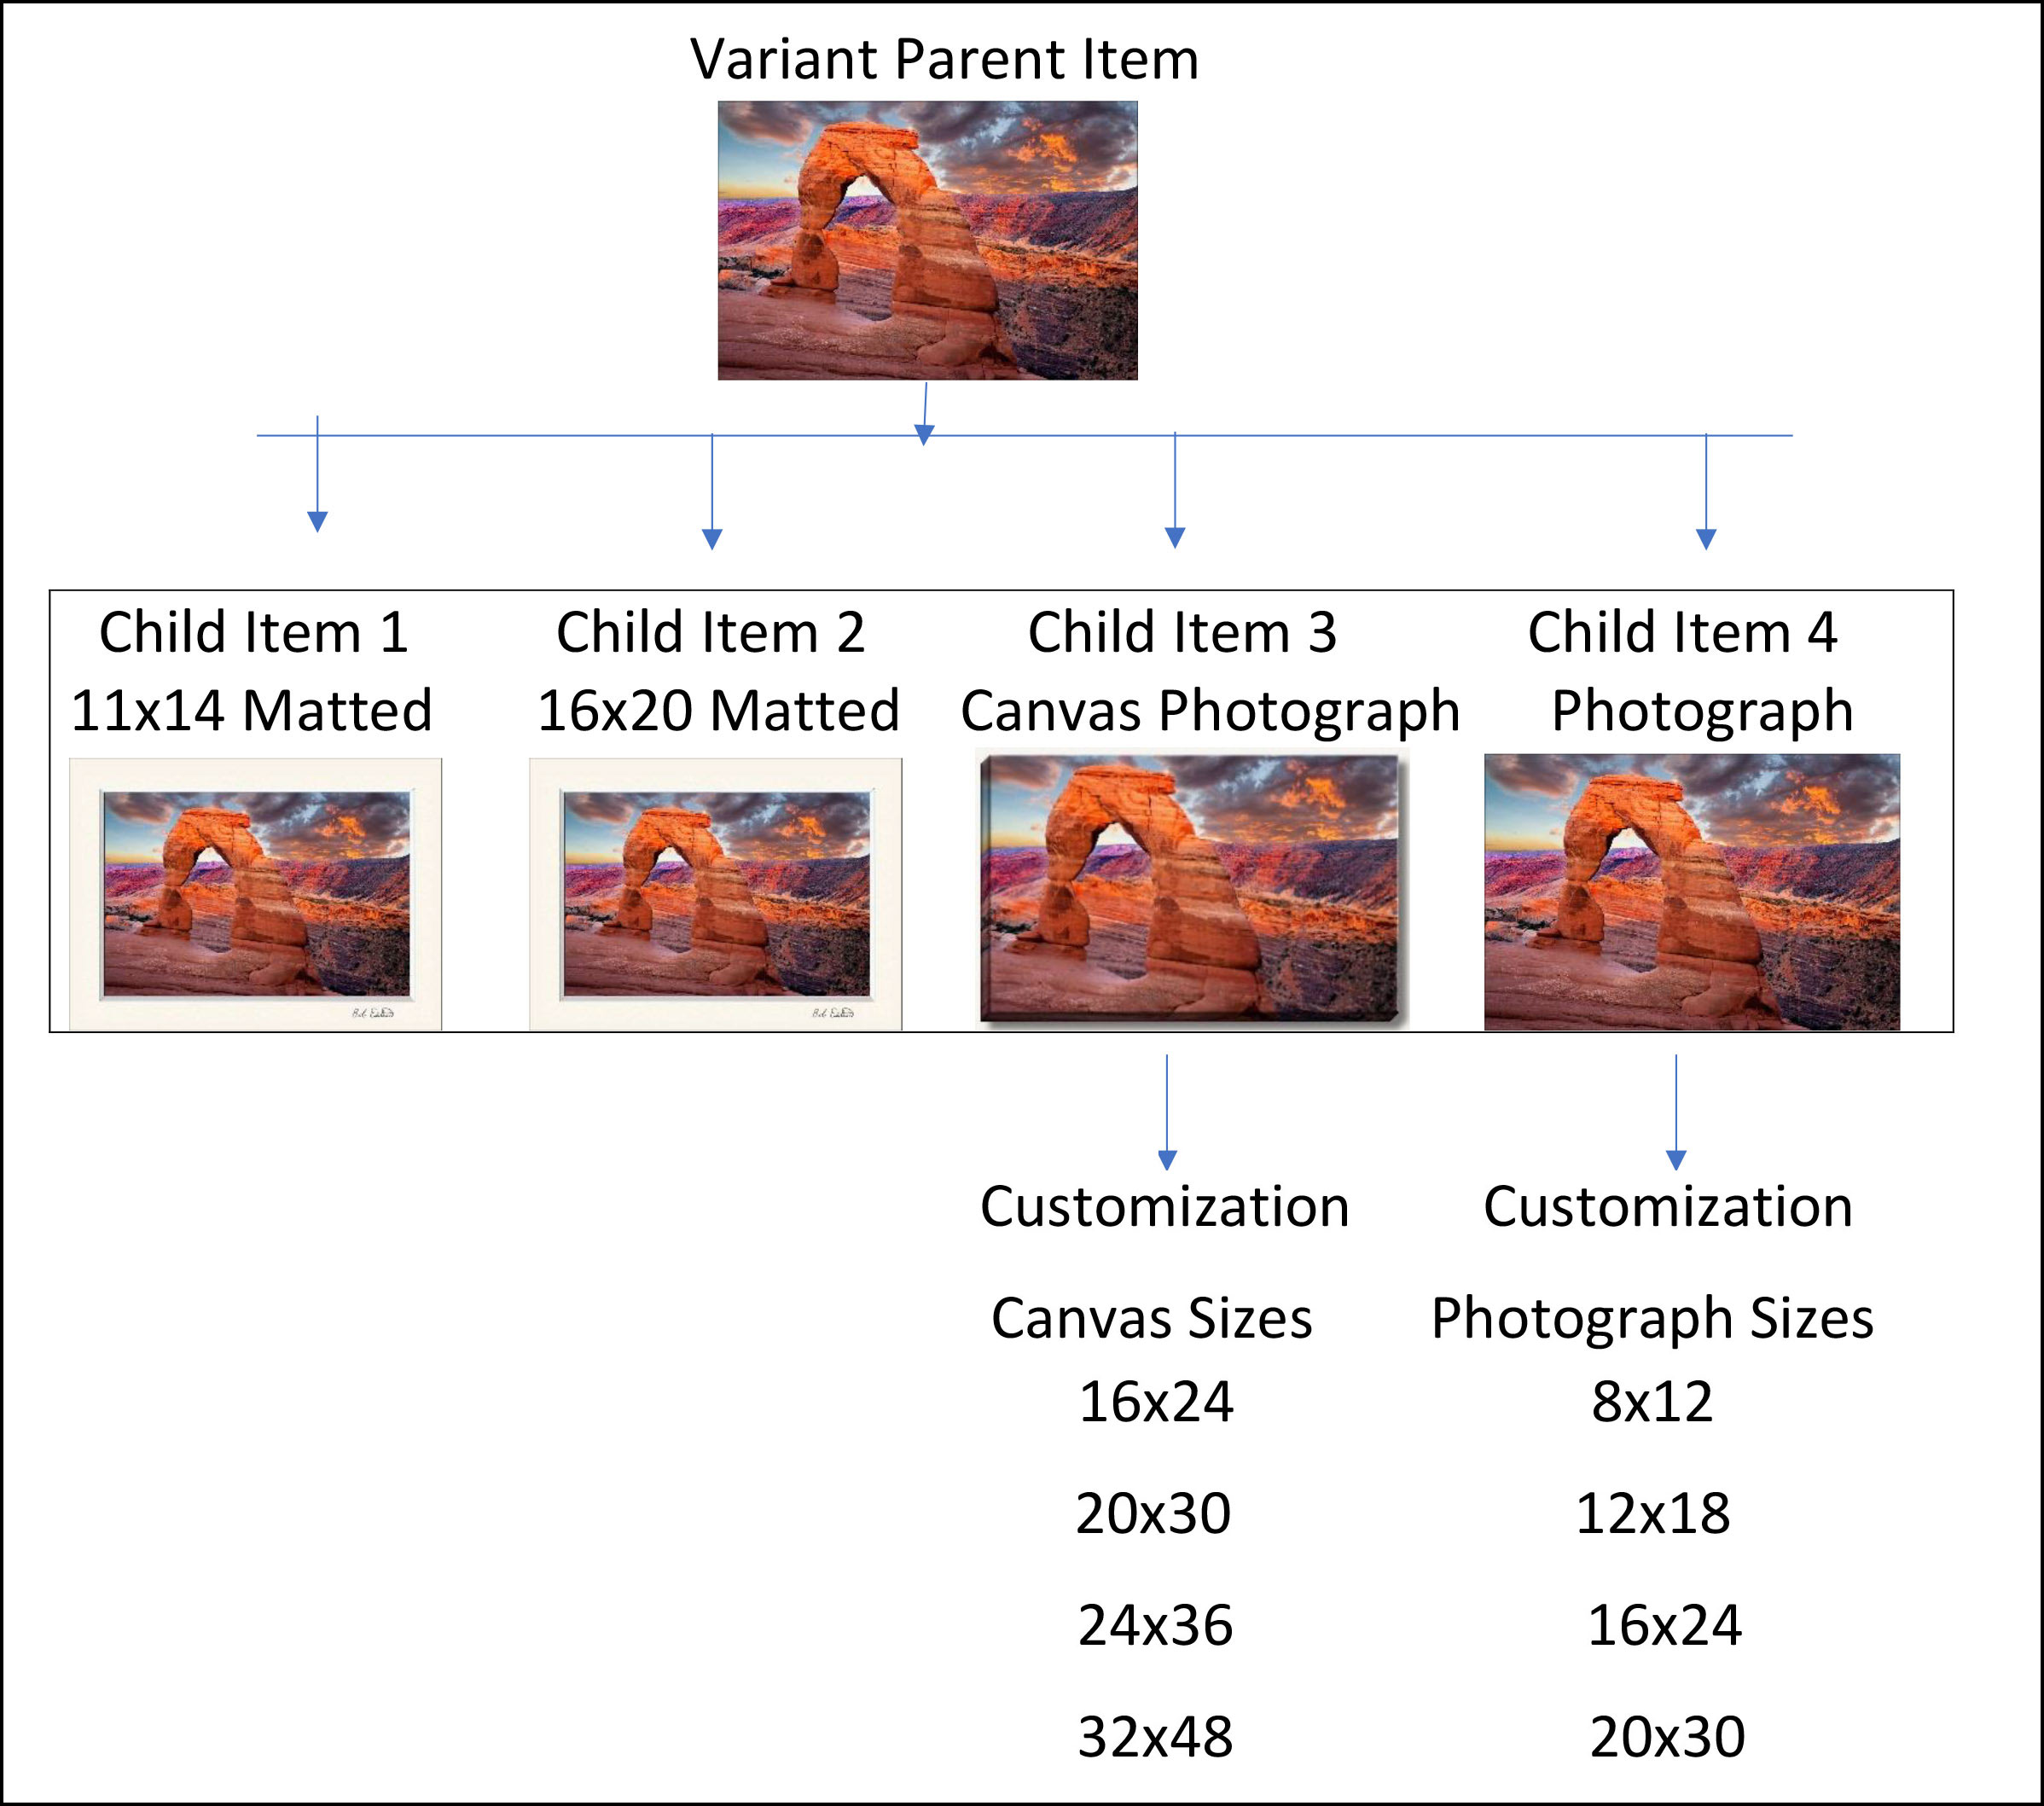
This shows a representation of this example use of the Variations with the Parent/Child relationship with one Parent and four Child items. In this case, two of the Child items have customizations and two of the Child items do not have customizations.
2: You can see how this chart below relates to the way the Parent/Child items are grouped in the Manage Inventory screen above.
Variations menu option entry screen for the Parent listing
3: You only need to fill out the Variations screen for the Parent listing and leave this section blank for all the Child items relating to this Parent listing. Later on in the article, I cover some of the other menu options Vital Info, Images, and More Details. While our previous edit screen allowed us to enter customization information at the time of the other item information, customization information is entered in a separate area now.
You can also see how to fill out the edit screen fields creating a Variant listing in my step-by-step instructions earlier in the article.
If you are creating a new Parent listing, besides the Variations edit screen, you will also need to fill out the other five edit screens Vital Info, Offer, Images, Keywords and More Details with at least the minimum required field values. I have been creating a new Parent listing by selecting a regular item that I would be using as one of these Parents Child items. I then copy that regular item and when I bring up the edit screen, many of my fields are already filled in for my Parent listing. I generally fill in the Variant edit screen and add one photo to the Images edit page. I may also adjust the title or product description if needed before saving and creating the Parent listing. After the Parent listing is created, I go into all the Child items under that Parent listing and see what Child item fields need to be adjusted since some of them have the Child item fields overwritten by the information from the Parent listing. I specifically check the Child item's title, product description, and keyword fields and modify as needed.
 If you are in the new edit screen just adding or editing an existing item, you can skip this Variations menu option. You only need to fill this out if you are specifically setting up a new Parent listing or editing an existing Parent listing.
In this example, from the Variation theme drop-down menu, I chose the theme 'SizeName'. There are many choices of Variation themes and this will determine what your items require. If you have a Parent listing that has different Child items with different colors, your Variation theme may be 'ColorName'. Where it says (B) Size, I entered four sizes, one for each of my Child items. This places the four lines below, one name for each size/name shown as (C) (F) (D) and (E) under the Size column header (Q).
At this time, I filled in the four seller's SKUs for each Child item under the Seller's SKU column. The SKUs will already be available from the Manage Inventory screen under the Child item line. I copy the SKUs from the Manage Inventory screen and paste them into the Variation screen. You do not want to get the SKU numbers mixed up. When you enter SKUs in the Variation screen, they must already exist as items. Do not enter an SKU number that does not exist yet and plan on creating a future item with that SKU entered.
Next, the Condition column is filled out. In my case all my items are New. Next, you fill out the Standard Price column (L). This can be taken from the item's regular price. If that item has customizations, the item's regular price will be the base price. Next, you will fill out the Quantity column (M). This would be zero if the item is FBA. If merchant fulfilled, this would be the inventory listed on your manage inventory item line.
When done filling in the Variations information, you can press the 'Save and Finish' button. There is also a button called 'Apply Changes' which if you optionally fill in the top line entry field boxes such as condition, price, or quantity and then press Apply Changes, those values entered will propagate to the below field boxes. You can change all six edit screens as needed and then press the 'Save and Finish' once when you are done with all your edits. You do not have to save for each page change.
I believe that if you make a change or add a new SKU to an existing previously saved Parent listing, after you enter your information, click the "Apply changes" button before you click the "Save & Finish" button.
While this Variations menu option for the Parent listing is new, it gets easier to understand once you use it a few times. If you do not see all six menu options, make sure that the 'Advanced View' toggle switch is on.
While I refer to a Parent as an item, in this article, such as 'Parent listing', the Parent is not a physical item that a customer can order. I think of the Parent as more of a header title that all the Child items fall under. The Parent listing does show up in the Manage Inventory screen as a line, but since it is not a physical item, no customer will see it.
After you create the Parent listing, you will notice that the titles on all the related Child items will be the title as stated on the Parent listing with the addition of the Variation theme wording such as what is listed under Size (Q shown above), ColorName or whatever Variations theme column name you have for this Parent listing. In this example, the title on the Parent listing is "11 x 14 Inch Mat Photograph". The Child item title would end up being "11 x 14 Inch Mat Photograph (11 x 14 Matted Print)" in which "(11 x 14 Matted Print)" (C shown above) is added to the end of the Child items titles. You can change the title on the Child items afterward to what you want.
Variations choices available:
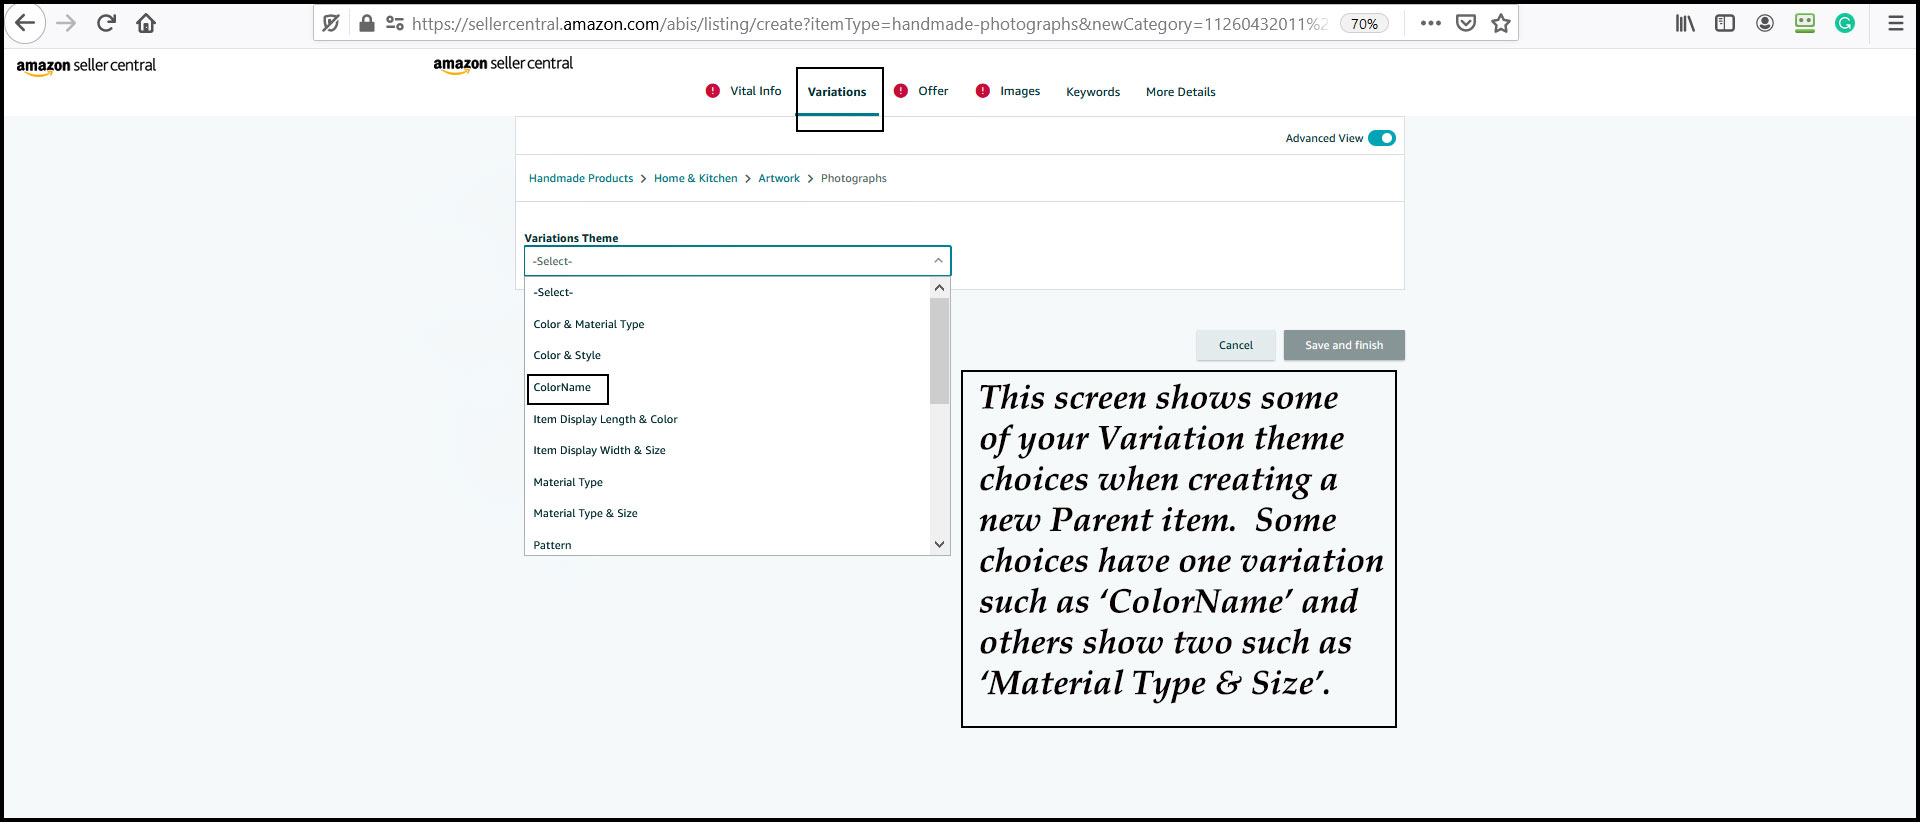
Depending on what items a seller sells and the options available to the customers that are offered, the seller must select the best Variation theme for the Parent listing. Some themes are more simple such as if your items only have a size difference, you may choose to use the Variation theme 'SizeName'. If only an item color difference you may choose to use the Variation theme 'ColorName'. On more complex customer choices, the Variation theme may contain two choices such as both size and color in which the Variation theme 'Size & Color' is used.
If you sold hats and you had three sizes (small, medium and large) and those hats came in four colors you may use the Variation theme 'Size & Color'. When using Variations, each hat and size combination needs to have its own item SKU, so you end up with twelve different Child items each with their own SKU number under the one Parent listing.
If you are not sure which Variation theme may be best for your handmade items, you can look in the Amazon marketplace categories outside of handmade for similar items to yours. Then see which Variation types show up and what Variation theme those other sellers are using. You should be able to visually see what will work best for the items you sell in the handmade category.
Color & Metal Type, Color & Pattern, Color & Ring Size, Color & Style, ColorName, Color & Item Display Length, Item Display Length & Style, Gem Type, Gem Type& Ring Size, Material Type, Metal Type, Metal Type & Ring Size, Pattern, Ring Size, Ring Size &Gem Type, Ring Size&Item Display Width, SizeName, Size & Color, Style, Style Pattern & Size, Style & Ring Size. You select the Variation theme that best fits your item.
I have read that not every Variation theme is available in every category, so some Variation themes listed here may not be available for all product categories.
Sample Variation theme of both Size and Color:
As you can see, when you have a Variation theme that list two options, you add to the complexity and additional Child item SKUs are required. In this sample, 12 lines would need to be filled out under this Variation listing.
Variations are not available for this category error message:
If you receive the message while editing your existing item "Variations are not available for this category" in the Variations edit screen as shown in the image below, the error message is misleading. It should probably say something like, 'Variations can only be accessed by the Parent listing, you are editing a regular product item' (Non-Parent). Basically, the Variations menu option in item edit will only open up on existing Parent listings or new items that have not been saved yet.
The 'Variations' edit screen can only be filled out for Parent listings. When you take an existing item and edit it and then go to the edit Variations screen, it will not let you enter this screen option. The Variations are not to be filled out for regular product items, only Parent listings.
Because of the recent changes to the Handmade customizations, some sellers may see the edit Variations menu option and think this is related to customizations. While the new Variations and the existing customizations have some similarities, they are separate features. Going into the Variations edit screen will not bring up your item customizations.
You can still edit this existing item, whether they are regular items or Child items with any of the other edit screen pages, just not the Variations edit screen. You create a Parent listing by finding the main menu 'Catalog' and then selecting the 'Add Products' menu option. You then select your category and finally fill out the new item edit screens including the Variation section with your child item information. When you save the Parent listing, this will add your chosen existing items as Child items to your Parent listing.
You can also create a Parent listing by copying one of the existing regular items and that should also allow you to access the Variation screen. When you copy an existing regular item, you will have to adjust all the fields as needed since many of them will be filled out from the copy. Update: Amazon may of broken this method of creating Parent listings by giving error messages. If you get error messages, then create the Parent listing with the method above.
It is required to have your Child items created before you add their SKUs to the Parent listing.
Variations: Very Important and Should Read:
While this article and many of the videos on Variants seem a little tricky until you get used to the process, I found adding existing items to a parent record, making a Variation, pretty straightforward. The part that was confusing to me was the changing of the information in many of the fields of the Child item when you attach that Child item to a Parent listing. I have no idea why Amazon has it set up that way. My viewpoint is if I do not fill in a field on the Parent listing, then do not overlay that field on the Child item and just let what was in that field on the Child item as it was.Of all of the videos I watched, I do not remember hearing about this aspect of changing the Child items field values.
This is why I recommend sellers request from Amazon the ability to run the Category Listings Report. This report will give you a backup of all your item fields, except the customization fields and the production time field, that you can save to your local hard drive. The regular inventory reports do not show you the style keyword, search terms, the new Variation fields, or the new Bullet Point (Additional features) fields and the Category Listing Report does. You can read how to request this report here Request category listing report / Bulk Upload Instructions.
You can use the category listing report's spreadsheet file to restore some of the item information onto Amazon by using the bulk upload. A detailed article link on how to do bulk uploads is also on the previous link reference.
When I create a new Parent listing, I copy one of the items from one of the Child items I will add to that Parent listing. That way many of the fields on the Parent listing are already filled in.
When creating your new Parent listing, most of the information added/entered to the new Parent listing will populate over to the Child items. This will overlay the same fields on all the Child items related to that Parent listing.
When creating your new Parent listing, most of the information fields left blank on the new Parent listing will populate over to the Child items. This will overlay the same fields on all the Child items related to that Parent listing clearing out all those Child item fields.
You can enter fields on the Parent listing to be transferred over to the Child item but the information may not be what you want in those Child item fields. If what you enter on the Parent listing that you would like to populate over to the Child item such as Shipping method, Gift message, Gift wrap, Bullet Points, Style keywords, Search terms, Size and How are the product made to name a few, then it is a good idea to enter that information on the Parent listing.
Take a special look at the Production Time field on the Child items to verify it did not revert to 1 day. It is best to fill out the Production Time field on the Parent listing so that the Child item does not get set to a default low number.
After the Parent listing has populated over to the Child items, you can go in and individually change any of the fields in the Child listings so they're not all the same. Each Child item will be different in some way and those differences should reflect in the fields of the Child item. These could be the title, product description, size, color, product material, keywords as some examples.
It is important to know that after the Parent listing / Child items relationship is formed (Initial creation of the Parent listing), the Child items information will no longer be affected or be changed by the information in the Parent listing. In other words, the Parent listing will no longer change or propagate its information down to the Child item information (for most fields) after the initial creation of the Parent listing. You can now change the information needed on the Child item and those changes will stay.
Update: I have read that updating an existing Parent listing may still change some of the fields on the related Child items such as the Child item description field as an example. If the seller makes a change to an existing Parent listing, they may want to check certain field values on the Child items such as the title, description, or fields relating to the Variation theme such as color or size. I have no idea of what fields may be affected.
If you add a new Child item to an existing Parent listing, I am not sure if the Parent listing will then propagate its information down to the new Child item since I had not done this to see. If it does not, I may in the future create a Parent listing with just one Child item, then wait a full 24 hours for all the updates to be finalized, and then go into the Parent listing and add the remaining Child item SKU numbers. This would stop the Child item fields from being changed due to the propagating of information from the Parent for most of the fields for these new SKU Child items just added. I have not tested this yet.
The Parent listing information trickles down, the Child item information does not trickle up. Changes on the Child item should not affect the related Parent listing.
I read that if you remove the Parent listing, the detail field information in the Child item will not be changed from its current state. The Child item will no longer be part of the variation and no longer have its rankings combined with the other Child items.
Note: With one Variation, I entered a Parent listing with three Child items. I adjusted the fields on the three Child items as needed and waited until the three Child items updated completely.
Next, I went into the same Parent listing and added two new Variation Child item SKUs. After the Parent listing was saved, the two new Child items fields needed to be adjusted. The previous three Child items fields from that Parent listing were left alone or did not get modified even though I changed the Parent listing.
If you find that your Child's items fields change unexpectedly, it could be that some of the information of the related Parent listing overwrote or cleared out some of the information in your Child's item records. I believe this happened to me with no idea why it happened.
This is what Amazon says about this but I do not think this is worded well "Note: When adding existing ASINs to a variation family, you must edit any information in Keywords and More Details in the parent ASIN, as these will not carry over from the existing child ASINs when you create your parent-child relationship. After successfully creating your variation, be sure to confirm your child ASINs have the correct information under Keywords and More Details."
Category listing spreadsheet report showing how variation information is stored:
If you plan to make numerous changes to your items due to converting many items to use Variations (Parent/Child), it may be a good idea to request from Amazon the ability to run the Category Listings Report. This report will give you a backup of all your item fields, except the customization fields and the production time field, that you can save to your local hard drive. You can read how to request this report here Request category listing report.
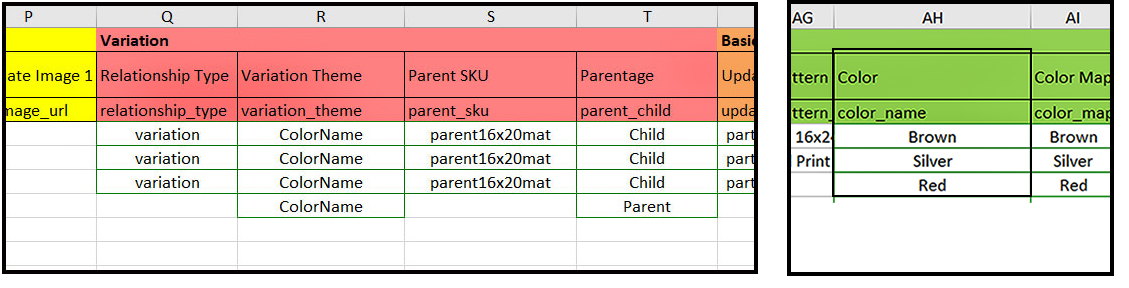
For advanced users, you can create Variations using Inventory File Templates and bulk upload the spreadsheet file to Amazon. For me, I will use the Variations edit menu screen and create my Parent records one at a time manually. See the video on this (Click here for more information).Here is a small section of the category listing report spreadsheet showing the new Variations fields and the 'Color' field. Note that the color field is different than the color map column field. When the item is not part of a variation, then these four variations fields would be blank. You can see the variation relationship type, the variation theme in which in this case is ColorName, the parent SKU name, and the Parent/ Child field showing if the item line is a parent or child item. In this situation, due to fact that the variations theme is ColorName, the Color column comes into play and is shown in this example. If the variation theme was SizeName, then the column Size would come into play. Depending on what the variation theme is will determine what other field or fields are used in conjunction with these variants. Not shown in this example, but if the variation theme was 'Size & Color', you would need both the Size and Color column fields filled in for all the child items.
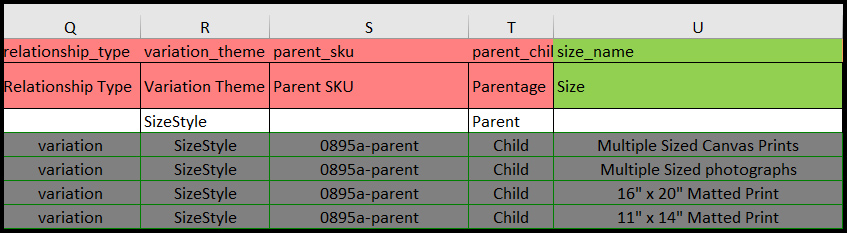
In this situation, due to fact that the variations theme is SizeStyle, the Size column comes into play and is shown in this example.
Variations: General Notes:
When you first create your Parent listing and enter a product title, the Parent listing title entered overlays your titles in all the Child items under this Variation. At the end of each Child item title will be extra wording such as (size title) or (color title). Basically, what was entered into the first Variable column for each Child item. The seller can later change the Child item title as they wish.
I noticed that when you initially create a new Parent-Child relationship, the system updates pretty quickly. My experience is that if you update after (or update multiple times) that for these Parent-Child items it can take a very long time to update. I had to wait until the next day to see the results that showed up for the customer. If you feel that the system is not updating your new information, you may have to wait up to 24 hours to see your results. Your update time may vary.
I have also noticed that your changes do not update all at once. Your Variation Child items showing to the customer may have various areas, such as wording to images, change all at different times throughout the day and into the next day. This makes it difficult to verify your changes and you may just have to wait until the next morning to check your Variation Child item listings to see if they are as expected.
My understanding is each Child item Variation has its individual keywords for Amazon to use in search. While the search terms may be very similar between the Children under the same Parent, each Child should have some unique search terms, specifically ones that indicate size, color, or whatever distinguishes this Child from the other Child Variation.
My understanding is that the Parent listing is not indexed and therefore is not searchable. You can enter search term keywords to the Parent listing and if you do those keywords will be transferred to all the Child items. You may need to go into the keywords for the Child items and add any specific keywords that directly relate to the Child item such as color or size as needed. From what I read rankings are tied to each individual Child Variation and the rankings of multiple Child items do not accumulate in the Parent listing.
The order in which you enter your Child items in the Variation edit page is not necessarily the same order the items display together on the item page the customer sees. From what I have read, the seller cannot set the Child items to show up to the customer in any specific order.
I have read that a single Parent listing can have both FBA Child items and FBM Child items on it.
Since a Parent listing can have both FBA and FBM items, if the customer did not select show me only Prime items, the item displayed may show other variations in which some are Prime items and others are merchant fulfilled items. The customer may not realize that the merchant fulfilled choices may not arrive at Prime item speed even if the item listing page shown to the customer should state the estimated delivery times for each variation separately.
There is a Variation Wizard, but I heard that it is not advised to use it for items in the Handmade category.
Child items under variations can still have their own individual production time (number of creation days) value for fulfilled by merchant items.
If you want to delete one of the Child items under a Variation, you just go to the Parent listing line under Manage Inventory and do an item edit on the Parent Listing. Once in edit mode, you can go to the Variations edit screen and check off the box to the left of the Child item SKU number you want to remove from this Parent listing. Then press the 'Delete selected' button on the screen and then save the changes with the Save and Finish button. This should just remove the child SKU number item connection to the Parent listing and not delete the SKU number item. You are only deleting the Parent/Child relationship for this one item and not the actual item itself. Once the child item is deleted from the Parent listing, it is now back to a regular (non-child) item. If you wish to add this regular item back to another Parent listing, I would wait a full 24 hours to make sure the previous transformation from the child item to a regular item has fully completed.
If you want to delete the Parent listing, all the variation child SKU items under that Parent listing will revert back to regular standalone items and will retain their data information, reviews, and sales history.
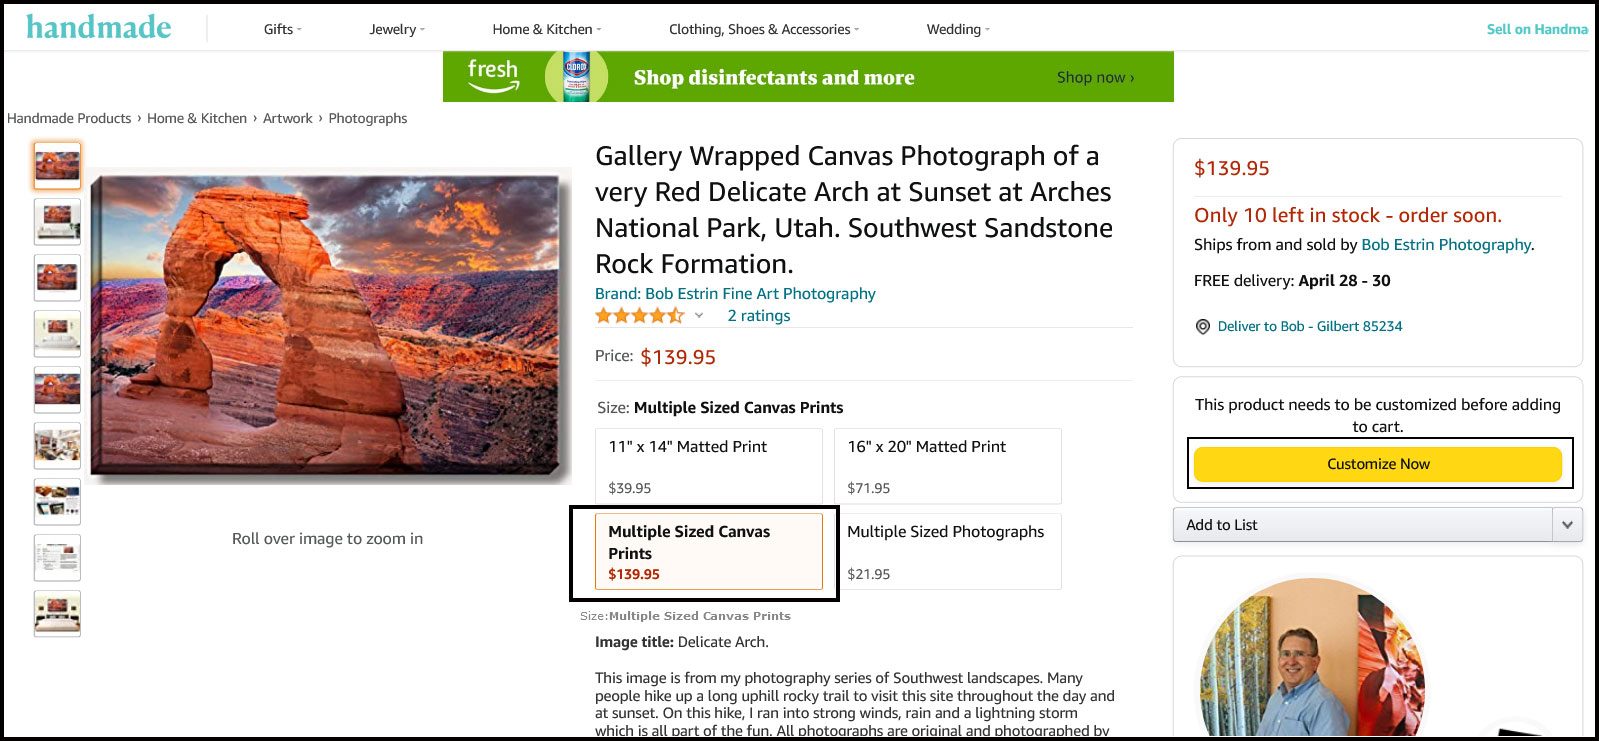
Amazon item detail page displayed to the customer showing four-item Variations (Child items)
4: This is the regular item selling page that the customer sees. In this display below, you can see the four Child items. They show up as four selectable text boxes C, D, E, and F.
This page displays a lot of letters. These letters point to the new edit screens, displayed above and below, showing where your entries go to show up for the customer. In most cases, the new edit screen fields are the same but just in a little different format. The fields that are related to the new Parent/Child Variation fields may have more of an interest hereof where you enter the data and where it shows up for the customer. Fields B, C, D, E, F, and Q, on the display below, relate to the Parent / Child Variations.
While having Variations on our handmade item selling page may seem odd, customers have been using item selling pages with Variation Child items for a long time and are used to them. It may be true for many items that work well with Variations that the seller may have an increase in sales.
When the customer clicks on one of the four Child boxes C, D, E, or F, you will notice that the photos change and the item description changes. With two of my Child items that have customization options, those customization options only display to the customer when the customer physically clicks on one of the Child boxes that have customizations associated with them.
You can see this sample Amazon Variation item listing live
(Click here to see listing) .
Notes:
When you add existing similar item SKUs to a Parent listing that has a Variation theme associated with it, all your Child SKUs will be available to be seen by the customer under that Parent. When one of the Child items displays, such as a result of a customer search, the customer will see the detailed information, such as different titles or photos, of the current Child SKU related to the search. The customer will also see multiple boxes with each box a different item SKU. One for each Child under that Parent to be clicked on as shown in C, D, E, and F areas in the sample screen below.
If the customer clicks on one of the other Child SKU item boxes, then the title, description, photos, and other information will change and now the customer is seeing another Child item and its specific information. See the example of four items (C, D, E, and F) under one Parent listing.
If the customer just places the mouse of one of the Child item boxes, then only the item image will be changed but not show the item detail information.
Variations can be used when appropriate and are similar items. Sellers are still allowed to use customizations, so I feel you should only switch to Variations when it makes sense.
One of the advantages of using Variations over customizations is that the customer can see different choices for a similar item all on one item detail page without needing the extra step of having the customer go into the Customization page. If your items have numerous different customization options, then listing with customizations may be a better choice than converting to use Variations. If you had to take each customization choice and make it into a separate SKU, that may add a lot of extra SKUs which would be harder to maintenance.
If you combine existing similar item SKUs, that already exist separately, using a Parent listing with Variation Child items, you have the same advantages without needing to create separate new SKU items.
You can view the screen below to match the letter to the screen above to give you an idea of where the data shows to the customer.
This detail page shows when the Box E (Multiple sized canvas prints) is selected. This is one of the other Child items under the same Parent listing. You will notice that the title, description, and photographs have changed for the customer since another Child item SKU is displaying. You can see that the customer has originally brought up one detail page which was originally the Box C Child item shown above and because Box E was selected by the customer, now the page displays the Box E Child item shown below. You will notice while the Box E item is showing, the customer still has easy access to the other three Child box SKUs on the same display page. This will probably look cooler if Amazon adds the ability to substitute the Child SKU text boxes to actual small photos.
You will also notice that Box E (Multiple sized canvas prints) is also showing customization options (See Customize Now button). This item offers multiple sizes. Even Child items can optionally have customizations.
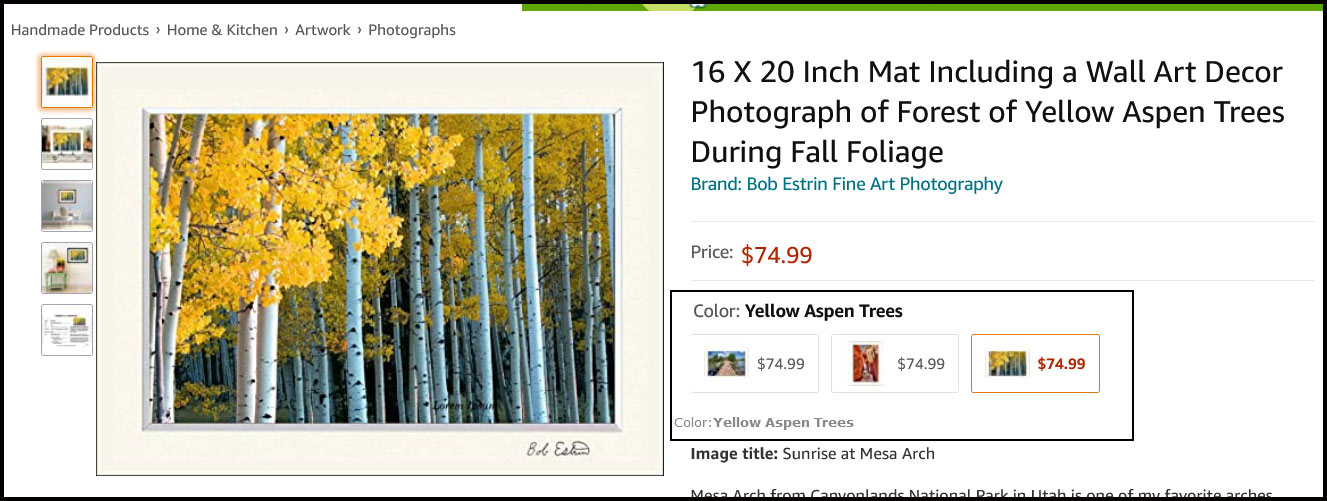
On my testing, the Variation theme 'ColorName' will display small swatch thumbnail photos of your product Child items in the text box as shown below. Most of the Variation themes do not show the small swatch thumbnail photos but only text box wording. Note: The different Child items shown here may not be typical items that belong in a Variation relationship, but I used them as an example to show a common Variation theme of 'ColorName'. More typically, you would use this theme selling a hat in four colors.
The new item edit screen 'Images' showing the product's images
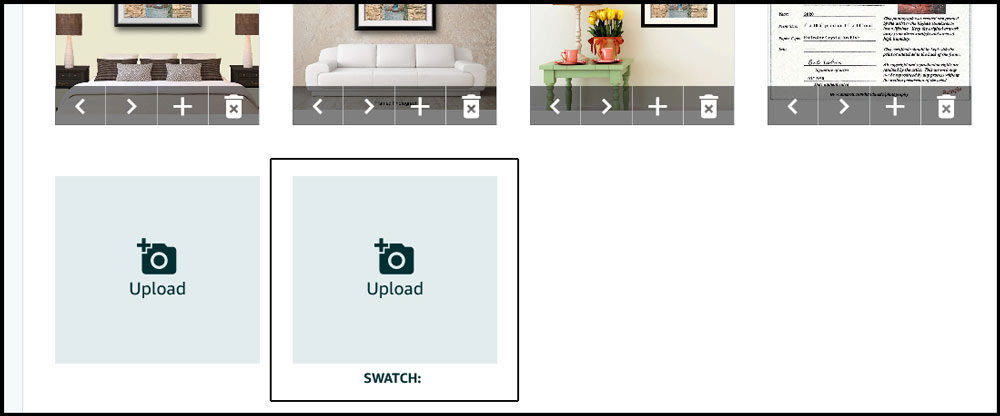
5: This is the new 'Images" edit screen for entering item images. It looks different since the screen has images on top and below. The upper section shows the images currently on the item. The lower section is where you can add or adjust the images and then rearrange them in the order wanted.
This example screen shown is the image page for a Child item. The edit image page for the regular items or Child items looks the same. For the regular and Child item images, they would be entered as usual.
For the Parent page, it is required that you enter at least one photo. I could not see any need to enter more than one photo. This photo shows up when you are editing the Parent listing pages but I do not think this photo gets transferred to the Child items.
I noticed on my child item listings with a related Parent listing, their seems to be 10 photo boxes with the 10th box stating 'Swatch'. This is shown in the example below. I believe this Swatch photo box only shows up when you have a variation theme with the word 'color' in it. I am not sure what happens when this swatch photo box is filled in but it may place this image on the item that shows up on the varient box for the customer instead of the first photo. This 10's swatch photo box is not required to fill in as far as I can tell.
As for now, this swatch photo field does not save and may not be working at this time 10/14/2021.

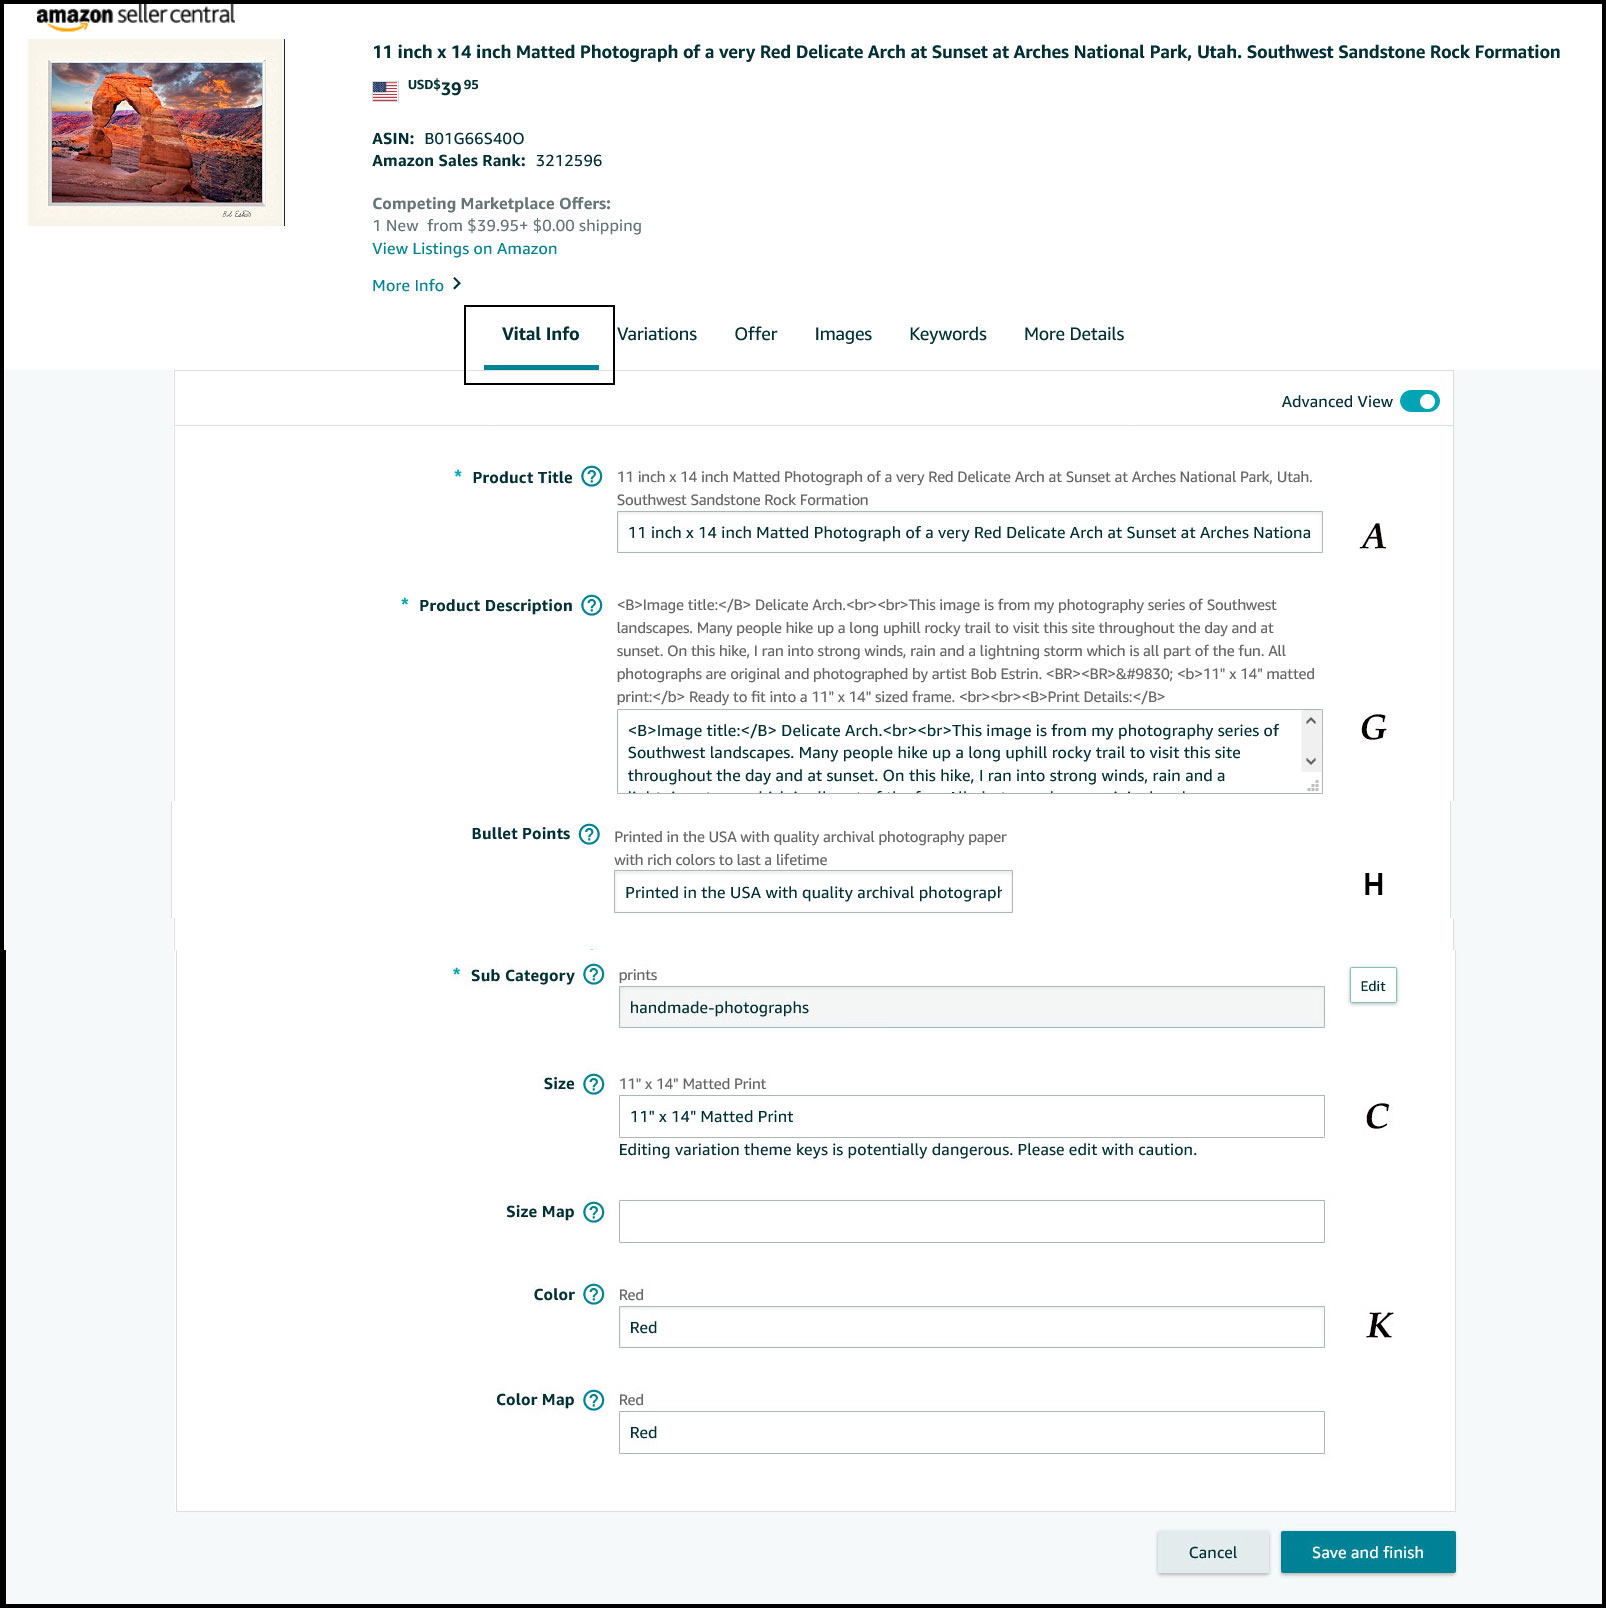
The new item edit screen 'Vital Info' showing the product's vital detail information
6: This Vital Info edit screen shows some letters (A, G, C, and K) next to the fields and where they show up on the item display screen shown above. These fields can be filled in as before on the old item edit screen.
On this Vital Info screen, you have the Size field (C). This relates to the wording that shows up to the customer in the Child item text box so it directly relates to items that have Variations or part of a Parent/Child relationship. This Size field (C) may be specific due to the sample Variation theme drop-down theme I chose for the Parent listing of 'SizeName'. I suspect that if I chose another Variation them such as 'ColorName', a color field will be filled out relating to the Child item text box.
When filling out this Vital Info edit screen on a Parent listing, your information may overlay the same fields on your Child items associated with this Parent listing. You may want to check to see if any information on your Child items has changed or overlayed and is not what is wanted in those fields.
Update: This Vital Info entry screen now has the new Bullet Point fields under the product description field.
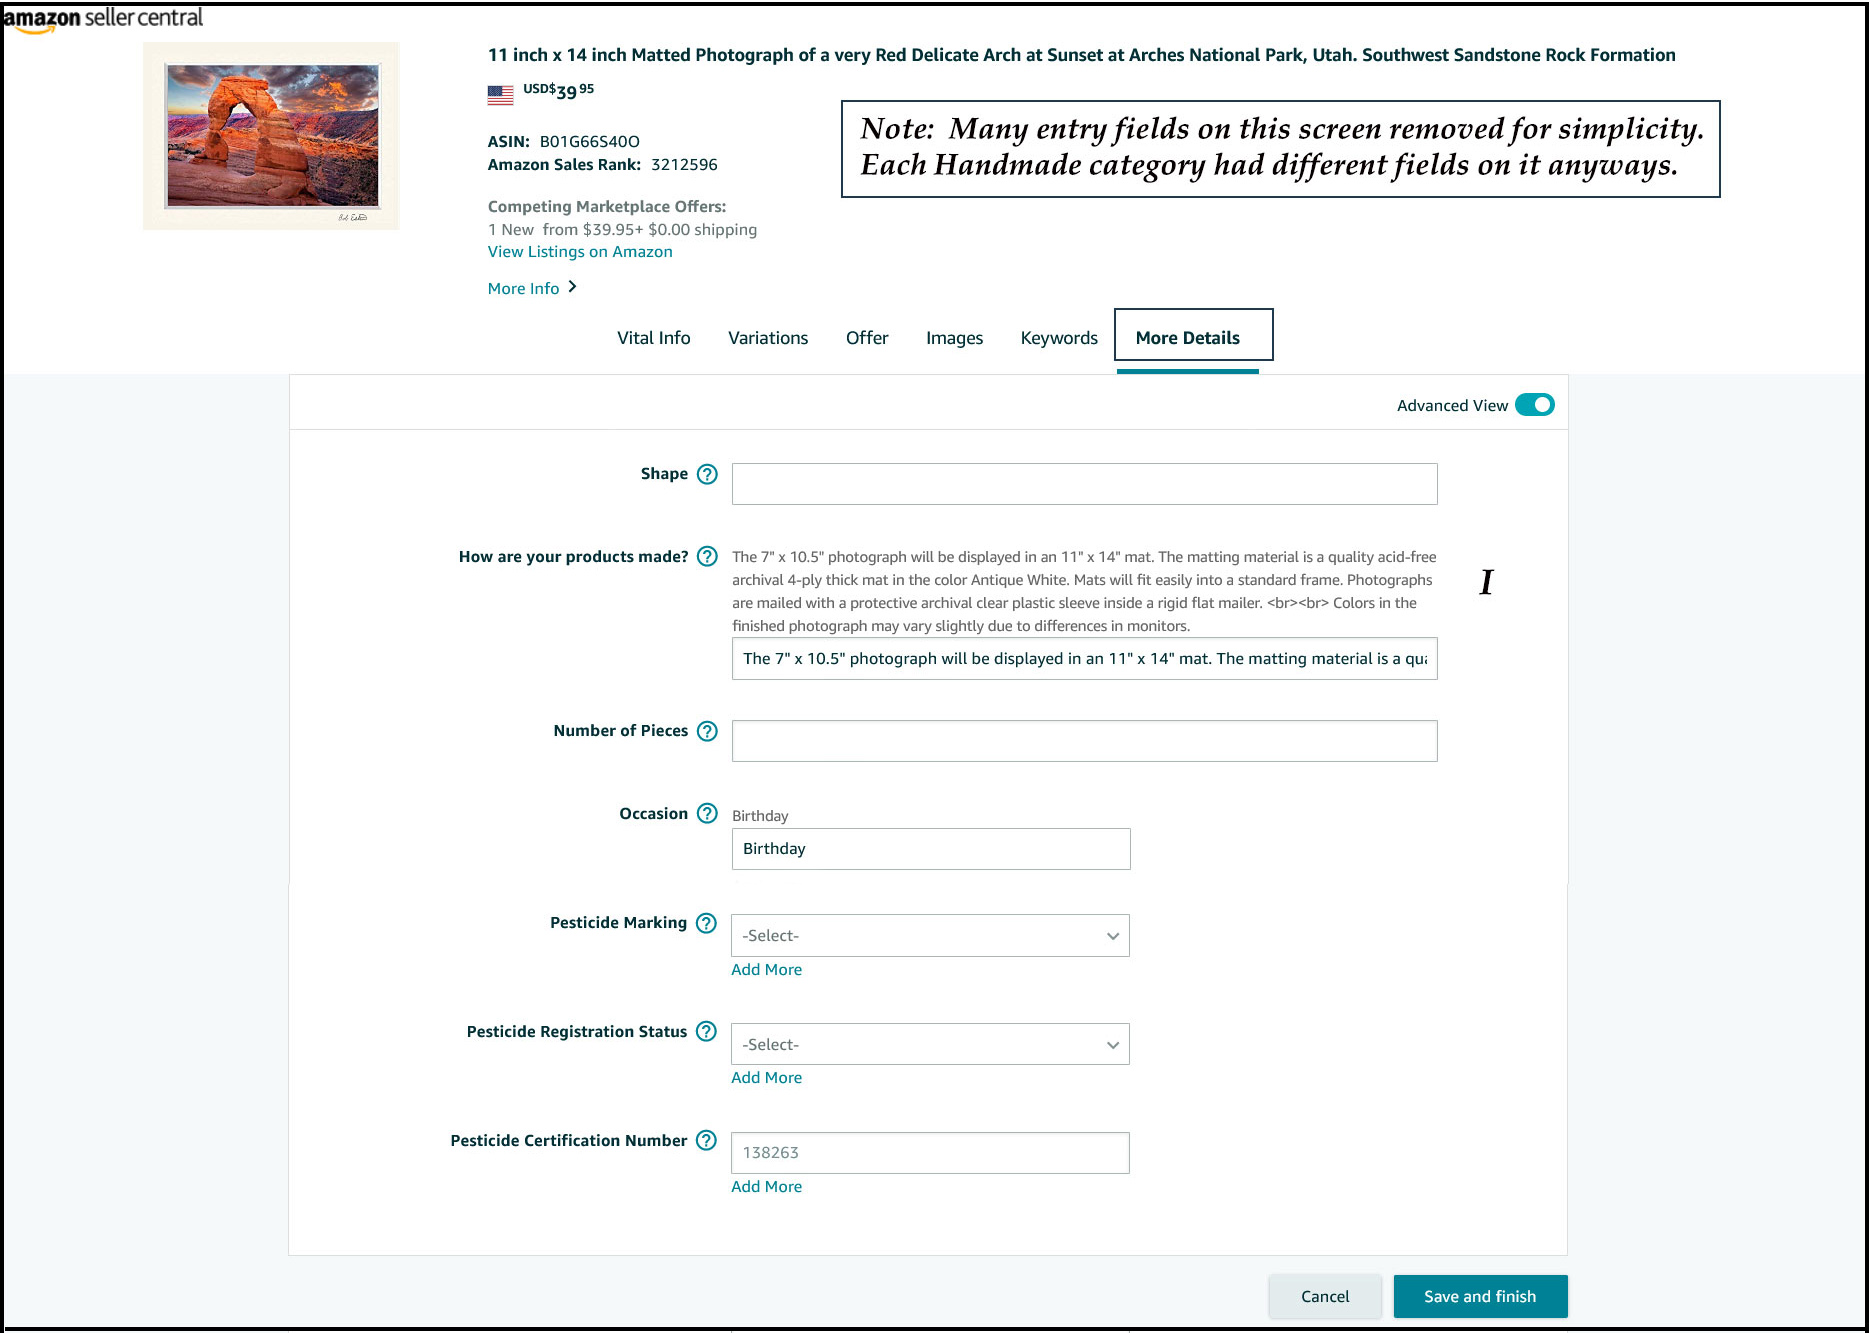
The new item edit screen 'More Details' showing the product's additional detail information
7: This More Details edit screen shows the letter (H) next to the field and where they show up on the item display screen, shown above. As with many of the new edit screens, the entry fields look the same. These fields can be filled in as before on the old item edit screen. I am not sure if all the previous field edits are the same. Some of the entry fields have been removed from this sample page for simplicity.
My understanding is that the 'Privacy' listing of an item is no longer available.
When filling out this More Details edit screen on a Parent listing, your information may overlay the same fields on your Child items associated with this Parent listing.
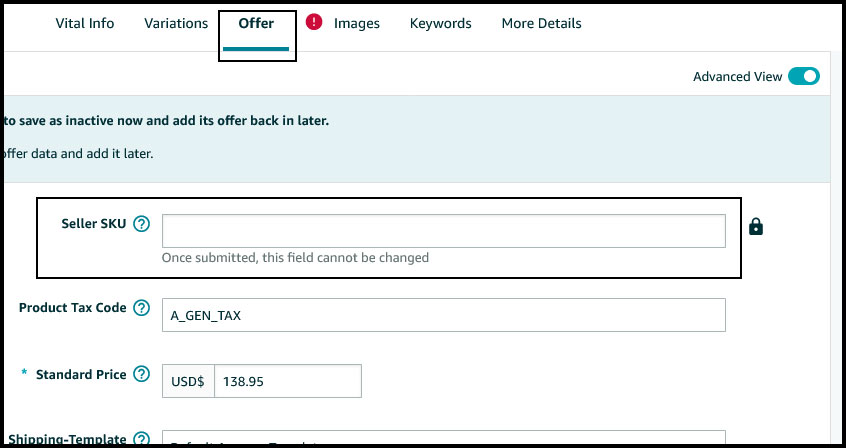
Sample item Offer page
8: This Amazon handmade Offer edit page shows a Parent listing with a blank SKU number. When you first create a Parent listing, this field is available for the seller to enter a Parent listing SKU. If you do not enter a Parent listing SKU, the system will automatically assign one. Once you save this Parent listing you will no longer see this SKU entry field when in the Parent listing edit screen even though an SKU has been saved for that Parent listing. The Parent listing SKU number will display under the Parent listing number in the Manage Inventory screen.
The other fields on this Offer edit page are the same as before.
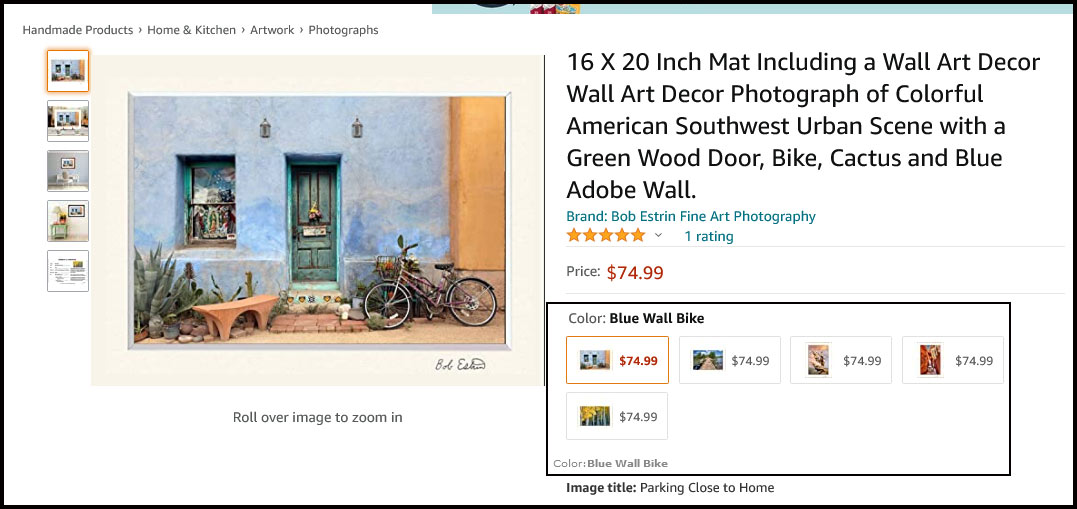
Sample item detail page showing item Variations by ColorName
9: This Amazon handmade detail page shows a Parent / Child Variations item with the Variation theme ColorName. You can see that for this item, the different Child items show up as small photos or swatches. The small photo thumbnails are not displaying for most of the Variation themes for handmade items at this time. Perhaps in the future since I feel this is one of the best features of using Variations. Note: This is not a typical use of the Variation theme ColorName. It is mostly used for the same item that has multiple colors such as selling a hat that comes in yellow, blue, and green.
--------------------------------------------------------------------------------------
The item customization screen and the changes:
The new edit item drop-down menu shown with customization option:
The "Copy listing" function, to create a new item from an old item, in the drop-down edit menu no longer copies over the customizations.
For some reason, the item quantity has to 1 or greater to add a new customization.
Sellers now have to add the customizations separately after the new item is created. The seller needs to wait until the new item has been updated on the Amazon system before entering customizations for the listing. This requires more time and is not as efficient as before.
Sellers now can save previously created customizations, so customizations can be loaded into existing items. This process is done using a more complicated bulk upload feature explained below, so many sellers will just enter customizations manually for new items.
My understanding is that you cannot enter customizations to a listing when the quantity is zero.
While it may make sense that you should be able to get to your existing listings customizations from the new edit screen, you can not. There is an edit menu option called 'Variations' that looks like that is where you will find your customizations, but they are not there. Variations, which are new, are much different from customizations. To edit existing items customizations or add new customizations, you need to go to the Manage Inventory page and go into the edit menu for the item of your choice and select 'Add/edit customization information'. You should then have the item's existing customization options display or you can add new ones.
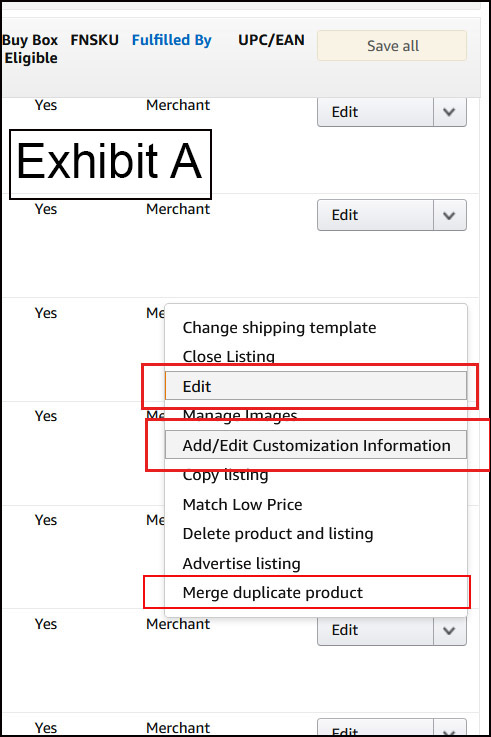
Sellers can still add/edit personalization (customizations). Look for a separate menu option in the manage inventory page under the 'edit' drop-down menu for Add/edit customization information (Exhibit A). For new items created, my understanding is that you need to create the item first and save it. Then you can add any customizations. When using Variations, the Child items can also optionally have their own customizations.
This is the new (04/2021) drop-down menu in the edit menu (Exhibit A) on the Manage Inventory page.
You can also see a menu option called 'Merge duplicate product' which I do not remember seeing before.
You can click on the 'Add/edit customization information' edit menu button (Exhibit A) which will bring up the customization screen (Exhibit B) for that item. You can then edit or delete any existing customizations.
If you would like to add new customization, then select the 'Add customization' button (Exhibit B) and this will bring up (Exhibit C). Then select one of the three customer entry options which are 'Text', 'Option dropdown' and 'Number' (Exhibit C).
You now have the new customization fields to fill out. If you already have a customer customization option set up for an existing item, it just shows up for the seller to modify or delete shown on (Exhibit B).
New handmade customization screen: Hidden surprise
The seller now has the option of saving a template of an item's customization options. Once saved, you will be able to call up those same customizations to quickly fill up other items. You can save many different customization templates.
To save a customization template click on the up arrow next to the word Publish in the lower right corner (Exhibit B). Then click on the option to Generate Template (Shown in Exhibit B). You can now fill in the template name as shown on the box insert below called 'Generate a template'.
Add / Edit Customization screen
Update 06/21: The Generate Template button, as shown below, has been disabled by Amazon. The seller can also not add a Customization Template Name as shown below. I am leaving this information in the article in case this option comes back.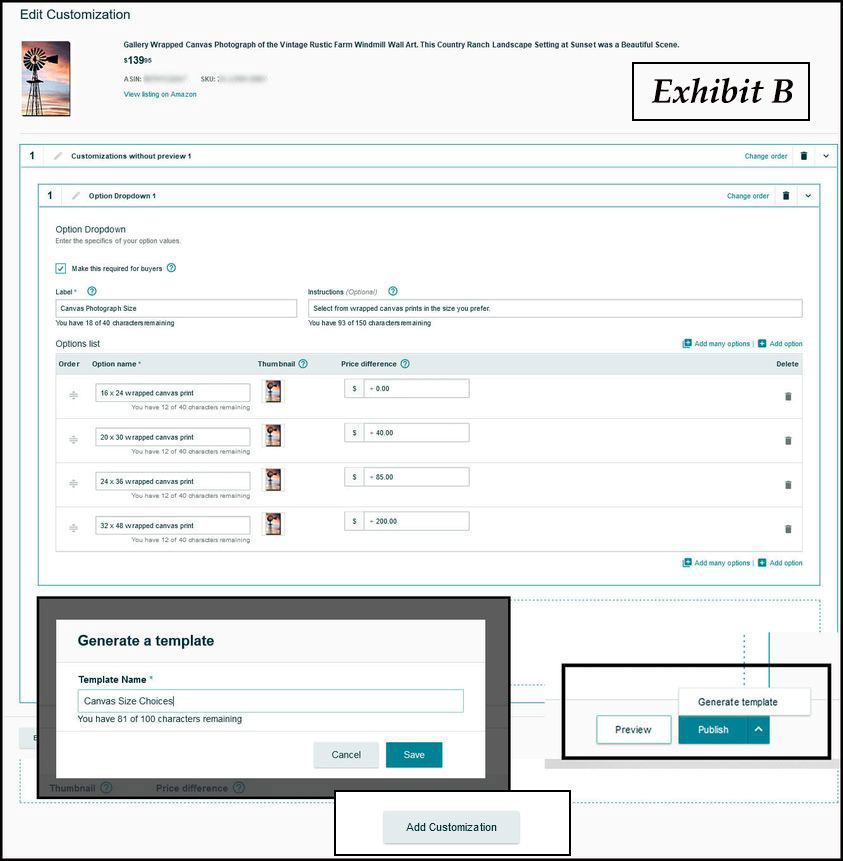
Customization type options screen
Customization type options (Exhibit C) including 'text' entry as shown in the first box below. You can also add customizations for 'Option dropdown' and 'Number'.
This Customization type options (Exhibit C) screen is brought up by selecting the 'Add Customization' button shown on Exhibit B above.
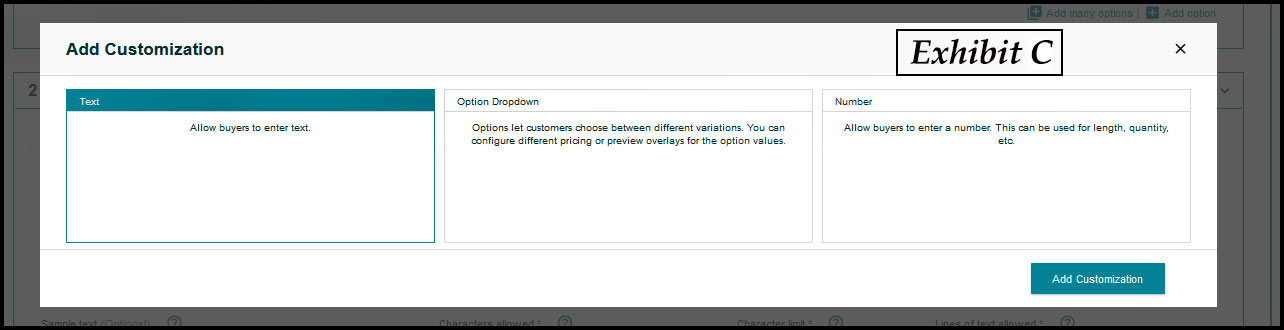
Customization edit screen showing the new thumbnail photographs for each customization option
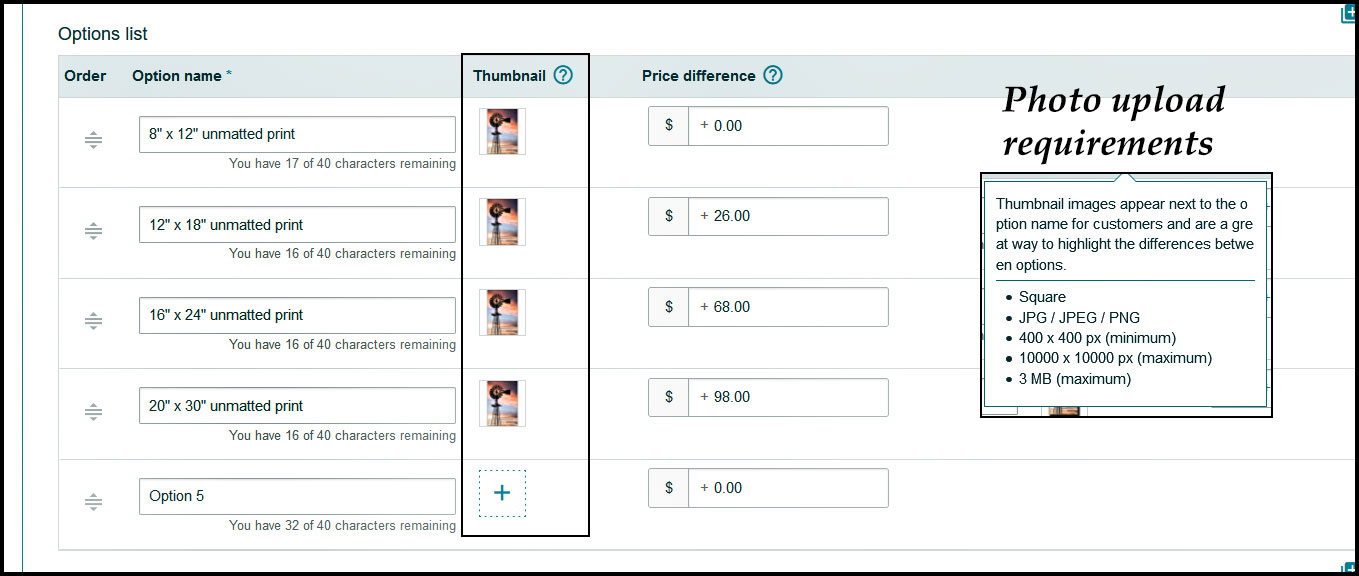
Customization new thumbnail photographs as shown to the customer

------------------------------------------------
Use existing Customization and place it in another item without needing to reenter all the customizations manually
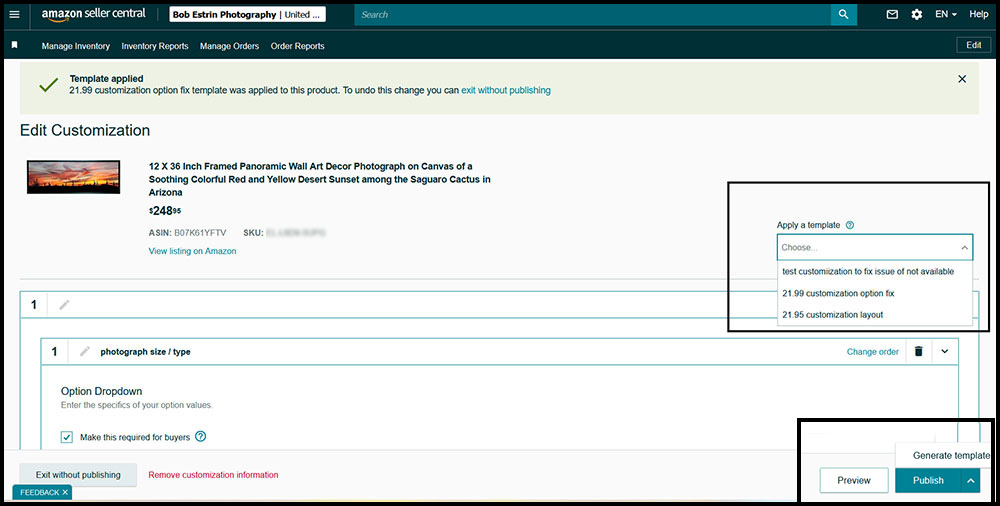
Amazon does not copy your customizations from an existing item to a new item when you do a 'Copy Listing' on an item in the Managed Inventory edit menu.
Saving a customization:
You can save (publish) a customization completed on a previous item under a customization template name. This customization template saves all the customizations options. You can do this by calling up an item with an existing template and selecting the 'Add/edit Customization Information' menu option. You now can see the customization options entered into this item previously.
On the next screen, select the down-facing arrow next to the word 'Publish' as shown on the sample screen. Do not select the word 'Publish'. You will see the words 'Generate Template' display which you then select. You now are given the ability to name and save the customization options into a customization template name on a screen shown in Exhibit D below. Then you can use that saved customization template name to copy those customizations to new items.
Use the customization template to bring those saved customizations to another item:
Once the customization template name is saved, you can call up the new item using the 'Add/edit Customization Information' menu option and select that customization template name from the 'Apply a template' selection box shown in the screen sample. This automatically brings in the saved customization template options to the new item without the need to manually add them. You only need to save the new customization on the screen by pressing the 'Publish' button.
Use the customization template to replace an items existing customizations:
You can also use the saved customization template name from the 'Apply a template' selection box shown in the screen sample to replace existing customization options already on the item. You do not need to delete the existing customizations first. This automatically brings in the saved customization template options to the existing item replacing the existing customization with the customizations listed under that template name. You only need to save the new customization on the screen by pressing the 'Publish' button.
How is this replacing an existing item customization useful? Let's say you have 20 items that have the same exact customizations. In this situation, you wanted to add one color to one of the options and add one size to another of the customizations for that item. You can call up one of those 20 items and manually add the color and size options and then save that item's customizations to a customization template name. You can then bring up the other 19 items and use the specific customization template name to replace the item's customization options. Using the customization template does not just add the two new changes, but erases the old customization options and brings in new customizations that include the size and color additions.
Have different customization template names to be used for those items that have the exact same customization options:
You can save many different customization templates, each under their own name, to be used later for other items. This not only saves a lot of time but brings accuracy and consistency to customizations among many of your item listings. This procedure is a little complicated at first, but once you know how to use it, it takes seconds.
------------------------------------------------
More information and step by step instructions to bulk upload customizations to multiple ASIN numbers at once is at the following Amazon link. Note: All Amazon's instruction steps are not accurate. (Click link here to see Amazon document) .
------------------------------------------------Add product customizations in bulk using Customization Template and Feed Spreadsheet file
The screen page (Exhibit D) shown below shows my three saved customization templates. You can now press the download feed file button (small arrow) shown on this screen. This downloads a spreadsheet file to your local computer. You can see a sample downloaded spreadsheet file below (Exhibit E). This spreadsheet file can now be modified with SKU numbers and customization information to be later used to upload customization changes to your Amazon items.
It helps to have a good working knowledge of spreadsheets to do this customization template upload.
You can have one saved customization bulk update template for each unique set of customization options. If you have a template that would fit or match 20 of your item SKUs customizations and you decided to adjust your customization options in some way such as change a price or add or delete a customization, you could create a new adjusted template with these changes. Then you use this template to create a new download spreadsheet feed file. You can update the customizations for all 20 SKUs at once by having 20 spreadsheet lines in the data upload feed file (Exhibit G). Each spreadsheet line would have a different SKU number in the first column.
You can also just update each SKU customizations manually one at a time as done previously and not use this new feature. For changes to a few SKU customizations, it is probably faster to do it manually one at a time.
I was able to do a bulk upload update with this customization template spreadsheet. The downloaded feed file sample template spreadsheet is shown below (Exhibit E). To do a bulk upload of your customization template spreadsheet, there is a place on the page (Exhibit D) that says "Upload Customizations" that you can click on. When you first try to do a bulk upload, you should do it with just one item SKUs customization until you have the procedure working. Once you have the procedure working, you can have multiple SKUs in the spreadsheet template file.
Doing this procedure does require some skills in spreadsheets and it helps if you have done previous updates to your Amazon items using spreadsheet uploads. As with anything new, you may not be able to do this on the first try. If you put some effort into this, you may find it beneficial in the end by making your workflow more efficient when changing customization for many items at a time. The method that Amazon came up with is a bad design and vastly over complicated. I tried to explain it as best as I could and it should get you started in learning this new skill.
Note: So after I wrote these step by step instructions 1-8 (part 1) just below and additionally (part 2) 1-10 slightly lower in the article, Amazon emailed me this link on their step by step instructions which you can view: (See Amazon's step by step instructions here on enabling bulk customizations).
Step by step guide to create and upload customizations in bulk to multiple items at once.
1. First visit one of your items that already have customizations in Managed Inventory and the Edit drop-down menu (Exhibit A), select 'Add/edit customization information'. This will display the customization screen (Exhibit B) sample screen shown above.2. On the customization screen (Exhibit B) click on the up arrow next to the word Publish in the lower right corner.
3. Then click on the option to 'Generate a Template' also shown in Exhibit B above.
4. You can now fill in the template name as shown on the box insert (Exhibit B) called 'Generate a template' and click on the Save button.
5. Once you fill in a new template name and save it, this will bring you to the screen shown below (Exhibit D). This screen will show the line of the template you just created. This sheet may also show other templates you created previously.
6. You can now use the download the feed file option (Exhibit D) by selecting the little south-facing arrow, of one of the templates, to save your customization template to your personal computer.
7. You can now modify this feed file (Exhibit E) in your spreadsheet program on your personal computer as needed. If you copy the first spreadsheet line down and change the first column to another SKU number, you will add or update this customization information on additional SKUs listed on the spreadsheet feed file (Exhibit G).
8. The further step-by-step process (Exhibit F) to upload the bulk customization spreadsheet template file to update your item listings is listed later in the article.
Note: Once you save your customization template and you want to go back in and call it up again at a later time to select it, I found no way to get to this screen without trying to save another template first. You should be able to get into this screen of saved templates without faking a template save to access this page.
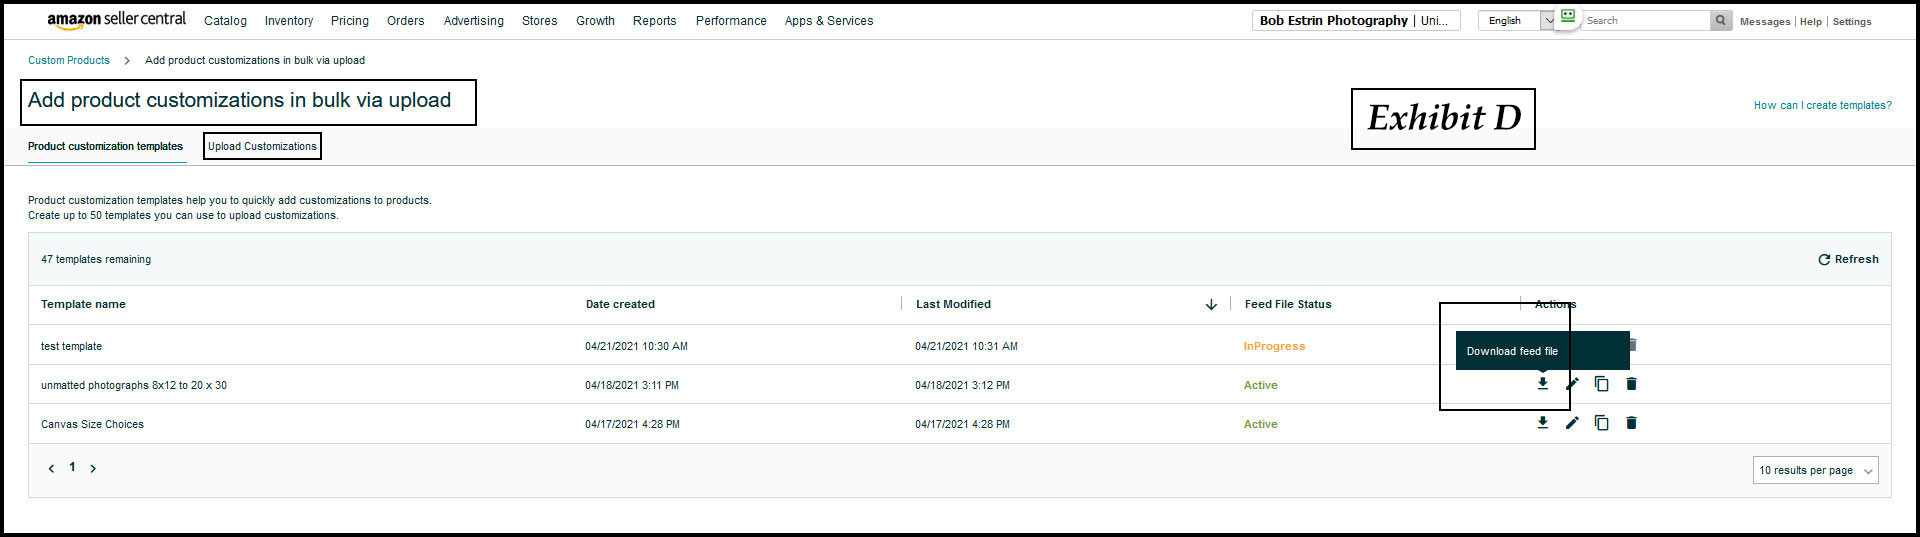
Sample customization bulk update spreadsheet template.
The seller would add a new spreadsheet line for every SKU item you want to update or add with a customization. This example (Exhibit E) has only one SKU line entered but you may add many more SKU lines. You can upload this spreadsheet using the "Upload Customizations" link shown on the above screen. Yes, this is more complicated than it should be but I did not design it.
When you first download the feed file from a specific saved customization template, you will get the spreadsheet that may look similar to the one below which contains the one SKU number and the contents of all the customization information for that SKU saved in a spreadsheet line format.
The spreadsheet column information will vary by what type of customization you have selected for an item. Your customization spreadsheet may look different from the one example shown here. The new 2023 customizations choices will be different with unique field information.

Update: 12/2023 You will see that now two new fields have been added to customization layout shown below. The two fields are 'Label' and 'Preview image'. These are now required fields when entering item customizations.
This makes this bulk customization method much more difficult since the label and preview image may be different for each SKU.

You can see in this sample below the relationship between the customization spreadsheet template (Top part of Exhibit G) and an actual item customization edit screen (Bottom part of Exhibit G) that was used to create the first spreadsheet line (Row 4). My line drawings try to show where the customization information is being saved to certain areas of the customization spreadsheet.
I determined in this sample that I wanted to add or change the SKUs to five different SKUs and I copied the first line down and just changed the first column which is the SKU number. After this spreadsheet is uploaded, all five items of the SKUs listed will have the same customizations.
This could be handy if you have 50 items with the same customizations that need to have one of the customizations change its price. If you knew which SKU number items were affected, you could update them all at once. If you only had a few SKUs that needed to be changed, then doing it one at a time manually would be faster.
Caution: If you copy down your spreadsheet line to additional lines, becarefull that your 'Option price' copied down the same number in the following lines. Sometimes it copies down adding 1 to each number in the following lines.
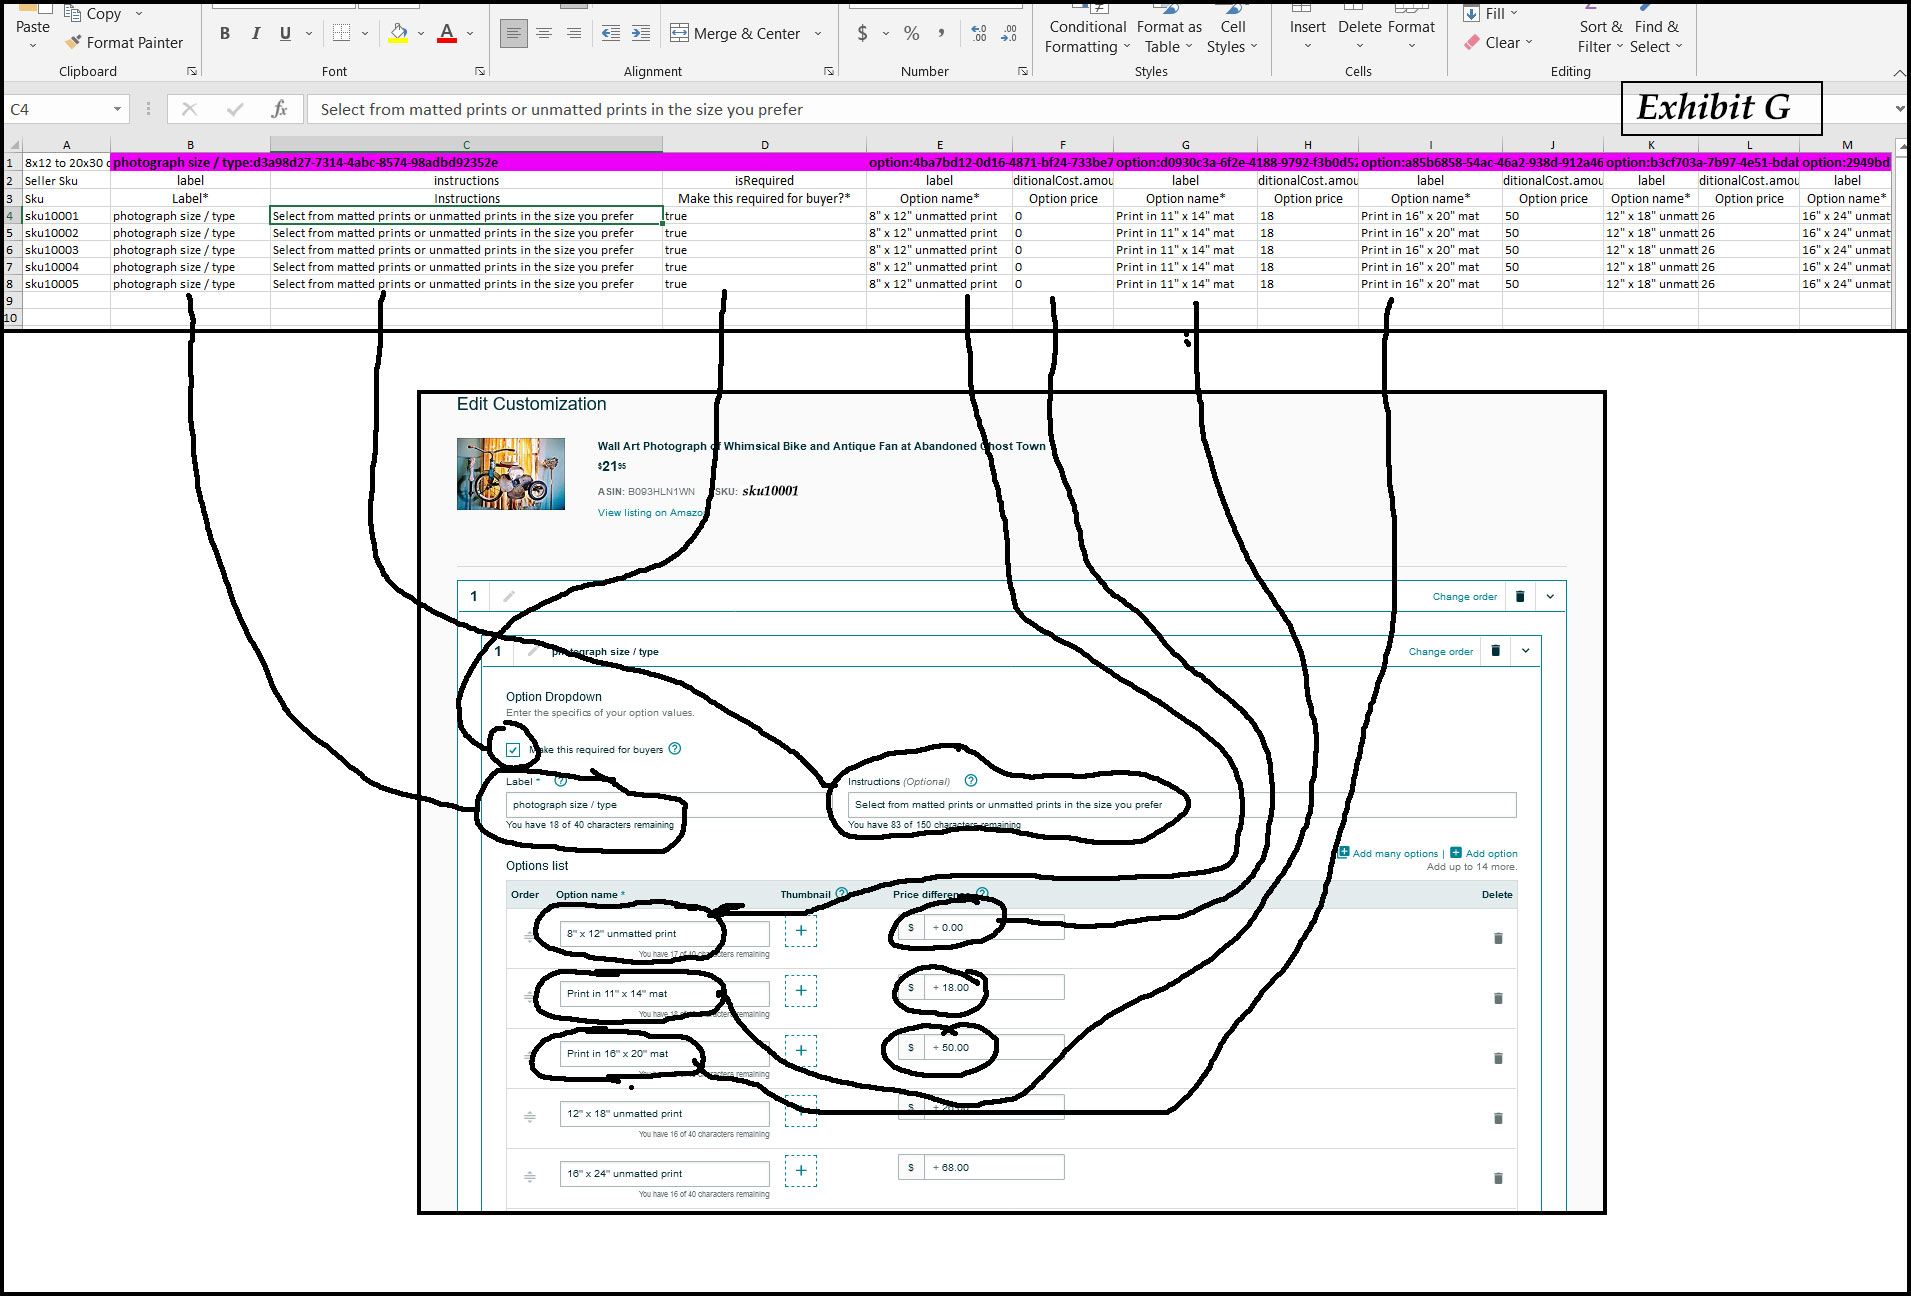
Steps to upload the bulk customization information: (See Exhibit F)
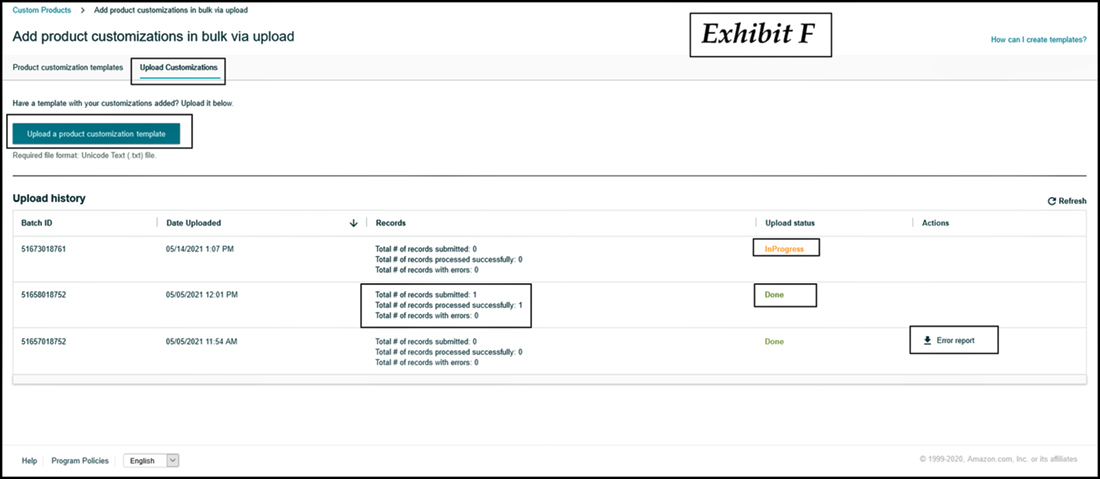 1. Create or adjust an existing update customization spreadsheet as explained above and save it as a regular Spreadsheet file.
2. Also save the same update customization spreadsheet file under a different name in a Unicode text file format.
3. Select the "Upload a Product Customization template" button.
4. Enter the spreadsheet name you completed in the Unicode text file format. Note: Not shown on screen sample.
5. Select the "Submit Customizations" button. Note: Not shown on screen sample.
6. At first the Upload status for your upload will say "InQueue", then "InProgress". This may take a while and you can reload the page by selecting the small "Refresh" label on the right side of the screen to see the current upload status.
7. Wait for the Upload status to say "Done".
8. Look for any upload error messages and adjust the spreadsheet as needed by going back to step 1. If you do have any errors the screen will display "Error Report" with a downward arrow. Select this arrow and then call up the error report downloaded to your computer to manually review.
9. If you have no errors such as the screen says "Total # of records with errors: 0" and records processed successfully is what you expect, then continue.
10. When completed with no errors on the customization upload, go into some sample item listings to verify that the customizations for the SKU numbers listed in the spreadsheet had changed as planned.
Sample Customization Bulk Update Processing Page
In this sample below, I uploaded a change to the customization of one SKU and did not receive any error messages. I recommend going into a small sample selection of the items you changed to check to verify that the customization changed as requested. If the upload results result in an error, you would need to determine what caused the error and correct it before trying the upload again.
In the sample screen shown above, you can see the results of another update. One shows the update in progress, one shows the updated completed with no errors and one shows an update that had errors and shows a download error report link.
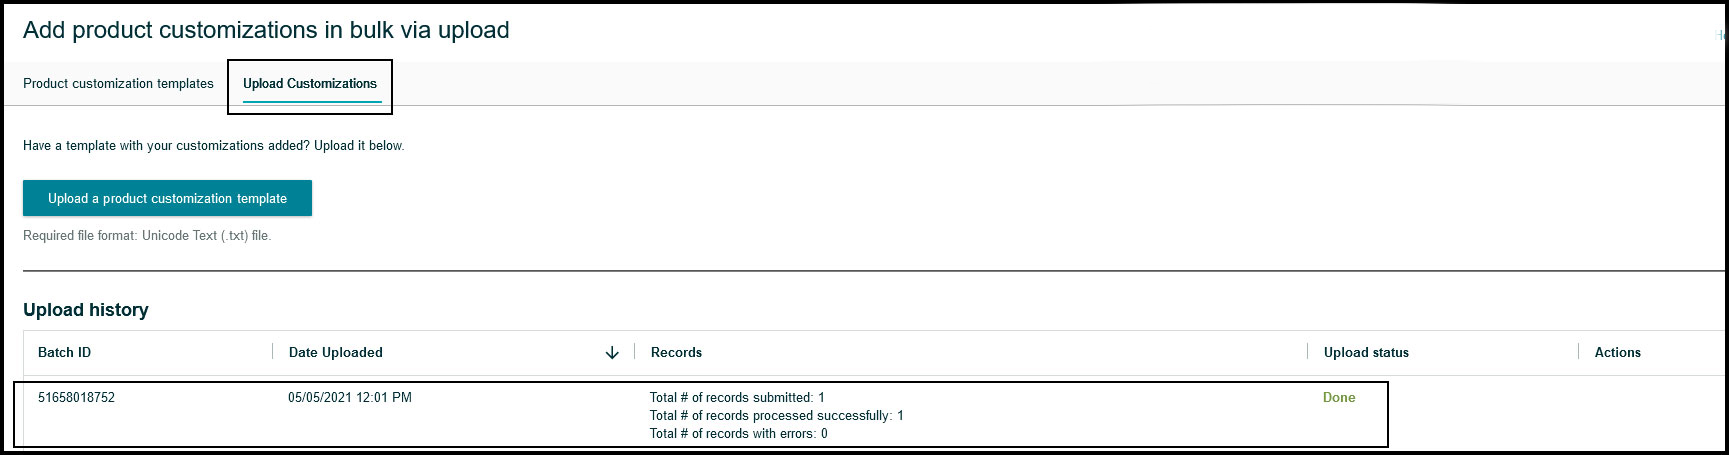
------------------------------------------------
Note: For those who are doing Parent / Child Variation listings: I found this information on Amazon which relates to updating the Parent listing with the customizations even if you already are individually updating the Child item with the customizations. This could be a problem if not all of the Child items (only some of them) under the Parent listing have customizations since placing customizations on the Parent listing may copy this down to all the Children items even those without customizations:
"Should I provide the information for parent SKUs, child SKUs, or both?
Both. Provide customization information for your parent SKU as if it were one of the child SKUs. However, this configuration will not be represented to customers.
Note: Product variations will first need to be built using a normal product listing feed. The Custom enablement feed does not support the creation of variation families.
In the customizable enablement tool, what is the difference between editing the parent ASIN and editing the child ASIN?
If you edit the parent ASIN using the customization enablement tool, your edits will copy through to all of your child ASINs.
If you edit the child ASIN, your edits will only occur on the specific child ASIN selected.
If you are configuring color variations, we recommend you edit each child so your preview image aligns to the correct color of the product."
------------------------------------------------
How to delete customizations from an item listing?
Go to the Edit Customization screen for the item. On the bottom of the screen you have the clickable link 'Remove customization information'. Selecting this link will delete the customizations for this item listing.------------------------------------------------
New Bullet Point entry field that displays in the product description:
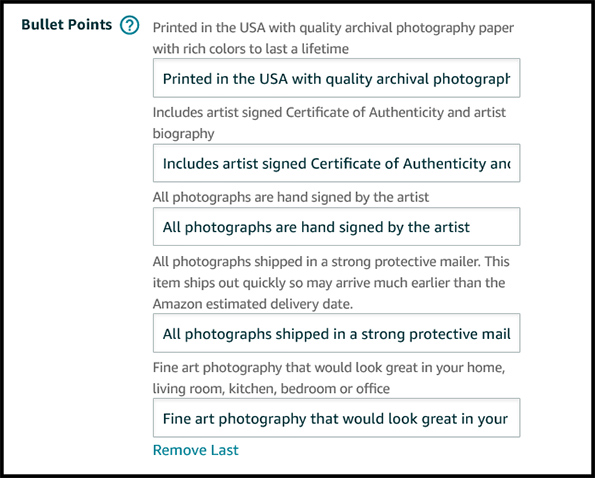 Sellers can now enter up to five new lines that show up to the customer in the item description area with Bullet Points placed in front of them. These Bullet Point lines show up at the end of the text entered into the description field. The information in these up to five lines can get indexed by Amazon to be used in SEO searching by customers to find your items. There is an advantage to using these new lines and a seller may choose to take some or all of their current information in their product description and fill in these five lines with that information. For now, the use of the 'Bullet Point' field is optional on existing older listings. Amazon now requires a bullet point on new item listings. The Bullet Point fields do not have to be limited to one line or sentence. Of course, customers are used to Bullet Point type fields to be short, precise, and informative.
 If you update the description and the bullet point fields at the same time, Amazon seems to update certain item fields at different times. The bullet points may take longer to show to the customer while other information entered at the same time showed up already to the customer. Give your bullet points 24 hours to display to the customer but may display much sooner.
From Amazon on bullet points:
Bullet Points accompany the product description and often catch the customer's eye first when looking for punctual, key product features, we recommend having 4-5 bullet points on each listing that following these practices:
. Order bullets by importance
. Keep your bullets clear and concise; avoiding run-on sentences stuffed with keywords or content that belongs elsewhere
. Bullets should be quick facts about your product - materials, dimensions, appropriate age ranges, benefits, or even warnings.
. Don't exceed 15 words/500 characters for each bullet point or 1,000 characters total for all bullets
. NO pricing information shipping details, or information about your company
. NO marketing or advertising content
. NO HTML or fancy coding
From what I read, you should not have more than 1000 characters (including spaces) in your bullet point fields combined. It is recommended to have a maximum of 200 to 250 characters including spaces on each bullet point. That is a maximum, and the number of characters can be less per bullet point. You never know if you use more than 250 characters on a bullet point if this may result in the characters no longer being detected by the algorithm meaning Amazon not picking up keywords. I have also read a recommendation that bullet point lines should not be over 80 characters.
Amazon may not accept some information in bullet point lines. To be safe and not risk a product from being suppressed or deactivated, enter information in the bullet point fields that follow the rules of the description field. For example, do not have an entire word capitalized such as OOAK (one of a kind), use HTML or symbols such as the copyright symbol as some examples. I have read that bullet point lines should not include any shipping information, separate multiple phrases with a ; (semi-colon), write all numbers as numerals, spell out measurements such as in grams, feet, or inches, do not use symbols, hyphens, periods or exclamation marks. I read that you should not use the word 'ship'. Also do not enter company-specific remarks as this section is for product features.
If your entered bullet points are not showing up for the customer, you may want to read the bullet point rules above to see if this could be your problem. If may be something or wording that seems file, but Amazon does not like it for some reason and you may need to adjust your bullet points to fix the problem.
At least one bullet point is required for new items or when modifying older items.
Amazon's Product detail page rules in the following link which includes what is allowd in title, description and bullet points: (Product Detail Page Rules) Another Amazon's Product detail page rules in the following link which includes what is allowd in title, description and bullet points: (Product Detail Page Rules) Many customers may not read the description but may read the bullet points due to their shorter and briefer format getting right to the most important product features. If the seller can move some, if not all, of the information from the existing description down to the bullet point format, this could increase the chances the customer may read more about the product. For many of my listings, I moved down the information I could to the bullet points and kept a much shorter description that shows above the bullet points to the customer.
You can structure your bullet points so the most important information for a customer to read is in the first few bullet points. Bullet points should highlight your unique selling points and be geared to answer questions that the customer may have leading to a purchase of the product. Amazon uses bullet points in addition to title and search terms to index for Amazon search. This alone should encourage most if not all listings to include bullet points for the additional keywords to bring more customers to your product pages.
The sample screen prints show the edit entry fields for Bullet Points and also how the same fields would look for the customer in the item description area.
You can find these new entry Bullet Point fields in the 'Description' menu edit page right under the Product Description field. You will initially see one Bullet Point entry field line but can open up a total of five entry field lines. These Bullet Points will show up at the bottom of any other wording you have in your product description and cannot be placed higher. From what I read, the bullet points give you an additional 1000 characters, and those characters are used at Amazon for indexing when the regular product description field is probably not indexed such as Amazon takes keywords from.
If you check some listings on the Amazon Marketplace, many sellers chose to have their entire product description from the Bullet Point lines with no additional product description lines above. Of course, you can fill in the Product Description field and have that information placed above the Bullet Point fields. Update: If a seller is branded and has a A+ brand store for their product ASINs, the description no longer shows to the customer since A+ branding format allows other ways to display this information.
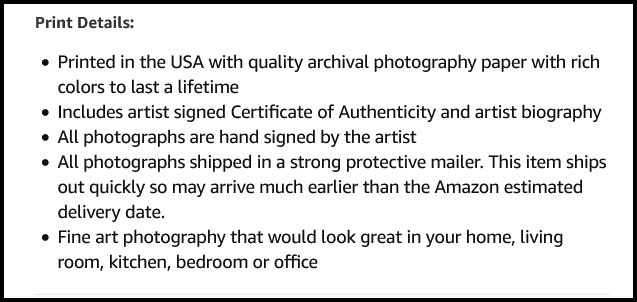 Since the use of HTML to create bullet points in the item description field is no longer allowed, I have removed my existing HTML Bullet Points and converting that information to the five new Bullet Point fields. The Bullet Point fields will automatically place a Bullet Point in front of the information line without the seller needing to add any HTML Bullet Point code. The Bullet Points from this field will not count as HTML Bullet Points.
 Also, my understanding is that the information in this new Bullet Point field will be indexed by Amazon for SEO search benefits and this alone would be enough incentive to make the change.
Amazon states in an 8/27/21 handmade newsletter "Based on a 2018 study of 2,000 US Sellers, nearly 75% of shoppers start their Amazon shopping journey using the search bar. Search Terms and Bullet Points are key catalog attributes that play a critical role in search relevancy and customer experience, which is why they'll become required fields on all new listings beginning September 27, 2021."
Update 8/27/21: Amazon announces that at least one Bullet Points is required on all new or edited listings beginning September 27, 2021.
If sellers start updating item listings with bullet points on many listings, you may want to test on a few listings first to see if your listings get checked for white background on the first image during the bullet point edit save. This could cause other issues if the first image does not have a white background yet and Amazon checks for this because you requested an update on an item listing. It would also be a good idea to test a few items first if you were planning on doing a massive amount of bullet point item changes using the spreadsheet bulk update option. It would not hurt to do a small test and wait a few days to see if your items show up as suppressed due to white background before doing 100 + listing changes. Just a thought.
Amazon now allows easier access to having your handmade items branded. One of the reasons to have items branded is the advantage of setting up your listings with A+ content. I read, A+ content also removes your product description from showing to the customer although the product description still shows up in the product edit screen. This would make your bullet points more important to inform the customer about your product description information. This could be the reason that many items on the marketplace side only use bullet points with no product description.
Because of all of the frequent changes Amazon is forcing on handmade listings, it is more important or at least can be an advantage to know about the Amazon category listing report which displays as a few of its fields the bullet points, as shown below. The category listing report can be used to do item information bulk updates using this report spreadsheet. Article link on doing Amazon Handmade bulk updates and requesting the category listing report is listed at end of this article.
Below is the spreadsheet section of the category listing report that shows the five bullet point fields.

Below is a sample of a bulk update spreadsheet I used to add bullet points to all my listings. You can learn more about this method of doing many updates to your existing listings in the following article:
Handmade at Amazon - Powerful Bulk editing step by step instructions for your Handmade items
For those who wish to pick up this new skill, you can learn it by using it to add/update your bullet points and later use the same skill to update many of your other fields when updates are needed to be done in large numbers.
Amazon wanting the sellers to remove the use of HTML in their item listings:
Amazon has asked Handmade sellers to remove all HTML code with the exception of line breaks. I believe Amazon will not remove the < BR > line feed HTML ability in the future for the description field. The following link page currently says "Don't use HTML, JavaScript, or other types of code in your product detail pages. As a special case, you can use line breaks < /br> in the description." More info in the Product description rules at (Click link here to see Amazon document) .I am also personally leaving in my "< b>Bold< /b>" HTML code. If Amazon chooses to supress my item listings for this or automatically strips out some HTML from our listings, then I will remove it then.
I am also leaving most of my < BR > line feed HTML code as it is even if Amazon says it should be < /BR >. I have converted some of my listings to < /B> and found this HTML code produces the same line feed. Sellers may run into a problem in which seller support may not want to help you on a item description listing problem if you are using the format of < BR > versus < /BR > since Amazon tells the seller support that it should be < /BR >. If needed, you could change all your < BR > to < /BR > for that listing before calling seller support for that item.
------------------------------------------------
All main images for handmade items must have a white background:
Update: As of 06/30/21 Amazon will require the Handmade main images to have a pure white background to increase deal eligibility and ensure consistency across the Amazon experience and product detail pages. All item main images outside the Handmade category had already had this requirement and Amazon is stating that they would like this consistency in the Handmade category to match the other categories. Updating your MAIN image to a pure white background will increase deal eligibility and ensure consistency across the Amazon experience and product detail pages-RGB color values of 255, 255, 255.The sellers should determine which of their items have main photos that are not currently on a white background and converting the main images to a white background by 06/30/21 or those items could be suppressed. It is recommended to not do this at the last minute due to the time-consuming aspect of this change. One never knows if Amazon is going to start suppressing items if your first image does not have a white background that Amazon considers pure white, but sellers can not take a chance. Amazon may not check the first image unless you change an item or create a new item.
A seller may have many items that do not currently have a white background on the first image, but Amazon has not suppressed any or has only suppressed a few at this time. It is adviced to make all your first images white background complient to avoid future suppressions. Also, my understanding is that Amazon may check for white balance complience when you add or change existing listings and then suppress your items. It is better to make all your items white balance complient so you do not run into supression problems when you change old listings in the future.
You can still feature your images with a non-white background or lifestyle images as secondary images the customer will see on your detail page. You can read more about this subject on the Amazon seller forum in the handmade section at https://sellercentral.amazon.com/forums/t/new-main-image-requirement/661132. One thing to consider is if you have a white area around almost all of the photo and then have a small area of your item going to the edge such as a jewelry chain, this may cause Amazon to feel your background is not white.
One way to get pure white backgrounds as in RGB 255 255 255 is to do it manually if you know how to use one of the software products that look for your item area and place white on the background for you or use one of the many small or one-person companies that will give you a white background for a price per photo. The software products and hiring specialists in this area are both reasonably priced. The white background now needs to be done by 6/30/2021. You can do the white background for the main first photo in advance and place it as one of your alternate photos. Then in June 2021, you can move the white background image to your main image area. I believe there is an Amazon app on the iPhone that can check your images to see if they pass the white background test. I have been told that this main image white background check is not available on a personal computer or other phones.
White background software: 1) https://www.remove.bg/ (Link here) or 2) https://www.picmonkey.com (Link here)
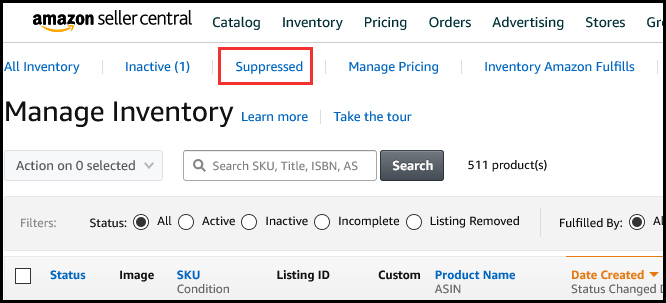 One area that may be tricky on the main photos is the shadow. I feel that a smaller shadow under the images with some white space surrounding the shadow is probably Amazon compliant. Having a shadow go into the edge of the photo may cause some compliant issues and Amazon may take the shadow as a non white area. I would keep the edges white if you can. Also, you may run into an issue if a portion of the object extends to the edge of the image. For example if you have a piece of jewelry that goes out of focus off the edge of the photo, Amazon may consider the image to not have a white background. Sellers may have images without a white edge and feel that they are complient with a white background, but those images may not be complient and may get suppressed or create an error message when that item is changed during an edit on any field.
One way you may be able to fix a white background issue when your background is already white but your product goes to the edge of the first photo is to add a small white border around your image. You can upload your new image with the white border to see if that fixes your listing suspension. You are allowed to have your item take up the entire first photo but if the seller feels that this is causing the suppression, they can try adding a white border to the image.
My understanding is that the main photo does not have to have a white background or at least a larger noticeable white background if you can crop the image to only display the actual item itself.
You can see if you have any current suppressed listings if you review your Manage Inventory screen page, shown above, and look for the menu option 'Suppressed'. If you do not see the menu option suppressed, then you do not have any suppressed items. It might be a good idea to do a regular check every month to see if you have any suppressed listings since you may not notice it unless a regular seller stops selling. See the Managed Inventory screen showing the menu option 'Suppressed'. There is also a report called "Listing quality and suppressed listing report" under the Inventory Reports menu option.
You also may want to check to see if you have any items 'search suppressed' in the Managed Inventory screen as shown below.

Having words on the first photo causing suspension that may look like a white background issue but is really caused by words:
The seller might be notified that their listing has been suppressed and given the reason from the computer or an Amazon service rep that the listing has been suppressed due to not having a white background. The issue is that the reason for the suppression may be something else such as having words on your first images. Even if the wording is part of the actual product that comes to the customer, the item may be suppressed by this even if this is allowed. Some examples may be a sign that has words on it, artwork that has a signature on it or a stamp that has the words on it that display when the stamp is used. Having words on your items, when the words are part of the product that the customer receives, is allowed but still might cause a suppression of the item.I went through this 4 times with about 15 different listings all with my artist signature on my art product. Amazon computer algorithm does not know an artist signature from non-needed words on an item that are not part of the actual item. Amazon may say that this is a white background issue but is most likely the wording on the product photo that is triggering the suspension.
You can open up a case with Amazon and say in an email request "Here are the ASINs that have been suppressed xxx, xxx, xxx, xxx. They are most likely suppressed due to the wording that shows up on the first product photos. The words are actually on my product that the customer receives and are part of the product. I request that you un-suppress my listed ASINs as they are compliant with your guidelines."
I have done this many times and a few weeks later, they are no longer suppressed.
------------------------------------------------
Video for Handmade now available to display to customer on both mobile phones and desktop:
I am not sure if you need to be branded or have a handmade brand waiver in the handmade category to have videos for your handmade items. Initially the handmade seller did not have to be branded to add or show videos, but that may have changed.
See if this link goes to your video upload page at (Click link here to see Amazon document) .
You can see in the image below how the video selection option is shown to the customer on the customer item display page. The other images show the page to Manage and Edit existing videos. You can bring up this Manage Videos screen shown below by going to Seller Central and then under the main menu option Catalog select the sub menu 'Upload and Manage Videos'.
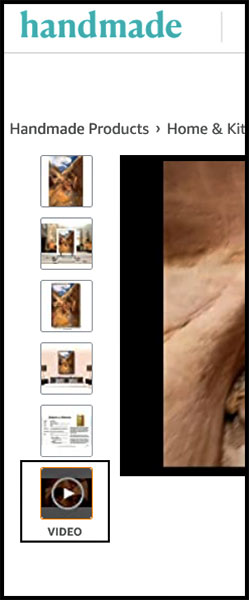

More information in an Amazon link for adding videos to your item listings at (Click link here to see Amazon document) .
Amazon states "Note: If your video has been in Live status for two days but has not shown up on the detail page for your products yet, check the number of images present for your product. If there are more than six images, remove some to prioritize your video.".
Amazon may have to review and approve your video before it is shown to the customer, so it may not show right after the video upload.
I noticed that on my desktop I have 9 photos for an item. On the Amazon phone app, it only shows the first 7 photos for the same item. Verify if you add a video to an item that already has 7 photos, the video in photo space 8 or 9 may not show up on a mobile phone app.
------------------------------------------------
New Brand Name Field for Handmade and Brand Registry:
Note: Update: Some of this information below was written at the introduction of the Brand Waiver when little information was available. Some information below relating to branding may be outdated.
------------ B R A N D - S T O R E - F R O N T - L I N K S -------------------------
Getting a seller's store branded will take some item with the application and setting up your store. Many new features will be available to the seller as well as changes in the item description format that your customer sees on your items. As with anything new, their will be a learning curve. Some of the links below may be helpful in getting your branded store started.
Handmade branding waiver application at (Click the link here for the Brand Registry Waiver application).
My understanding is if the handmade seller applies for branding using the regular marketplace branding application, they have to have a company-registered trademark. With the handmade waiver brand application with the link listed above, you do not have to have a company-registered trademark. If the seller already has their company trademarked, they may be better off requesting branding the regular way, not using the Handmade waiver form since getting branded with a trademark adds to your IP protection.
What is A+ branding and its advantages of advanced product display to the customer? See a great article on A+ branding information at the following link (Click the link here for examples of A+ branding product display).
A+ content manager quick guide (Click the link here for examples of A+ quick guide).
A+ content for selling partners (Click the link here for examples of A+ contact for selling partners guide).
Video from Jungle Scout on how to create your A+ content store front (Click the link here for creating a store front).
Video from Amazon Seller University on how to create your A+ content store front (Click the link here for creating a store front).
Another Video from Amazon Seller University on how to create your A+ content store front (Click the link here for creating a store front).
Another Video (2022) step by step guide for creating an Amazon store front (Click the link here for creating a store front).
Another Video (2021) What is a Amazon store front (Click the link here for creating a store front).
Handmade branding information is discussed on the Amazon Handmade forums at (Click the link here for the Brand information on the forums).
The brand logo must meet Amazon's policy standards and you can see those standards in section '3.5 Brand logo' in the following Amazon link (Click the link here for the Brand logo information).
You can see some logo examples here (Click the link here for logo examples). If you are having trouble having the logos accepted, you can try making the background transparent and upload the logo as a .png file instead of a .jpg file.
Seller's variations are no longer workings:
The seller's variations are no longer working, it is probably because the child items are now separated from the parent listing. This happens when Amazon changes the item brand names to Generic. When the Parent listing brand name does not match the child item's brand name, then this causes the Parent and child items to be seperated. It may look like it is okay in the Manage Inventory screen, but will show not working for the customer.
To fix this:
1. The seller can delete the parent listing. This will not affect the child items that were previously associated with the Parent listing.
2. Wait a day for the child items to totally separate on Amazon (Since the child items are already separated, you may not have to wait a day).
3. Create the Parent listing again (which will have a different SKU number)
4. Finally, add the still existing child items back to the newly created Parent listing. You will not lose any ranking or comments and the variation will start working again.
5. Just as before, review the wording and fields in the child items for accuracy since the Parent listing over writes many fields on all the child items.
6. It may take 2 days for the item ranking and comments to combine for all the parent listings child items.
To fix this situation, you do not delete the item child listings as some seller reps at Amazon are telling sellers.
------------------------------------------------
Brand name item field is now 'Generic':
Amazon is changing the seller's item brand name fields to 'Generic'. They seem to be doing this for many handmade sellers but not all at once. If you're experiencing error messages, while editing your items, due to your item's brand name now being Generic you may have to call Amazon on this. Amazon took away the option for sellers to change the Brand Name field on their own. You could call Amazon with all your item ASINs that are branded, and still listed as Generic, and have Amazon change your brand name on those items from Generic to your brand name. If Amazon tells you to delete your items and re-enter them, do not do this. If this is a variation issue, see my notes above.
Another issue with no branding your items, when your brand name is 'Generic' then when a customer clicks on your brand name 'Generic' on all your item pages, the customer will be shown item thumbnails of other sellers Generic items and not items from your store as before. This is how Amazon made it worst for sellers and Amazon is basically telling you to get these enhancements, you must apply and get branded even if it is branding using the handmade waiver.
There are probably many advantages in getting your shop branded but the seller must apply and wait for the brand to be approved which could take 6-8 weeks. This comes down to if the seller wants to make another change and if the seller wants to go through a large learning curve for all the new brand related features. The seller would also have to learn how to and invest time setting up a new store front that would be available to them and offer new item description options such as A+ content. In the end, I would think that sellers who are selling in quantity bringing in decent sales would eventually want to take the time to set up a storefront to compete with other stores with a storefront selling simular items.
------------------------------------------------
General Branding Notes:
Once accepted for branding, you will be allowed to have a more friendly URL set up to go to your Amazon handmade branded store. The separate Maker Profile URLs will be changed to a more nonfriendly Maker Profile URL showing an alphanumeric code after 12/31/2021. The maker profile URL (nonfriendly) is different and separate from the branded store-friendly URL available after your store is branded. I read that you actually have to have a branded store set up, not just be accepted to be branded, to receive a store-friendly URL.
Update: I was told that the short store-friendly URL is no longer available when you are branded with a waiver. I believe you have to be fully branded (not waiver branded).
The benefits of being approved for the waiver are that sellers can take advantage of benefits like the ability to create a custom Amazon storefront, including a vanity URL (Amazon Stores) and Enhanced brand content on detail pages (A+ Content), Vine Reviews, Brand Dashboard (the US Only) and Brand Analytics.
When you are approved for branding, you probably will not get any notification of the approval. After 4 - 6 weeks, you can just check once a week to see if your store is brand approved.
-----------------------------------------------------
How do you know when Amazon has accepted your store as branded:
I have heard that Amazon states that they will send you an email when you are accepted and have a brand name, but others have said that they did not get a notification that they were already branded. If it takes 6-8 weeks, you can check yourself every few weeks.This may be a way to check if your shop is branded.
1. On the main Seller Central Menu, select the menu option 'Brand Dashboard'
2. Then select the menu option 'View registered brands'
3. See if you have your company name or brand name under Enrolled Brands.

4. You can check your individual item's brand name field to see that it has your brand name in it and is not blank or generic. This may tell you which items are branded. It could be some or all.
5. You can select the brand menu option 'Brand Health' as shown below. I am not sure if the items that show up on this list are the items that are branded, but they could be.
------------------------------------------------------
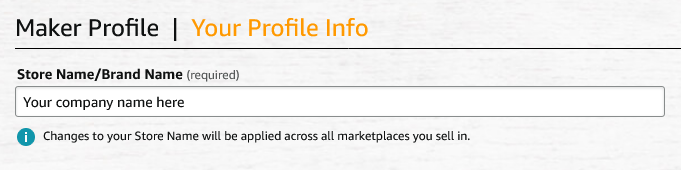
See the new Brand Name field including the 'This product does not have a brand name' check-off box which shows right after the new Bullet Point fields on the item edit screen:
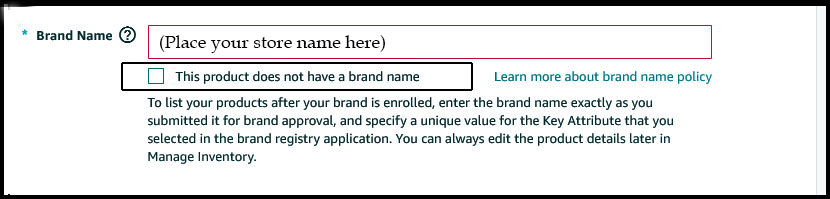
See the new Brand Name field which shows right after the new Bullet Point fields on the item edit screen:
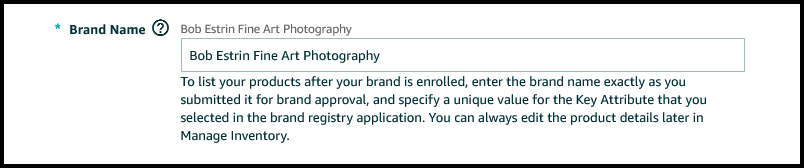
See the new Brand Name field on the item order display screen for the customer:
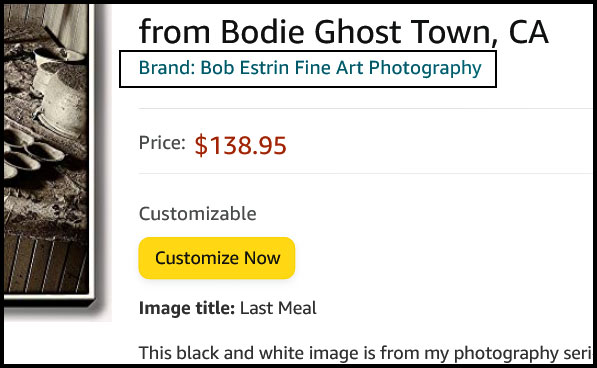
In Seller Central, there are numerous menu options related to Brand screens with the sample Brand Dashboard shown below:
If you are not sure if you have a brand setup for your handmade items, you could check the brand screen options for more information.
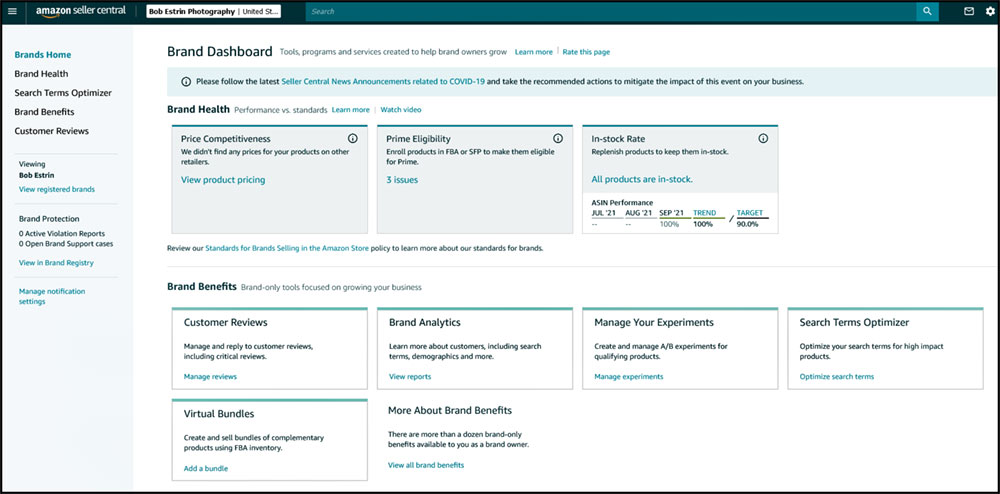
You can tell if you have your brand approved by reviewing the Brand Catalog Manager screen for products:
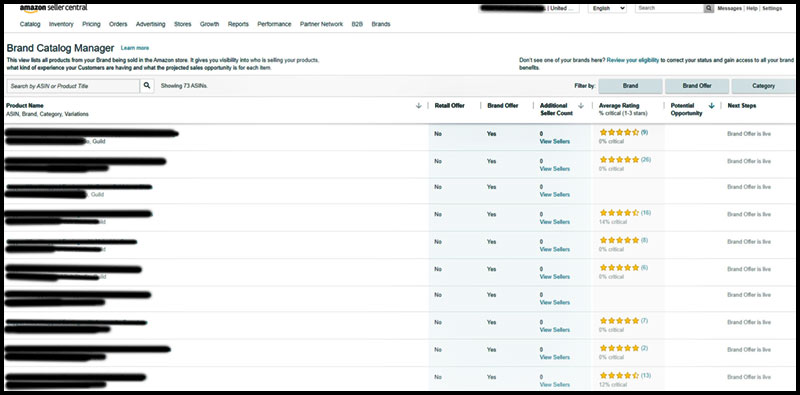
------------------------------------------------
One of the reasons to have items branded is the advantage of setting up your listings with A+ content. I read, A+ content also removes your product description from showing to the customer although the product description still shows up in the product edit screen. Your bullet points are available to hold product description information. This could be the reason that many items on the marketplace side only use bullet points with no product description.
If you run into a problem in which the product description stops showing to the customer but shows up in your product edit screen, your products may be branded and you have access to A+ product information content for those items. The description area of this A+ product area may be blank and replace what the description displays to the customer causing the blank description.
The Brand Customer Reviews (BCR) tool allows US Brand Owners to respond to 1-3-star product reviews with several email templates.
------------------------------------------------
Once accepted for branding, the seller must design a store layout. I read that the first store design needs to be approved by Amazon and updates to the store also need to be approved but happen faster. Many of the links above of articles and videos can assist in the store design. Also on the Brand Benefits Seller Central screen shown below, you have many other instructional references.
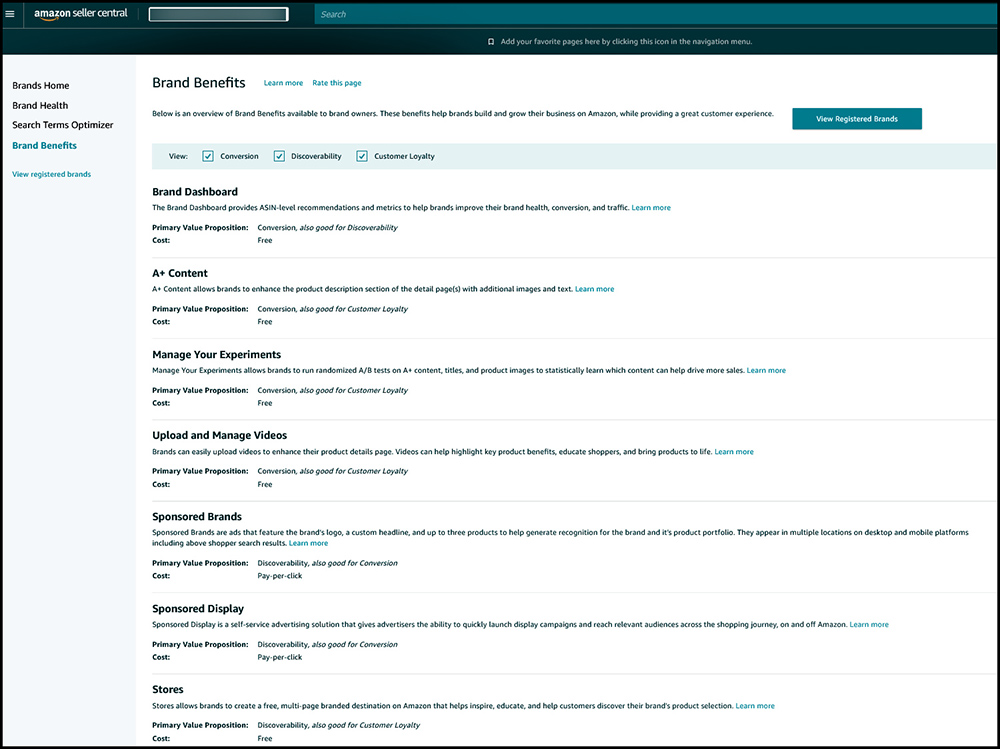
------------------------------------------------
It was asked on the Amazon Handmade forum "Please tell us what happens to our products/account if we don't pursue this waiver. I'm fine not having the benefits as long as I'm not penalized in some way."
Amazon forum reps stated "No, it's not going to hurt your search results, suppress or penalize you in any way. This is a way to take advantage of more available benefits for Handmade Sellers and can increase your sales and visibility to customers." ------------------------------------------------
The following is what I read on the Amazon Handmade forum regarding Brand Registry:
Brand Registry is a program that enables sellers to create A+ Content, Amazon Vine, Amazon Stores, Sponsored Brands ad campaigns, and many other features. The Handmade team is now working with Handmade sellers to help enroll them into the Brand Registry program.
In order to be eligible, you must meet the following criteria:
1) be an active Handmade seller with items listed on Amazon
2) have an active store on another marketplace (ex. Etsy, eBay, Shopify, your own website, etc)
3) have images on your Amazon product pages that clearly display any branding you use on your products
Branding can be a logo on the product itself, or on the packaging that you use to ship the product. Assuming you meet those criteria, once you have filled out the info below, the Handmade team will submit your account for enrollment into Brand Registry and will notify you once enrollment is complete (typically takes 4-6 weeks).
Question 1: What is your seller name? This is the name your brand will be registered under.
Question 2: Which Amazon marketplaces do you currently sell Handmade products in?
Question 3: Please share three examples of active ASINs (e.g. B01MRZSEEQ) that you are currently selling AND that have product page images that clearly display your branding. Branding must be a logo or name printing on the product itself, or on the packaging (not a watermark, or digitally superimposed). See examples of photos showing branding
Please share a link to your storefront on another platform (ex. Etsy, eBay, etc.) or your own website. The Brand Registry team will use this to verify that you have branded products.
Here is a 2021 link that explains in detail about having and the advantages of having a brand registry for your store on the Amazon marketplace. This information may not directly apply to the handmade brand registry. (Click link here for brand information).
------------------------------------------------
From the Amazon forums (11/21) it was said by a seller "A reminder for those just now getting approved, there is a lag before you can setup a store. Not sure how long, but it was weeks+ for me before products showed up and I was actually able to do the store setup." From what I am reading at this time, setting up for branding using the handmade waiver does not always go smoothly, and even after approval, the seller may have to wait for a while for Amazon to adjust things on their end before a seller can set up their branded store. Sellers are stating it can take 3-4 weeks to be brand-approved but times may vary depending on how many applications Amazon is reviewing at that time.
------------------------------------------------10/20/21 From the Amazon Forum reps: Handmade x Brand Registry FAQs
WAIVER PROGRAM QUESTIONS
Q. What is the difference between Brand Registry and the Brand Registry waiver that is being offered to Handmade sellers?
A: The Brand Registry program's main benefit is Intellectual Property (IP) protection for registered brands. In addition, they offer several other benefits to brand-registered sellers.
The Brand Registry waiver does NOT include IP protection but does grant access to some of the other benefits offered to brand-registered sellers.
To submit a Brand Registry waiver, answer these 4 easy questions:
Note: Added this link (Click link here for information on submitting for a Brand Registry waiver).
NOTE: Brand Registry waivers take up to 2-4 weeks for processing.
Q: What benefits do I have access to if I have been approved for the waiver?
Sellers that have received the waiver can take advantage of benefits like the ability to create a custom Amazon storefront, including a vanity URL (Amazon Stores) and Enhanced brand content on detail pages (A+ Content), Vine Reviews, Brand Dashboard (US Only), Brand Analytics.
Q. Do I need to be trademark registered before applying for the brand registry waiver?
A. No! The Handmade waiver process does not require a trademark; however, we do require:
Sellers must be active Handmade sellers with items listed on Amazon
Have an active online store presence on another site; e.g. - Etsy, eBay, Shopify, your own website with a shopping cart function.
Have images on your Amazon product pages that clearly display any branding your use on your products
Branding can be a logo on the product itself, or on the packaging, you use to ship the product and could include branded tape, stickers, cards, etc. These images are only needed on three different ASINs to qualify.
Q. What if I don't have branding in my packaging?
A. This is a one-time validation check to get the waiver, so you need to provide evidence of (3) ASINs with your logo / brand name somewhere in that picture (can be a business card photo take next to your product). Once you are approved for the BR program, you can remove those product photos as this is just to get you through the waiver process. In this example, the seller uses a sticker on the product but if you don't use stickers, you can also put your business card next to the product and use that photo for this process.
Q. Regarding the waiver, I don't have "branded" pictures in my ASINs nor on Etsy or my own site. I do have a "branded" sticker that I apply to things I make as well as "branded" tape that I use to seal all boxes I ship. These all have JoeBcrafts (my "brand") prominently displayed but just not in listing photos. I don't want to submit the waiver and have it rejected because I don't have enough branding "visible" to qualify. I assume that I should modify some listings to contain pictures of those things before submitting the waiver?
A. Correct. All we need is three ASINs with pictures of branding - branded tape or a sticker would work.
Q. Do we receive any confirmation or feedback that Handmade or Brand Registry received our case after we fill the questionnaire?
A. We do not send a confirmation of receipt for the survey, but will send an email (to the email address specified by the Seller in the survey) within approx. 4-6 weeks once your application has been approved (or will reach out before then if additional info is needed from you).
Q. If I don't hear back for over a month, should I apply again or do I receive some sort of communication that I wasn't approved? See above
Q. How are some sellers getting access to Brand Registry benefits without having applied for either the Brand Registry program or the Handmade waiver? I am one of those sellers who has not officially in either way registered my account.
A. The Handmade team has been executing an automated process to proactively grant the waiver to sellers who meet certain criteria (a limited set of sellers). If you already have access to certain Brand Registry benefits and have not filled out the survey or gone through the formal registration process, you are one of those sellers.
Q. There seem to be gaps in what is active to each seller: for example wadeorcas (another non-officially registered) has been able to create a Store in addition to A+ content. Currently I have been able to create A+ content but not a store.
A. Stores and A+ content should be available for all waiver sellers. If you are unable to create a Store, please go to Amazon Advertising Contact Us page in the Advertising Console Support Center for additional assistance.
Q. I'm one of those sellers who doesn't have "Brand" tab on my seller central to access any of the Brand features, and would like to know why.
A. If you submit a waiver request via the survey, once approved, the Brands tab will display in your Seller Central account with access to Brand Registry features.
MAKER PROFILE - BRAND QUESTIONS
Q. When will our current custom URLs stop working?
A. The custom, friendly URLs will be eliminated on 12/31/2021.
Amazon does offer the use of Stores which allows you to create your own branded URL and gives you an immersive place to introduce audiences to your story, mission, and products.
Here's an example of an Amazon Store: https://www.amazon.com/lotusstonejewelry. Stores are available for sellers enrolled in Amazon Brand Registry, which is a program Amazon Handmade Sellers can qualify for free.
To submit a Brand Registry waiver, answer these 4 easy questions: Note: Added this link (Click link here for information on submitting for a Brand Registry waiver).
Other questions answered by handmade reps on Amazon forums: Q. Amazon Handmade had in-house brand registry (without USPTO trade mark; well before this trade mark requirement started) for Handmade sellers, in the beginning - 2015-2018, I think. I had applied and got the Approval at that time. Why isn't Amazon honoring that now ? Why should I apply again, even though my Amazon Brand Registry(in-house) was approved already ?
A. If you are already Brand Registered, there is no need to for you to apply again. Any seller who enrolled in Brand Registry in the past is still enrolled.
Q. Regarding image with logo requirement :- should this be the main/first image or can it be non-first image ? (if I put brand logo on first image, Amazon bot will/may reject my add/update process
A. It does not have to be the first image - any image is fine.
Q. If Handmade sellers choose not to apply to the Brand Registry waiver, will Amazon start allowing other sellers to piggy back on our listings?
A. No.
------------------------------------------------
11/18/21 From the Amazon Forum reps:
Hello Makers,
Thank you for giving us visibility of the inconveniences to create a Brand Store after the Brand Registry waiver was approved.
The Business Team is working together with Brand Registry to figure out how Handmade waiver sellers can be supported by them.
In the meantime, we kindly ask you to send an email to the address handmade-account-support@amazon.com to report that you are having issues creating a Brand Store. Please make sure to provide your Name and Seller ID.
Thank you for your patience while we work on this issue!
Best regards,
Hazel
------------------------------------------------
Handmade Return Policy (Updated 2023):
New Handmade category return policy starting Feb 15, 2023. The new return policy stated meaning is for Handmade items. Written under the handmade return documentation "Products sold by Handmade Makers are subject to the standard A-to-z Guarantee policies for Amazon. The exception to this is items that are purchased with optional customization options, other than size and color. See Customized Products for additional details."
Now, most Handmade items that have customizations, not related to color or size, have a no-return policy and my understanding the customer will not see any return option for the item. Another seller on the Amazon handmade forums stated that the Return option button, shown to the customer, does not show up for handmade items that have customization options.
Since customers can return handmade items when the customizations are size or color related, the customer must contact Amazon. Amazon can then contact the seller with the customer's return request. The seller can then authorize the return. This can cause some problems since both sellers and customers may not be clear on what the new return rules are. Basically, my understanding is that the sellers should authorize a return for handmade items that are customized just related to size or color.
As shown below the wording is different on the item detail page return options showing to the customer for items that have customizations. Basically, the word 'return' is removed as shown on the screen print below. For items that do have customizations it displays "Return Policy: Eligible for Return, Refund or Replacement within 30 days of receipt".
If the handmade item arives damaged or defective (including handmade items that are customized and not normally returnable), the customer may request a refund or replacement.
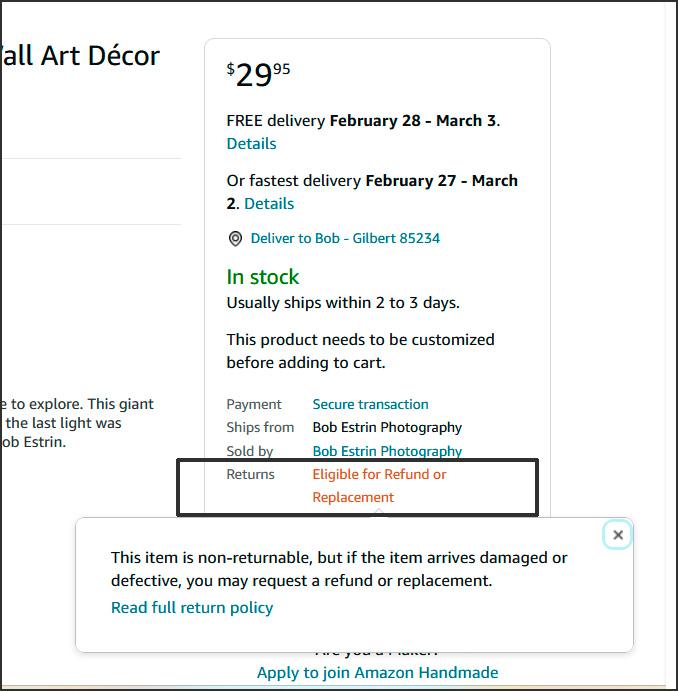
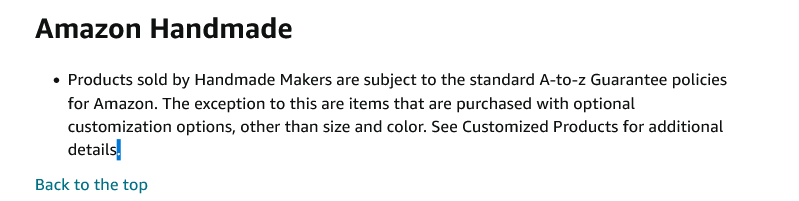
------------------------------------------------
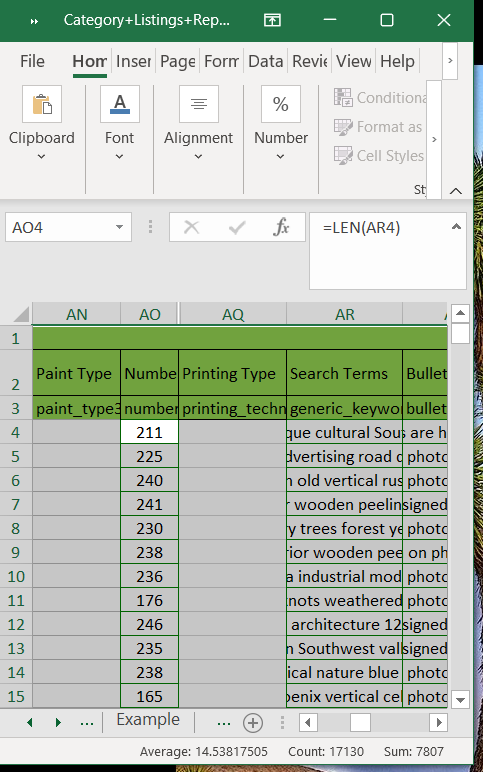
How to do a character length count check on the search term field or any other field to see if too long or too short:
It may be a good idea to do a character count on selected fields to see if they are not too long. This method shows how you can check hundreds of fields in a short time with no actual manual counting needing to be done using a built-in feature in spreadsheets and an existing Amazon report.After reviewing my search term field lengths shown in the example, a seller may also use this count option to determine if your Search Term field lengths are too short. You may want to add additional search term field character so you can use closer to the full character or byte length of 250 characters available to your full advantage.
The Search term (keyword) field must be 250 characters long or shorter. Some people say not over 250 bytes since certain special characters count more than one byte. The Title field must not be over 200 characters, the Style Keywords field must not be over 100 characters and the Item Description field must not be over 1000 characters. Initially, Amazon did not put length checks in these fields so it is possible that some old item listings may have some fields that are too long. If you edit an old listing with a field too long, Amazon will now inform you before you are allowed to save the item listing.
If you do a lot of bulk uploads changing your item fields using a spreadsheet, Amazon may not check for excessive field length and this may cause a problem such as Amazon not using that items search terms without the selling knowing or your item listings being suspended. It may be a good idea to do this check once just to make sure any of these fields are not too long and you were not aware of it. If you have only been adding listings since 2020 and do not do bulk uploads using spreadsheets, your field lengths are probably correct.
If you request from Amazon the category listing report, it will show in a spreadsheet the Search Term fields. This report will also show you the Item Description, Item Title, and Style Keyword fields. You can read how to request this report here Request category listing report.
This example, shows how you can check if you have any over 250 characters in the Search Term field by entering a formula in a spreadsheet cell that is in a number or numeric format. In this example, the formula values, such as in =LEN(AR4), is determined where AR is the column title for the Search Term fields and the number is the line number. You would need to enter the formula for all cells going down. While you enter the formula in the cell (see the upper area sample image that shows the formula =LEN(AR4)), what you see in the cell displayed is the actual formula result (character count). In this example is the character count of the Search Term field.
See the instruction below on how to copy the cell formulas down quickly. After all the formulas are entered down the AO column in this example, you look down the same AO column for any values that are over 250 and manually shorten with your edits in Manage Inventory. You can do the same check for other spreadsheet columns in which you wish to check the character length.
Sample cell formula =LEN(AR4): Entered in the AO column and line 4 which will then display the length of characters in the AR4 (search term field)
=LEN(AR4)
=LEN(AR5)
=LEN(AR6)
.
.
.
Notes:
An easy way to copy/duplicate a field down to the last row such as the sample length formula described above is to place your cursor in the lower right corner until you get a black plus sign. You then drag the plus sign down the rows. In this sample, this results in the top value "Christmas" to be seen all in the other fields as shown below. This is a real-time saver.
Always verified the copied down cells to make sure they copied down correctly.
If you are copying down a cell with numbers in it using the black plus sign, you would want to hold down the shift key while dragging the plus sign down the rows. This keeps the numbers in the copied down row the same. If you do not use the shift key, then your numbers in the cell may change such as adding one to the numbers in the cell.
The same technique can be done to copy down a formula down the cells. In the case of the formula, the line number should automatically change in the formula as you go down the columns such as
=LEN(AR4)
=LEN(AR5)
=LEN(AR6)
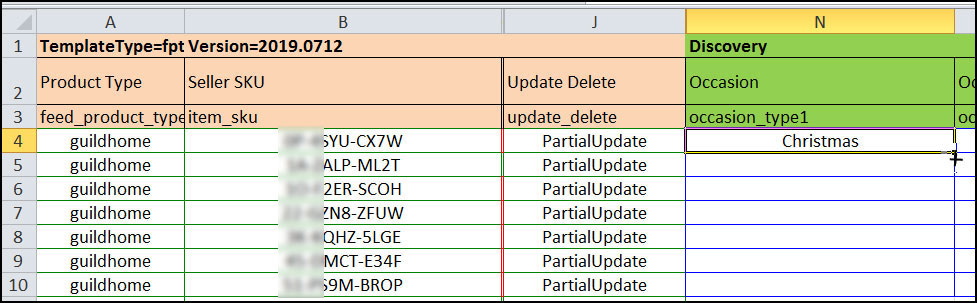
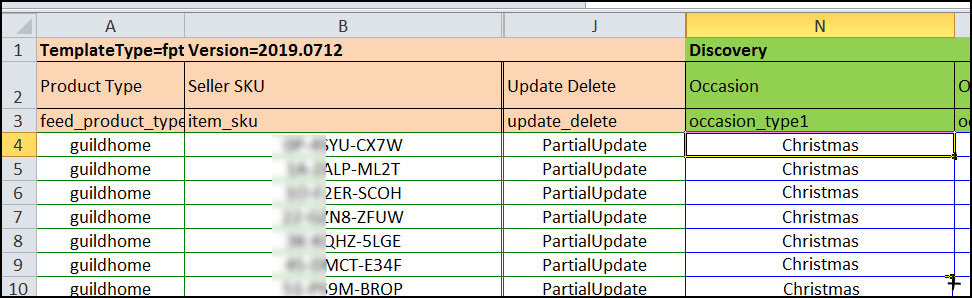
Cancelling your Amazon Account Steps:
If you decided that Amazon is not right for you anymore, you may want to stop selling on Amazon for a variety of reasons. One person in the forums said, "Make it a well thought out business decision, not an emotional one". Perhaps another selling platform may fit your needs better.I recommend that you change your professional account (handmade) to an Individual account. There is no monthly fee for the Individual selling account and you do not have to put up any listings. You end up with an Amazon Individual account that takes no effort or cost on the seller to maintain. This will allow you to open up a professional selling account or any type of selling account in the future if you want. If you just close your professional selling account and do not change your account to an Individual account, Amazon has it set up so you can not sell on Amazon in the future. You may change your mind in 5 or 10 years to sell again on Amazon and downgrading to an Individual account lets you do this.
Some steps you may choose to take. They may be done in different orders:
1. Place your Professional selling account on vacation for 45 days or more if you wish.
2. Remove any PCC marketing you currently have running.
3. Ask Amazon to return all your FBA items they have if you use FBA.
4. After your 45 days on Vacation time, check to see if you have any remaining return requests. This may be longer during the holiday season since customer have until January 31 to request a return for some Christmas time purchases.
If you are paying the monthly professional amount, you can save in fees if you do not wait the 45 days.
5. Verify that you received any money left that Amazon owes you. Amazon may keep some money temporarily for use in customer refunds if needed or to pay any remaining Amazon fees.
6. Optionally request from Amazon and run the category listing report and save or download the report spreadsheet results on your own computer. If you just save this report on Amazon it will not be available to you once you downgrade your Amazon account. The report can be used to help restore your old item information if needed in the future. The information on the report in spreadsheet form can also be used to transfer to another selling platform (not Amazon) without needing to enter much of the information.
7a) Contact Amazon Handmade to leave the Handmade catagory. This will leave you with a Amazon Professional account.
7b) Downgrade your Amazon Professional account to an Individual account or you will be billed for the Professional account since it will no longer be free since you cancelled your Handmade account. You can also just delete your Professional account without downgrading, but you will not be able to sell on Amazon in the future.
8. Delete any item listings remaining on your account. The handmade listings will be removed for you when you close your Handmade account. I am not sure if all your marketplace listings will be removed automatically.
9. After a period of time, you may receive any remaining balance from Amazon.
10. If you had business insurance due to Amazon requirements, you may be able to cancel it if you feel you no longer need it.
11. You would probably want to download the latest year end tax information. You can cancel your professional account (your Handmade account) by going to the Seller Central Services page and you click on "Want to leave Amazon Handmade? ". You can see this page listed below. My understanding is that if you cancel your professional account, all your handmade listings will be removed for you. You may have to delete your non-handmade item listings in the regular Marketplace. If you have FBA items at the warehouse, I would request them all back and receive them before downgrading your Amazon Professional account to an Individual account. You can place your account on Vacation mode until you get your FBA items back. Having your account on Vacation mode will also allow you to handle easier any remaining return requests that may come in after you decide to no longer sell on Amazon.
If you call Amazon to downgrade your Amazon Professional account to an Individual account, make sure you do not say Handmade account instead of Amazon Professional account, or the customer relations rep may not know what you are asking.
Another option instead of canceling your Amazon account is to put your shop on vacation mode instead. You may still have FBA items in the warehouse and you still would have to bring up your Amazon account once a day to check for any customer messages. This may not be what you want if you want to stop selling on Amazon.
The following link describes how Amazon states to from going from a professional selling account and downgrade to an individual account at (Click link here to see Amazon document) .
Another thing I would highly recommend before you leave Amazon is to request the category listing report with instructions at Request category listing report. After you run the report, you must download it to your own computer. This report will have all your item information in it in a spreadsheet format that is now off of Amazon. Once you delete your Amazon Professional account, all this information will be gone. With the report, you can always use it to restore your item information back on Amazon or any other online selling platform such as Etsy. You can use the information in this report to automatically fill in most of your fields such as title, description, price, search terms, and others that can be filled in on a different selling platform without the need to enter the information again.
S
------------------------------------------------
Feel free to enter comments or ask questions. I can adjust or correct the article based on your comments.
www.bobestrin.com
Copyright 2021 Bob Estrin
Articles for artist:
1. Selling your art at an art show2. The artist relationship with the alternative art gallery and artist/gallery contracts
3. The artist reception - A social event or a business opportunity
4. Artist printing photography on canvas
5. DIY project on mounting metal prints to the wall
6. Printing photography on different surfaces and presentations
7. Photography career paths for photography students
Articles for artist selling online at Amazon:
1. Selling your art or artisan craft on Amazon
3. Handmade at Amazon - Powerful Bulk editing step by step instructions for your Handmade items
4. How to prove your items are handmade to Amazon
Articles on Web Security:
1. Internet password hints for a more secure internet experience
2. How artist can protect themselves from internet scam orders
Articles for photographers:
1. Cleaning your digital sensor