Undercover Tent Review:
Another tent that opens like an EZ-Up tent is under the brand name “Undercover”. I use this tent now and find it a good value for the many extra features it offers not on the EZ-UP tent models.
I saw this tent at a local art show and was impressed with the quality and unique CRS Curtain wall hanging system for the side walls. I also wanted a tent with pinch-proof release levels to raise the legs. The zippers on the Undercover tent seemed to be larger and stronger than the smaller zippers I had on my EZ-Up. I feel that the larger zippers will make it easier to zip up the tent.
The roof and also the side walls have an inner silver reflective undercoating which is designed to keep the tent cooler. It should also help me from getting sunburn from the sun passing through the tent. While the inside of the tent has a silver look, the outside of the tent’s top and walls are white so it should pass as a white tent for art shows that require a white tent.
The image below shows the Undercover tent with the polyester sides wrapped around the legs when open for business. The polyester sides seem to be more like flowing fabric where my EZ-Up came with thinner vinyl sides.


The first image shows the Undercover tent with the polyester sides wrapped around the legs when open for business. The polyester sides seem to be more like flowing fabric where my EZ-Up came with thinner vinyl sides.
The second image shows the unique curtain-type wall hanging CRS system for the sides as well as the silver undercoating on the inside of the walls.
You put up the walls by simply attaching clips, located along the top edge of the walls to the hanging wire shown in the second image. This makes putting up the walls fast and easy. The hanging wire is incorporated as part of the tent.
Note: With this type of CRS wall system, it seems that you do not put the 10-foot wall section up on the one 10-foot tent side with the connecting wall zippers being in the corners of the tent as done with other tents. You place the 10-foot wall with five feet being on one side of the corner pole and the other five feet of the wall side on the other side of the corner pole. The actual location of the zippers used to attach two walls together will be in the middle of the tent side as shown in the second video and also in the first picture if you look for the vertical line in the wall’s center.
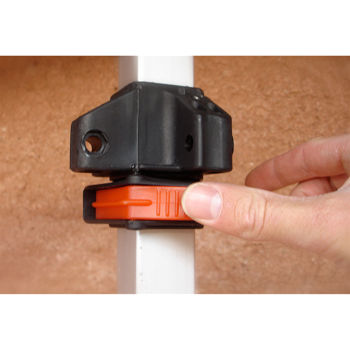
The third image shows the pinch proof method of raising or lowering the top sides.
The fourth image shows the legs having a separate pinch proof method on raising the legs.
The fifth image shows the silver undercoating on the tent top (facing inside).
The fifth image also shows a method of adjusting the top fit which they call “dial a fit peak pole extender” which could come in handy to make the top stiffer if it rains. Inside that shorter pole piece is a spring that pushes up. If you turn the dial, you can tighten the spring tension. Seems clever to me.
The six images show the Undercover UC-2R10CRS tent with all four walls up.
The seventh image shows the Undercover UC-2P10WCRS tent with all four walls up showing tent skirts over the corner legs in this model.
The eighth image shows a vented peak on the top to let out hot air but not let in rain.
These features are what I was looking for on a tent at a reasonable price, that my older EZ-Up did not have. Your own preferences may be different. This tent may not always be in stock on Amazon, but you can search for “tent UC-2R10CRS” and find one at another store.
I purchased the Undercover tent UC-2R10CRS tent and am happy with it. It is available for purchase on Amazon at
(Undercover UC-2R10CRS) .
Undercover Tent: Purchase of the three different models
The first two Undercover tent models listed below have a 300-denier thick roof with the third listing a more expensive professional model having a 600-denier rooftop, as well as higher quality, honeycombed tubing.
Undercover Tent 1:
(Undercover 10×10 with CRS sides model UC-2R10CRS medium quality tent and the tent that I use)
This UC-2R10CRS tent is good for those that do numerous art shows.
This UC-2R10CRS tent is available for purchase at Amazon.
Undercover Tent 2:
(Undercover 10×10 with CRS sides model UC-3R10CRS basic quality tent).
If you do occasional local art shows, this tent may be enough for you. This UC-3R10CRS tent is available for purchase at this Walmart link Undercover Tent 3:

(Undercover 10×10 without sides model UC-2P10WCRS best quality tent)
Note: Do not purchase the non-CRS sides made by Undercover.
Tent can be purchased at ecanopy at Undercover tent.
Sides can be purchased at ecanopy at Undercover CRS sides.
Rain / Wind/ Bad weather:
One thing bad weather such as cold, excessive heat, rain or heavy overcast will do is lower the number of people who visit the art show. This will most likely lead to lower sales. On a multiple-day show, you can only hope that the weather will be nice on the next day.
I check the weather for the art show a few days before to see what the temperature will be, what the estimated wind speed will be, and also what the chance for rain is. I also do this the morning of the show for a more current weather forecast. If I feel it may rain, I bring all 4 sides of my tent and keep them in my vehicle just in case. Artists may want to have an emergency disposable camping poncho or raincoat, also available at sporting goods stores, in your supplies box or bring a regular rain jacket when it looks like rain.

It is really a good idea to always bring tent weights with you to an art show even if you do not think you will need them. This will give you the option to bring them out if needed for one-day shows. I would always recommend using your weights or stakes all the time your tent is up for safety reasons. For multiple-day shows, you need weights or tent stakes. Attaching the walls that you hang art on to your tent, will give you additional weight on windy days.
Here in Arizona, I found that it does not rain that much but the wind is what causes most of the problems and damage. Since most art tents up at an art fair are only water-resistant and not waterproof, heavy rain during the show or overnight can cause much damage since water can pool up in the lower corners of your tent resulting in damage to your product or even a crushed tent.
I have seen many artists use free-standing easels and I have used them myself at times. From my experience, they will eventually lead to damage to your art from wind and I no longer recommend them for outdoor use. Flat art tends to pick up the wind like a sail and fly off. If you do use an easel, then I would use a string or zip ties to more securely attach the art to the back of the easel. Another option is to put a weight such as a sandbag at the base of the easel to give it more weight.
While I have weights, when I know I will be setting my tent up on grass or dirt, I usually just bring four long tent stakes and a hammer. I buy these 10″ metal tent stakes at Walmart or at Amazon and they fit through the holes at the base of my tent legs. The tent stakes do not take much room so I always have them with me even if I decide not to use them.
Tent stakes, Cable Zip Ties, and a few different lengths Bungee Cords:
Sometimes you have items such as trees or a bench next to your tent that you can anchor onto if necessary. I use white cable zip ties all the time to anchor the sides of my walls or my weights to the tent’s side polls. I prefer the 10″ size which is not too short or long. If I need a longer length, I use two zip ties in which a second zip tie loops on the first one allowing for a longer reach. Be sure to bring a pair of scissors, knife or another method to cut the zip ties when done. For better presentation, you can cut off the extra zip ties length not using.
You can also always bring a few white tent sidewalls even if you do not plan to use them. The walls can also be used to block the sun from hitting you directly and reduce your sun exposure or in case of rain. If you have artwork hanging on only the inside walls, placing a white sidewall up also presents a less distracting background if you have your art hanging on walls you can see through.
On numerous art shows, I have heard walls from nearby tents fall over due to wind and you hear glass from frames breaking. This happens more often than you would think. When possible, it is best to attach your walls to the tent with cable ties or other methods. Having sections of the walls bent on an angle will give additional support. Falling walls can be a liability to yourself or your customers and nobody likes to pick up the glass and have their product damaged.
The first time this happened to me when I first started showing, I lost seven frames and most of the mats and photos inside the frames were cut by the glass. I learned my lesson and am now very careful on this issue. 
In case of rain, move your artwork closer to the center of the tent and put up your walls. You can never have too many extra clips and they come in handy to quickly put up walls. Be sure to watch for the accumulation of water on the lower tent roof corners and use a long stick-like object to push up on the inside of the roof from inside and let the waterfall off the sides. If lighting is in the area, you may think you want to stay dry under your tent, but you should also consider that your tent may also be a big metal lightning rod and an alternate shelter location may be prudent.
I store and transport most of my flat matted art in large plastic tubs with water-resistant tops. You can put the matted art back in the tubs during a large downpour if needed. If you feel it may rain, be very windy, or storm overnight you will need to determine which items in your booth you want to store in your vehicle and bring home for the night. If overnight bad weather is possible, keep everything off of the ground. If you have boxes, artwork, or supplies stored under your table during show hours, place them on top of your tables overnight with a waterproof tarp over them and secured with clips.
I keep a few clear very large bags with me. Folded up with a rubber band they take up little room. They can be used as a bag to pack up a large framed artwork for a customer. If you think it may rain, you could store your art show supplies or art in these bags overnight off of the ground level.
If you pack your tent while still wet when you get it home take it out and open it up to let it dry. This will prevent mildew from forming on the fabric.
 If you think it will be windy overnight on multiple day shows, you can lower your legs on your tent a little, giving it a lower profile and then raise them back up the next morning. While I have never tried this, you could lower the height of your tent during the show if the wind is a problem.
On days/overnight in which rain is probable, placing foam swim or pool noodles in all four roof corners of EZ-up tents to “bend up” the tent corners will help if you have rain. This would reduce water gathering in the lower tent corners which could lead to leaking or collapsing of your tent overnight. The noodles can be purchased inexpensively at many local stores when needed. You can find white pool noodles at Amazon which will match your tent top better.
One thing I do is to purchase a product I have used to put on camping tents and is available at sporting goods stores. This can be sprayed on your tent roof with a few extra coats on the roof seams. This will help the water run off your tent when it rains. This spray will not make your tent totally waterproof or stop water from gathering in your tent corners. You need to spray these products outside with proper ventilation. I have heard that using some of these waterproof sprays will counteract the fire-resistant coating that is on the tents so I would not do this if you are cooking or using flames under your tent. I did see one tent roof catch on fire from a food vendor. It was mostly a melted part of the vinyl tent roof (large hole) and a lot of smoke.
Tent weights:
https://amzn.to/2SI1Tqg

I highly recommend bringing weights or stakes that are permitted to hold down your tent during days with wind. If you leave your tent up overnight, you must weigh down your tent or it may not be there in the morning. Most, if not all, art show requirements state that you must have weights and some even say how much weight you must have in each corner. I have never seen anyone from a show come around with a scale to check weights. Many sellers do not bring weights and when it gets windy, they have to hold the tent down with their hands. Some people make their own weights such as from PVC pipe and cement. You can see instructions here
(Click to see weight instructions) or another option is to purchase weights from a store (Click to see tent weight samples)
I feel you need a weight of at least 35 lbs. or more on each tent corner. You can use adjustable truck straps or tie down straps with a S hook on each end to hang the weights to the tent corners. A set of four straps can be found at Amazon (Click to see strap samples) asense-Ratchet-Tie-Down-Straps/16651533″ span style=”font-size:1.2em”>(Click to see strap sample) .
If you have weights that stand up high such as the weight shown to the left, you can wrap a small bungee cord around the weight and tent leg to keep the weight from moving.

When your tent is on the grass or another soft surface, you can also use metal stakes. Some shows do not allow stakes on the grass and state this in the art show instructions. When allowed, I use the Coleman tent pegs available from Walmart (Click to see stake sample). The (Coleman 10-In. Steel Nail Tent Pegs) stakes can also be purchased at Amazon shown below. I bring a small hammer to pound them in and also use the hammer claw to get the stakes out of the ground. If you do not hit the green plastic part with the hammer, they last a long time. When you break the plastic part, they are so inexpensive, you can just purchase more.
You may want to see if the holes in your tent leg base will allow your stakes to go through them. I also carry a small hammer with me to pound in the stakes and to pull them out at the end of the art show.
Must watch the scary video of a dust devil sending tents up in the air. This gives you the incentive and reason to weigh your tent down. I have personally seen a tent fly up in the air spinning about 60 feet and come down hard.
How to find art shows:

- Look for shows being marketed to the public, go to them and check them out to see if they look like they are any good. Find out who to talk to so when the next show comes, you are on the artist notification list. Sometimes you just see them while driving and can stop to check them out and talk to the organizer.
- Ask your artist friends which shows they do and have good sales at.
- Read the artist section on Craigslist in the city closest to you and also in other more distant cities in your selling areas to find smaller local art shows.
- Search on-line for local art shows.
- Join art clubs that put on local art shows that you can participate in.
- The magazine Sunshine Artists list many festival locations around the nation. Once you get the magazine for a year or longer you will have accumulated many of the better art festival names, locations and times.
- Some companies sell lists of known art shows such as the Art Fair Source Book at www.artfairsource.com or Festival Network at http://festivalnet.com. This will list more shows than you could possibly participate in. The number of shows that will be right for you may be based on costs, distance, attendance, or if your art may be especially suited for that show if it is theme orientated.Also, sometimes art can sell at events that are specifically art-related events such as “Home Tours”. In general, art shows that are mixed with other events such as music events are not usually good as art only events but some festivals can be good if they bring in a good crowd.
- Over time, you will get re-invited to art shows you have done before.
Pricing Art:

This is a really tricky subject but you should price to make a profit. Take into consideration your costs beyond just your material costs, gas and art show fees. The artist has a lot of overhead and should be compensated for his time and talent.
When setting your prices, a lot depends on a variety of factors such as:
1. Your experience
2. How you value your time
3. Time spent on a specific piece of art
4. Quality of your art
5. Material Costs
6. What the competition charges for similar artwork in your area
7. What your artwork has sold for in the past
8. If you are more well known, the demand for your work
The subject of pricing is so tricky, that 10 different people could come with 10 different methods. Some shows are geared for higher-priced artwork and with small local shows, this may not be true. Also, the show’s customer attendance, demographics, and location play a role. Different artists have many different theories of what pricing strategy works best and it comes with experience.
Many photographers seem to charge by the size of the image and not how difficult or costly the image was to take or the time it took to produce. The price can vary based on other factors such as the associated costs of how the photograph is framed or printed on special paper or canvas.
As a photographer, I tend to see what other photographers are charging for their art on their websites. Many of these photographers are charging two to four times the amount I do for what I consider the same quality of photography. When determining what you are going to charge at an art show, please remember that there is a difference between what people charge online and if they are selling at that price.
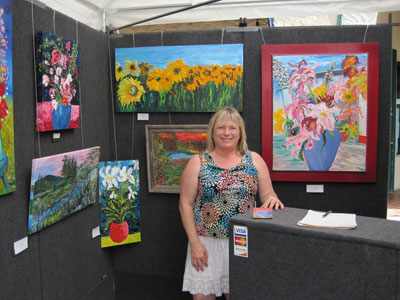
(Photo to right) You will notice carpeted Pro Panel walls, large title card labels with easy-to-see prices, and a sign stating which credit cards are accepted. This booth also has a work desk for taking orders. I recommend hanging title cards at least 1 inch from the framed or canvas artwork. This prevents the shadow from the above artwork from falling on the title card making it harder to read some of the printed information.
Many painters charge by the square inch but this can vary widely between different artists. Even the same artist may have a different cost per square inch for different sizes such as a higher square inch cost for very small paintings or less per square inch for very large paintings. Also, the artist should not determine prices based on their own personal or emotional attachment to a specific art piece.
For commission work such as in paintings, many recommend charging a larger fee than your normal amount. A commission can be more work and sometimes a pain with some clients and this should be incorporated in your pricing.
When you are selling photography or prints, a customer may ask you if you offer larger sizes. This is a good sign since most customers think art is only offered in the sizes that they can see in your booth. I recommend that you have a printed sheet listing the different sizes that you offer along with prices to show your customer. I have a sheet listing the various enlargement print sizes I offer as well as wrapped canvas sizes. This allows the artist to create custom prints on demand for the customer without the need to carry large sizes in inventory. You can offer to ship, the made to order product, directly to the customer.
Some people feel you must keep your art prices the same everywhere you sell. Other artists may adjust prices to fit different shows or areas where artist costs may be higher. I feel that you should be flexible. If you have a gallery nearby that represents your art in the area of the art show; then your prices should be the same as the gallery for that art show. The previous advice is my recommendation for the new artist that this article is geared for. For the more experienced artist that has their art in many galleries and is successful enough to bring in a steady income from those galleries, then I do not recommend that artists have different prices at art shows or on-line from the type of pricing levels at those galleries.
To me the bottom line is that if your art is not selling; you need to lower your prices to where it will sell at a price you are comfortable with. If you are selling a lot, you can try to raise your prices until you are losing sales. You will eventually set a balance that both the artist and customers are happy with.
Depending on the economy being good during some years and bad in some years, this can affect how much art, in general, is purchased in all art selling venues. A bad economy can also affect what customers will currently pay for the same art they may have been happy to pay more for in a past good economy period. Sometimes, the seller may have to adjust prices based on larger outside influences out of the seller’s control.
Since I am updating this article, in 2020 due to the Covid virus, the art show market has been basically canceled and there will be fewer outdoor type shows in 2021, as the world slowly goes back to normal. I am not sure, but fewer people will have discretionary income to purchase items they absolutely do not require at this time. The smaller local shows that this article is more geared for may sell more lower-priced items than the larger multi-day art shows. The smaller art shows may recover faster having more lower-priced options. Only time will tell when customers will start showing up in the large crowded gatherings that are part of the art show business.
I suspect that many of the smaller shows may not show up for a while due to not physically meeting to organize such events or the show organizers will just stop having the shows. I know that many of the larger art shows had financial issues and have chosen to not do shows anymore. We will have to wait to see how things go later in 2021 and into 2022. This could be an opportunity for some to start new local art/craft type shows and bring in many new artists that have not done shows before.
I do not recommend lowering your prices to compete with other artists that are really undervaluing their art. This is a no-win situation and you cannot compete on price with someone who does not mind selling for a little over the cost of his materials and not based on the total costs of running a business.
These are some thoughts from three online sellers on dealing with other sellers who charge too little, but I thought it also applied to the art show world.
- Do you guys ever feel like because most artisans undersell themselves and their products it affects how people perceive you’re pricing? I like to check myself when it comes to pricing by comparing to other sellers on Etsy or Amazon but for the life of me, I don’t know how they can charge so little!
- I think many that are priced low aren’t running as a legitimate business, not paying taxes, etc. My advice would be to price where you can make a profit you are happy with and then offer amazing customer service. When you offer a great product and service, buyers will be happy to pay your asking price.
The other part is that these people honestly have no idea how to price their goods to make a profit. And, because they “sew from home” or are “just a little person” or “because it is just for pocket change” – they do not invest in themselves enough to price it right. It is a mentality that I have seen in many different venues. People need to learn to value both themselves and the work they create.
- I don’t worry about the ones that are priced low. I refuse to sell at Walmart prices. I value my time too much for that.
Daniel Rozmiarek wrote: “As the artist, if I want customers to give me money in exchange for my art, I don’t get to assign value to my work. My customers are in control of valuing my work. My “price” is nothing more than a guess at an amount that I believe somebody else will agree to. I have every right to assign a price higher than that of other artists, but customers have no obligation to purchase.
Fine art is a pure luxury good. It is not a commodity that people need to survive. Every sale of fine art is about the perceived value the customer has for my work, and that customer’s willingness to exchange their cash for my art.
But the reality is that nearly all potential customers at art shows are willing to pay something between $50-$500 for my work. They set the price. I’m only trying to guess what it is. If I guess too low, I’m not recovering the full value. If I guess too high, I don’t make a sale. When I guess correctly, I make a sale at the best price that customer is willing to offer.”
Additional articles and videos on pricing artwork:
- This is a good pricing article by ArtBusiness.com titled: How to Set and Raise Selling Prices for your Art
- Video of oil painter Cedar Lee describing how she prices her art and other good general advice:
Video here - Video of painter Skye Taylor describing how he prices his art and other good general advice: Video here
- This is a pricing article with helpful information for artist selling commissioned art titled: 5 Art Pricing Lessons I Learned the Hard Way
Customers like to get a discount:
I find you encourage and get additional sales if you mark your items such as matted artwork with a single price and then a discounted price for multiple purchases. An example would be a matted print price of $65.00 or two for $110.00. You can also do this on small items such as note cards for $4.50 or two for $8.00. While discounting will lower your profits on that specific sale, I feel it is better to sell to that customer for a reasonable profit than not at all. My overall pricing will average out between the initial asking price and discount sales to a fair balance. The multiple price option is available for many items that sellers have.

Some customers are afraid to ask you for a lower price. If they are looking at a piece for a while trying to decide to purchase it, I usually offer them a discount such as a set amount or a percentage discount. Many of my sales are when I offer a discount. I sometimes think I should raise my prices and then offer all my customers a discount.
If the item costs $69.00, I may say “I can offer you that item for $60.00” or “I can give you a 15% discount on that item”. If the customer is looking closely at two items to determine which one, they would like to purchase, I may say that “I can offer you a 20% discount on the second item purchased”. Sometimes they purchase both items. Unless the discount for multiple purchases is printed and displayed at the booth, I do not have a set discount I offer and pretty much make it up based on my mood at the time.
Some artists do not offer price discounts to the customer as they do not think they should discount their items. If that works for them, then they should price as they seem best. I feel that when we are in a down economy or having a show with slow sales that not offering a discount as a hard rule will just cost you sales. Even the most high-end galleries in great locations offer discounts upon request even on more established artists.
Offering a discount is different than having a sale. I do not recommend having a sales sign in your booth or a sign that says 50% off. These types of signs will bother the other sellers. Signs that say “Sale” make it more of a lower-end show and give it a flea market type feel. The customers may feel that they can also expect large discounts at other seller’s booths.
I will offer a set discount without the customer asking if I feel they are hesitant to purchase one of my items if I feel that the price is an issue for them. I feel that most sellers should be open to offering discounts to customers, even if it is a small one to encourage sales.
While the seller should not sell an item at a price they are uncomfortable with, I do not feel that handmade type items have a set price such as purchasing a toaster at Walmart. With a little negotiating, you can end up with a happy customer bringing home one of the items you sell and some money in your pocket. If you have not tried offering a discount, try it out a few times and see how it works for you.
Quite often, I am in a situation in which either the husband or the wife is in the booth. The customer is interested in purchasing one of my items but wants to bring their spouse, who is in another area of the art festival, back to the booth to approve of the purchase. Many times, they never come back. I decided to try to offer the customer an incentive before they leave to encourage a return. I recommend that you try different sales discount techniques and see what works best for you.
Pricing Labels:
I find that you need to price all your items. The price on the labels also needs to be larger than you would think would be needed. It seems that many people just cannot find the price even if it is right in front of them. You do not want customers to walk away because they do not see the price and do not want to ask. Price labels can be handwritten or printed off. My basic suggestion is if you hear numerous times the customer asks you what the price of an item is, you should adjust the location of your price label or make it larger.
Pricing Labels can be found on Amazon or at your local craft stores.
For individual items, such as those lying on a table, I would price them all separately.
I price all my framed work on my walls with a separate price label. I display my matted prints grouped by size which have the same price. If they are in a print rack or boxed container on a table, I generally have one larger price label on the front center of the print rack or box.
I have seen some artists not price the more expensive framed or original paintings displayed on the walls. Like any other business, different business owners make different decisions based on their own experiences.
For artwork that has a title card you have room to display more than the price such as the artwork title, medium, and size. I feel that if the artwork is not the original, you should state on the title card that it is a print or other term you wish to use. This basic information might be obvious to the seller and does not need to be stated, but this information is not always obvious or known to the buyer. As one example, a buyer may not know if a watercolor painting behind glass is an original painting or a high-quality print unless you state that on the title card.
Name Tags:
I see most artists do not use a name tag or (Name Badge) but they seem to wear them if the art show supplies them. I feel the artist should always wear a name tag. The customer is not only buying art but also part of the experience is meeting with the artists and the forming of an emotional bond beyond just the artwork. Just because you know you are the artist, the customer may have no idea if the first person they meet in the booth is the creator or not.
Often customers ask me if I am the artist even if I am the only person in the booth. If you have more than one person in the booth and one is not the artist, then I feel it is even more important to have name tags. Also, if your booth is crowded and someone wants to ask the artist a question or make a purchase, they may not be able to tell the artist from anyone else in the booth.
Many times a customer sees my name on my name tag, relates it to my signature on the artwork, and seems to be surprised that the artist is in front of them. I am not sure why this happens so often. Perhaps they are so used to purchasing items made in factories or faraway places that it does not occur to them that some items are still made by hand and sold by the maker.
Competition:
In life, I like to think that I am competing against myself to always make myself better or become a better artist. In the art show business, you have a concentration of many other businesses in your same art medium as close as 20′ away. Many art shows have a higher percentage of booths that sell jewelry and photography. There is much more competition in these art mediums but I am sure everyone feels the same way about their own art medium.
It helps if your art is of higher quality, unique and you have a good presentation. In art mediums that have more competition, the customers are more likely to be more sensitive on pricing. 
It is my viewpoint that much of the purchasing decision for the customer comes down to price. They may love what you sell and even tell you so but it still comes down to price. It is fine to competitively price your items but you cannot compete, and do not even try, with the other sellers that undervalue their artwork and who do not care if they make a profit based on the real costs of running even a small business.
For art shows that do not take into consideration limiting the number of sellers of the same medium that I sell, I tend not to go back for future shows. I figure that there are only so many people that will purchase in my product category. If 15 – 20% of the artists at this show are selling in your medium, then those dollars need to spread out to more artists making it much more difficult to have a good sales day. Another factor is how many customers attend the art show; more customers can support more artists of the same medium. This is specifically more important for those selling jewelry and photography.
Some art shows are more of fundraising events for local art clubs and they may have more artist booths than the number of customers that they bring in can support. You generally know how many booths will be at the show from seeing the show in previous years. But at the time of the application, you do not always know how many booths are selling similar types of items as you will be displaying. If a specific type of item that I sell is oversaturated in the show, I would feel that better show planning could have avoided this. If an art show does this a few times and I feel it is affecting sales, I just do not come back to that show since most of the sellers in those oversaturated groups sell very little.
How important are credit cards?
I say that if you do many art shows or if you sell items for more money than customers usually carry around, you should take credit cards. The loss of only a few sales due to not taking credit cards is not worth it since it is easy to set up an account to take credit cards and the cost for entry is very low if you already have a smartphone. I feel that the days of only taking cash are gone.
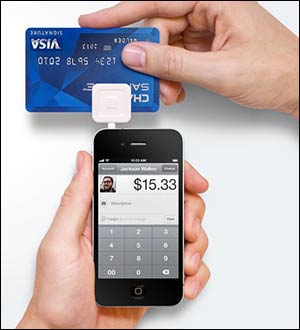
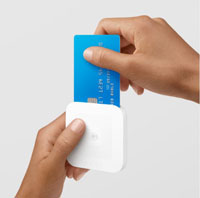
Companies such as Square up (The Square reader shown on right), PayPal, and Etsy have come out with small credit card readers that attach to many Apple or Android smartphones.
Not too many years ago, many artists that took credit cards, with similar capabilities to what the Square does now, used expensive stand-alone machines with heavy monthly service charges even on months that no credit cards were run. These credit card machines were not financially practical for the artist or small shopkeeper at outdoor events that did not sell in enough quantities to justify the cost. Most vendors at art shows are now using the small readers that work with their existing smartphones. The percentage rates to the credit companies are very competitive so even vendors that take only the occasional credit card can justify the cost since you are only charged when you use the reader.
For all of these card readers, I recommend getting at least two from your vendor of choice. If you have trouble running a customer’s card, you can try using the second reader. There is no need to lose a sale for not having a second free or low-cost card reader. You may want to from time to time, see if your readers need any free software updates. Since these hardware readers deal with money and are security-related, it is good to keep the software from not getting too old. You should also charge up your card readers that have batteries so the battery does not die during an art show.
If you take credit cards, be sure to place a sign such as Visa/MasterCard/AMEX logo on your table or wall in plain sight. You can purchase Credit card signs at reasonable prices. You may want to purchase a few signs such as for on tables or art show walls. If the customer is wondering if you take credit cards and cannot find the signs, you may lose a sale.
The Square credit card reader: Magnetic strip, embedded chip and Apple Pay
Below I describe the three different credit card readers from Square. The first one is the reader that most people were using when I first wrote this article, that only reads the credit card’s magnetic strip. I am not sure they even sell these anymore but do not currently recommend any credit card reader that does not use the chip.
The second reader can read the credit card’s embedded chip as well as the credit card’s magnetic strip. If your phone or another device can use this new reader, it is recommended that you switch to this chip reader from the reader that only reads magnetic strips.
The third type of reader allows you to not only read credit cards with the embedded chip in them but additionally allows you to take credit cards wirelessly using Apple Pay.
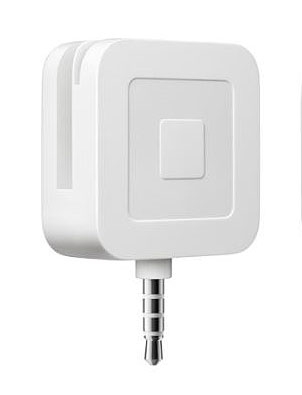
The Square credit card reader (card reader type 1), shown in photo to left, is the “Square” which is available at www.squareup.com. The Square is what I see most people use and has reasonable percentage fees with no other monthly service costs. This Square reader will read the magnetic stripe on the credit card.
Once you run your charge using the Square device, you will receive an email letting you know that they have received your charge. You will receive another email when they transfer the money into your bank account.
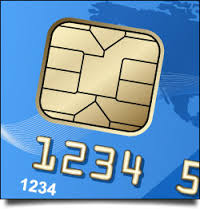
Many credit cards currently in use already have the more secure chip embedded in them, as shown in the photo to the right. My understanding is that due to a law change, all new credit cards sent out after October 2015 will be required to have the new chip in them.

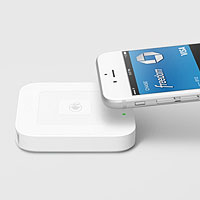
The new and slightly larger Square reader (card reader type 2), shown to the right, is available directly from the manufacturer (Square chip card reader purchase link) or from Amazon (Square chip card reader purchase link).
This new reader has two slots that will read both the magnetic strips on older cards and also be able to read the credit cards with the chip in them.
The new Square chip reader does have a small battery in it that will need to be charged with a USB charger slot found on the bottom of the reader. I believe that the reader comes with a recharging cord. You may want to charge up the reader before any major show or at least have a spare reader.
See how to use the new Square chip reader 2 in this short video.
 Square also has a third reader model (card reader type 3), shown to the right. This much larger reader will read Apple Pay and EMV (Europay, MasterCard and Visa) which in English mean cards with chips in them. I do not think this reader has the ability to read the credit card magnetic strip, so you will have to keep your older Square reader for this.
See how to use the new Square chip reader 3 in this short video.
(Square chip card reader 3 Amazon purchase link)
This card reader type 3 purchase. This device also runs off of a battery.
You probably can get away with using the card reader, shown at the top left, for a while since the new cards that contain the chip will also have a magnetic strip on them. If you do many charges, the better security of card readers that can read the chip, which will have some advantages such as better fraud protection and not needing to scan the magnetic strip multiple times to get it to work.
Starting October 1, 2015, that liability for fraud shifts from the bank to the store. Because of this, another reason to get a card reader that reads the chip is that eventually, the bank may hold the artist responsible for any credit card fraud if you accept a credit card charge by using the magnetic strip.
The following information was found on the Squareup web site (link here) . Tax law requires that we provide account holders who process over $20,000 and 200 credit card payments per calendar year with a Form 1099-K before January 31st. We are also required to file a corresponding tax form with the IRS Whether you reach $20,000 in payments and more than 200 payments will be determined by looking at the SSN associated with your Square Account.
Paypal does have a customer service phone number if you have any problems. I feel that their rates are also reasonable.
PayPal update: PayPal also has a new chip reader, shown to the right, for credit cards with chips and Apple Pay. See information at (Product link here) .
Etsy also has a credit card reader. More information in (this article link) . An art show vendor told me you could call up your Etsy shop on your phone with an app. The customer can view your Etsy store items and can then order the item if you do not have that item available at your art show at that time.