
Tables:
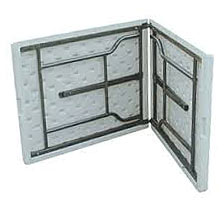
I prefer the 6′ tables or 4′ tables that fold in the center which may fit better in vehicles when transporting
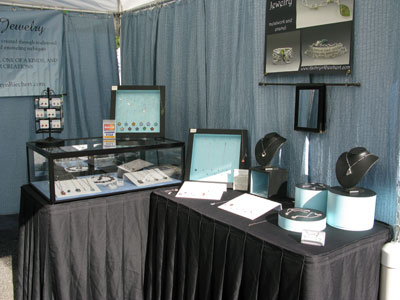
Many artists have multiple tables since they may lay their art flat. Many artists layer the art items on the tables at different levels. Much depends on what you are selling.
Standard 4′ or 6′ tables are available locally at Walmart (table link).
Tables are also available at Amazon:
(Mainstays 6′ Centerfold Table link)
(Lifetime 4′ Centerfold Table link)

Tablecloths:
Most every artist places a fitted tablecloth
over the table for a more professional look.
Fitted tablecloths are also available at Amazon
(TEKTRUM 6-Foot black tablecloth link, (TEKTRUM 4-Foot black tablecloth link and(TEKTRUM 8-Foot black tablecloth link)
Here is a link to linen tablecloths
https://amzn.to/3vB1Jzw
Many artists use the standard black tablecloth, but the tablecloths come in a variety of colors. Artists can choose different colors that may show off their product best. Using a tablecloth, allows you to hide your extra product, boxes, supplies, lunch, and other items under the table for a more professional clean look. I find it helpful to have some clamps with me to hold down the sides of the tablecloth on a windy day.
https://amzn.to/34uzBlD
When purchasing a fitted tablecloth, check your table’s width, length, and height to match against available tablecloth sizes. Many artists have multiple tables since they may lay their art flat. Many artists layer the art items on the tables at different levels. Much depends on what you are selling. It is convenient to purchase an extra tablecloth so you have one available when the other one needs to be washed. Click on images for more information.
Art show items: List of items to bring to art show
Some personal items that you may want to bring to the art show are water, lunch, snacks, a hat, suntan lotion, and a small cooler. Many times, food is not available, unhealthy or overpriced at art shows so you should bring some just in case.
I usually carry Scotch tape, extra paper to make labels, scissors, pliers, lots of extra 4″ and 6″ screwdrivers, first aid kit, pens, pencil, marker, small hammer, hanging hooks for artwork, shopping bags, extra cash and coins for change, Windex, paper towels or towel, dust cloth, change of clothes, aspirin, order book, calculator, folding table, print racks, labels, tablecloth, tent, walls, weights, chair, and credit card device, forms and signs saying I take credit cards. If lighting is needed, bring those supplies. Also, a sign-up book to collect email addresses for future marketing.
I find that various sized clamps and cable or zip ties come in handy in many different situations like some people feel about duct tape. You should always have these items around while doing art shows. I recommend only getting metal clamps since the plastic ones seem to break over time. On the metal clamps, many times the soft red part pieces fall off over time and you can drop some glue under them at purchase time to reduce this. I recommend zip ties of at least 10″, I find that the shorter ones do not have much reach for art show purposes and you can always cut off the extra length after with a pair of scissors. Zip ties in smaller quantities are more pricey, but in bulk of 50 or 100 per size, they are inexpensive.
The two links below contain detailed lists of items to bring to art shows. Many of these lists are long for use in 3-day shows while on the road and some items are particular to specific art mediums. It is good to review which items apply to your needs and make your own list to review when packing. When you need something at an art show and do not have it, it’s a good time to add that item to your list.
Art Show Walls:
Many artists have been very creative in making walls from scratch as shown in this article (Article Link) . I have seen them made from attaching doors together to using pegboard and hinges. Some of these homemade wall methods may be fine for small local art/craft shows, but may not look good at a larger multiple day show which includes mostly full time sellers.
Sometimes you can look for artists selling their walls or other art supplies when upgrading or no longer doing art shows. This can save you money and if your walls are still in good condition, you may be able to sell them for close to what the used price you paid for them. You can see below some common wall options that many artists use. They cover a range of costs and functionality.
Some common wall options:

Graphic display panels: www.graphicdisplaysystems.com

Graphic display panels are shown to the left and the right. These display panels can come in one piece per wall but I prefer the model that comes in two pieces per wall as shown.
The two-piece per wall model has the advantage of fitting better in your vehicle and perhaps easier to handle.
The walls are light in weight and come with floor base hardware to support the walls. About $90 a panel. The company sells many accessories and configurations to support many wall designs for multiple art mediums and professional needs. I suggest using their hanging hooks but standard S hooks will also work. Note: A company called Flourish makes nice cloth covers for the Graphic display panels at (Graphic Display panel covers link) .
These Displays2go Art Display Grid panels are simular to the graphic display panels available on Amazon.
Grid Wall:
Inexpensive, heavier but stronger than other walls, can be set up in a variety of configurations to best fit your specific art/craft items. While the standard size is a 2′ x 6′ grid wall, they do come in different lengths such as 6′, 7′ or 8′ and even a few different widths. Make sure the length you choose fits in your vehicle before purchase. Grid walls come in colors such as chrome, white and black Since these walls are heavy, I suggest that if you purchase grid walls online, you look for free shipping such as on Amazon.
Many artists just starting at art shows use grid walls. They will not break, so you can easily sell them to another artist if you later upgrade to another wall system. You may be able to find grid walls and accessories locally at a place that sells store fixtures. It takes about five 2′ x 6′ grid walls to fill up one 10′ wall section. You can purchase a grid wall in groups of three at a reasonable price. Grid wall has many useful accessories such as Grid Wall Shelves.
Joining Clips to attach grid walls together and Utility Hooks which can be used to hang art on. Many different types of Grid wall Hooks are available to hang a variety of items.
A few of many available accessories for Grid wall (click on pictures):
Pro Panels:


These are carpeted walls, what professional art show artists use, flexible in setup,
durable, cleanable, stable, come in a variant of colors, and expensive.
Have a high resale value for used ones. The company sells many accessories and configurations to support many wall designs for multiple art mediums and professional needs.
Armstrong Product Panels:
These are also carpeted walls similar to Pro panels that many professional art show artists use. You can also arrange these panels in many configurations and use many optional accessories.


that can be folded for travel but make tight walls for hanging art when installed. Since the walls can be folded, they take up much less room while transporting. Many professional artists use these walls. If you do not have your outside tent walls up, the mesh panels allow for better air circulation inside the tent area as well as the ability to hang art on both sides. You need to get the Mesh panels and stabar configuration that fits the type of tent that you have.
While these walls may seem initially expensive, but less than most Pro panel configurations, they should have a good resale value when sold. Your long-term cost on professional walls is the difference between how much you paid minus your selling value divided by how many years or shows you used them for.
A company called Flourish makes the mesh panels at (Mesh panel link) .
The second image below shows a close-up of the mesh detail. The holes are used for S or drapery hooks to hang your art on.
The third image shows the Stabar system used to attach your mesh panels to a top Stabar for some tent models.
The fourth image shows a close-up of how to attach the top of your mesh panels to other tent models.
The fifth image shows a short video of the mesh panels being installed in a tent.
The sixth image shows the lower bar of the Stabar system used to attach your mesh panels to your tent. It also shows the option of a shorter back mesh wall with a door opening.
The seventh image is another example of a tent display using mesh panels with three 10′ walls.


This video shows steps to putting up Mesh Panels. A company called Flourish makes the mesh panels at (Mesh panel link) .


Art Show Tents (canopies):
Most art shows require white tents. I do not recommend getting a colored tent. While many of these colored tents are less expensive, the lightweight design is more for sun shading and not art shows.
It is common for these lightweight tents to easily fly up in the air, especially if not properly weighted down on windy days. This can result in damage to your art, nearby booths, or customers as they come down. Also, these colored tents will pass on the colored roof color to your art as a color cast.
I also do not recommend tents where the four legs bow out a little instead of going straight down since these tents are a sign of a less sturdy tent and are mainly made to be used as a sunshade and not for art shows.
The most common tent found at smaller art shows and many larger art shows is made by EZ-up or are EZ-up type tents. They are quick to put up and take down which is a major advantage. These types of tents are referred to as pop-up tents and most people can put up and take down this type of tent by themselves. When you first start using your tent, you may want to ask for some help until you get the hang of it. I feel they are fine for the small or occasional weekend art show. They will not hold up as well in bad weather as the better tents will but I see them used by a new artist to a full-time professional artist.
Many artists will put up one to three sides during the show to give the tent area some shade to protect them from the sun as it travels across the sky. Another reason to put up your sides is to give a clean white or less distracting background to your hanging art. Many times, I decide what sides to put up based on the location of my tent. If I have no one next to me, I may put artwork on both sides of one wall and then not put up my sides on that wall.
If you leave your tent up overnight, you should put all four sides up before you leave. Many times, it is hard to zip up all four sides due to the four walls may not fit all-around your tent to the point where the last two sides have enough room to meet. Sometimes your legs are not straight up and down or not square with the other legs. When using stakes instead of weights, it is best to first put up all four walls and see if it fits before placing stakes in the four corners. Once you know that all four sides of the walls fit together, then stake down your corners. If you are just using weights, then you can manually adjust your legs as needed so that the wall fits. For one-day shows, I sometimes have one or two sides in my vehicle in case I choose to put them up later in the day as needed.
You want your tent to come with walls or sides. I like the walls that have zippers to connect the tent walls to each other. Some tents come without zippers and some use Velcro. Some walls may have zippers and Velcro, but the Velcro is used for securing the wall to the tent top or corner legs. Your tent may also come with a storage bag and a sun visor. Pay attention to the Denier number of the tent top with the higher the Denier number, the better. A denier top of 300 should be the least you should purchase with a denier of 500 or 600, being better. Do not purchase a tent that does not list the denier number or at least call the manufacturer or retailer and ask first. Since shipping is expensive, compare prices based on the total tent and shipping costs since some stores include shipping in the price.
If you are new to tents or setting up tents, the following short videos will be very helpful. When you put up your tent for the first few times, you will probably need someone to help you. You will eventually be able to do it by yourself.
Two short video instruction on how to set up 10 x 10 art show tents:
Short video instruction on how to take down 10 x 10 art show tents:
(Video 3: View full size)
Video answering common questions on art show pop up tents and what options and features are available allowing you to better choose the type of tent for your needs: (Video 4: View full size)
Short video instruction on how to take down 10 x 10 art show tents:
(Video 3: View full size)
Video answering common questions on art show pop up tents and what options and features are available allowing you to better choose the type of tent for your needs: (Video 4: View full size)
Below you will see a variety of common tents that you will see at art shows such as the Trimline, Caravan, and the EZ-up. I recently saw an Undercover tent at an art show and was impressed so I also listed that brand. I also purchased one and found it of good quality.
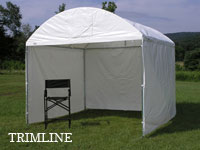
Trimline Canopies:
The very high quality professional Trimline Canopies are made by Flourish at http://www.flourishdisplays.com.
These tents take a while to put up because they are not the pop-up type. This tent will hold up in strong winds and bad weather better than most tents. These tents would be best for those who do many 2 or 3 days shows, full-time professional artists, participating in many art shows, or do art shows in locations in which it rains a lot or often runs into bad weather.
Video of TrimLine Canopy, along with Flourish mesh display panels, being put up in fast motion:
Caravan Canopies:
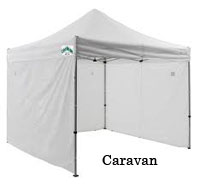
The high-quality professional line of Caravan Canopies can be seen at http://www.caravancanopies.com. The Caravan tents are also easy to put up. Note: One tent in the Caravan line that seems to be popular on Amazon is listed above. You will need to buy the sides separately which are also sold at Amazon.
Undercover tents:
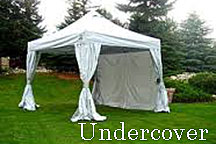
The Undercover 10′ x 10′ tents are easy to put up and come with a variety of tent quality versions suitable for different needs such as standard models for light use to professional quality models for heavy use. I started with an EZ-up tent and switched to an Undercover tent.
See the Undercover tent review, showing details on three models further down the article.
EZ-up tents:
The reasonably quality and very popular EZ-up tents can be seen at http://www.ezup.com.
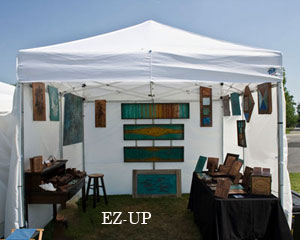
The EZ-up type tents have a variety of prices based on quality and sell for about $200 – $300. I do not recommend you buy a tent from Costco or Sam’s club unless you can verify the tent’s specs to make sure they meet your needs. When purchasing from a store, the specs or features should be written on the box side. There are different quality levels of EZ-up type tents and even though many models look similar, they are not all the same. With online vendors, you usually get a list of information about the different tent’s specs, features and accessories offered in the box.
When the manufacturer says that this line of their tents is “Professional” or “Commercial”, then these are usually the higher quality tents.
The word “Shade” in a tent description usually means a lesser quality and may not be suitable for art show use. Some shade type tents have legs that angle outward and not straight down which makes them not fit in a standard 10′ x 10′ art show area.
I also would look at the denier number which is how thick the tent top material is. I do recommend getting a denier of at least 300 or higher. If you are doing many shows in a rainy State, I would go for a higher than 300 denier such as 500 or 600 denier and also coat the top with a rain guard spray. If the tent specs do not specify the denier, then just skip that tent model. You can get a general idea of the quality of a tent by the price, but you should still review the specs.
I started out with an EZ-up Encore II tent and used it for many years. The weather is usually good here in Arizona and I do not run into a lot of bad weather. I mostly worry about wind. You will not get the same protection from wind and rain from an EZ-up tent as a higher-end Trimline tent, but they are much less expensive and faster to put up.
The standard walls for an EZ-up are not as high quality as what would come with the Caravan or Trimline tents but are used by most artists with good results. You can also purchase thicker and higher-quality walls for your EZup later at an additional cost.
When I look for a tent or art canopy, my choices are listed below. Your preferences may vary. You may find that looking at the different tent models at a local art show and seeing what features you want. You may be able to get a tent brand and tent model number from the seller if needed.
White roof
Top of 300 denier or higher
Legs that go straight down and do not angle outward
Comes with four solid white sides with larger zippers (not small plastic ones that jam up)
Comes with a carrier bag with wheels, larger wheels are better
Does not say the tent is for shade
Should say on box, treated with fire retardant, but most all should be
Pop up type tent, but some other professional tents are not pop up
Reasonable cost for the features I am requesting
I prefer the leg height adjusters to be finger pinch free, so not the simple little small button to press in
Note: The Eurmax Premium Canopy shown above does not include four sidewalls, but can be purchased separately.
