I prefer the 6′ tables or 4′ tables that fold in the center which may fit better in vehicles when transporting
Many artists have multiple tables since they may lay their art flat. Many artists layer the art items on the tables at different levels. Much depends on what you are selling.
Standard 4′ or 6′ tables are available locally at Walmart (table link).
Tables are also available at Amazon:
(Mainstays 6′ Centerfold Table link)
(Lifetime 4′ Centerfold Table link)
Tablecloths:
Most every artist places a fitted tablecloth
over the table for a more professional look.
Fitted tablecloths are also available at Amazon
(TEKTRUM 6-Foot black tablecloth link, (TEKTRUM 4-Foot black tablecloth link and(TEKTRUM 8-Foot black tablecloth link)
Here is a link to linen tablecloths
https://amzn.to/3vB1Jzw
Many artists use the standard black tablecloth, but the tablecloths come in a variety of colors. Artists can choose different colors that may show off their product best. Using a tablecloth, allows you to hide your extra product, boxes, supplies, lunch, and other items under the table for a more professional clean look. I find it helpful to have some clamps with me to hold down the sides of the tablecloth on a windy day.
https://amzn.to/34uzBlD
When purchasing a fitted tablecloth, check your table’s width, length, and height to match against available tablecloth sizes. Many artists have multiple tables since they may lay their art flat. Many artists layer the art items on the tables at different levels. Much depends on what you are selling. It is convenient to purchase an extra tablecloth so you have one available when the other one needs to be washed. Click on images for more information.
Art show items: List of items to bring to art show
Some personal items that you may want to bring to the art show are water, lunch, snacks, a hat, suntan lotion, and a small cooler. Many times, food is not available, unhealthy or overpriced at art shows so you should bring some just in case.
I usually carry Scotch tape, extra paper to make labels, scissors, pliers, lots of extra 4″ and 6″ screwdrivers, first aid kit, pens, pencil, marker, small hammer, hanging hooks for artwork, shopping bags, extra cash and coins for change, Windex, paper towels or towel, dust cloth, change of clothes, aspirin, order book, calculator, folding table, print racks, labels, tablecloth, tent, walls, weights, chair, and credit card device, forms and signs saying I take credit cards. If lighting is needed, bring those supplies. Also, a sign-up book to collect email addresses for future marketing.
I find that various sized clamps and cable or zip ties come in handy in many different situations like some people feel about duct tape. You should always have these items around while doing art shows. I recommend only getting metal clamps since the plastic ones seem to break over time. On the metal clamps, many times the soft red part pieces fall off over time and you can drop some glue under them at purchase time to reduce this. I recommend zip ties of at least 10″, I find that the shorter ones do not have much reach for art show purposes and you can always cut off the extra length after with a pair of scissors. Zip ties in smaller quantities are more pricey, but in bulk of 50 or 100 per size, they are inexpensive.
The two links below contain detailed lists of items to bring to art shows. Many of these lists are long for use in 3-day shows while on the road and some items are particular to specific art mediums. It is good to review which items apply to your needs and make your own list to review when packing. When you need something at an art show and do not have it, it’s a good time to add that item to your list.
Many artists have been very creative in making walls from scratch as shown in this article (Article Link) . I have seen them made from attaching doors together to using pegboard and hinges. Some of these homemade wall methods may be fine for small local art/craft shows, but may not look good at a larger multiple day show which includes mostly full time sellers.
Sometimes you can look for artists selling their walls or other art supplies when upgrading or no longer doing art shows. This can save you money and if your walls are still in good condition, you may be able to sell them for close to what the used price you paid for them. You can see below some common wall options that many artists use. They cover a range of costs and functionality.
Graphic display panels are shown to the left and the right. These display panels can come in one piece per wall but I prefer the model that comes in two pieces per wall as shown.
The two-piece per wall model has the advantage of fitting better in your vehicle and perhaps easier to handle.
The walls are light in weight and come with floor base hardware to support the walls. About $90 a panel. The company sells many accessories and configurations to support many wall designs for multiple art mediums and professional needs. I suggest using their hanging hooks but standard S hooks will also work. Note: A company called Flourish makes nice cloth covers for the Graphic display panels at (Graphic Display panel covers link) .
These Displays2go Art Display Grid panels are simular to the graphic display panels available on Amazon.
Grid Wall:
Inexpensive, heavier but stronger than other walls, can be set up in a variety of configurations to best fit your specific art/craft items. While the standard size is a 2′ x 6′ grid wall, they do come in different lengths such as 6′, 7′ or 8′ and even a few different widths. Make sure the length you choose fits in your vehicle before purchase. Grid walls come in colors such as chrome, white and black Since these walls are heavy, I suggest that if you purchase grid walls online, you look for free shipping such as on Amazon.
Many artists just starting at art shows use grid walls. They will not break, so you can easily sell them to another artist if you later upgrade to another wall system. You may be able to find grid walls and accessories locally at a place that sells store fixtures. It takes about five 2′ x 6′ grid walls to fill up one 10′ wall section. You can purchase a grid wall in groups of three at a reasonable price. Grid wall has many useful accessories such as Grid Wall Shelves.
Joining Clips to attach grid walls together and Utility Hooks which can be used to hang art on. Many different types of Grid wall Hooks are available to hang a variety of items.
A few of many available accessories for Grid wall (click on pictures):
These are carpeted walls, what professional art show artists use, flexible in setup,
durable, cleanable, stable, come in a variant of colors, and expensive.
Have a high resale value for used ones. The company sells many accessories and configurations to support many wall designs for multiple art mediums and professional needs.
These are also carpeted walls similar to Pro panels that many professional art show artists use. You can also arrange these panels in many configurations and use many optional accessories.
that can be folded for travel but make tight walls for hanging art when installed. Since the walls can be folded, they take up much less room while transporting. Many professional artists use these walls. If you do not have your outside tent walls up, the mesh panels allow for better air circulation inside the tent area as well as the ability to hang art on both sides. You need to get the Mesh panels and stabar configuration that fits the type of tent that you have.
While these walls may seem initially expensive, but less than most Pro panel configurations, they should have a good resale value when sold. Your long-term cost on professional walls is the difference between how much you paid minus your selling value divided by how many years or shows you used them for.
The second image below shows a close-up of the mesh detail. The holes are used for S or drapery hooks to hang your art on.
The third image shows the Stabar system used to attach your mesh panels to a top Stabar for some tent models.
The fourth image shows a close-up of how to attach the top of your mesh panels to other tent models.
The fifth image shows a short video of the mesh panels being installed in a tent.
The sixth image shows the lower bar of the Stabar system used to attach your mesh panels to your tent. It also shows the option of a shorter back mesh wall with a door opening.
The seventh image is another example of a tent display using mesh panels with three 10′ walls.
This video shows steps to putting up Mesh Panels. A company called Flourish makes the mesh panels at (Mesh panel link) .
Art Show Tents (canopies):
Most art shows require white tents. I do not recommend getting a colored tent. While many of these colored tents are less expensive, the lightweight design is more for sun shading and not art shows.
It is common for these lightweight tents to easily fly up in the air, especially if not properly weighted down on windy days. This can result in damage to your art, nearby booths, or customers as they come down. Also, these colored tents will pass on the colored roof color to your art as a color cast.
I also do not recommend tents where the four legs bow out a little instead of going straight down since these tents are a sign of a less sturdy tent and are mainly made to be used as a sunshade and not for art shows.
The most common tent found at smaller art shows and many larger art shows is made by EZ-up or are EZ-up type tents. They are quick to put up and take down which is a major advantage. These types of tents are referred to as pop-up tents and most people can put up and take down this type of tent by themselves. When you first start using your tent, you may want to ask for some help until you get the hang of it. I feel they are fine for the small or occasional weekend art show. They will not hold up as well in bad weather as the better tents will but I see them used by a new artist to a full-time professional artist.
Many artists will put up one to three sides during the show to give the tent area some shade to protect them from the sun as it travels across the sky. Another reason to put up your sides is to give a clean white or less distracting background to your hanging art. Many times, I decide what sides to put up based on the location of my tent. If I have no one next to me, I may put artwork on both sides of one wall and then not put up my sides on that wall.
If you leave your tent up overnight, you should put all four sides up before you leave. Many times, it is hard to zip up all four sides due to the four walls may not fit all-around your tent to the point where the last two sides have enough room to meet. Sometimes your legs are not straight up and down or not square with the other legs. When using stakes instead of weights, it is best to first put up all four walls and see if it fits before placing stakes in the four corners. Once you know that all four sides of the walls fit together, then stake down your corners. If you are just using weights, then you can manually adjust your legs as needed so that the wall fits. For one-day shows, I sometimes have one or two sides in my vehicle in case I choose to put them up later in the day as needed.
You want your tent to come with walls or sides. I like the walls that have zippers to connect the tent walls to each other. Some tents come without zippers and some use Velcro. Some walls may have zippers and Velcro, but the Velcro is used for securing the wall to the tent top or corner legs. Your tent may also come with a storage bag and a sun visor. Pay attention to the Denier number of the tent top with the higher the Denier number, the better. A denier top of 300 should be the least you should purchase with a denier of 500 or 600, being better. Do not purchase a tent that does not list the denier number or at least call the manufacturer or retailer and ask first. Since shipping is expensive, compare prices based on the total tent and shipping costs since some stores include shipping in the price.
If you are new to tents or setting up tents, the following short videos will be very helpful. When you put up your tent for the first few times, you will probably need someone to help you. You will eventually be able to do it by yourself.
Two short video instruction on how to set up 10 x 10 art show tents:
Video answering common questions on art show pop up tents and what options and features are available allowing you to better choose the type of tent for your needs: (Video 4: View full size)
Video answering common questions on art show pop up tents and what options and features are available allowing you to better choose the type of tent for your needs: (Video 4: View full size)
Below you will see a variety of common tents that you will see at art shows such as the Trimline, Caravan, and the EZ-up. I recently saw an Undercover tent at an art show and was impressed so I also listed that brand. I also purchased one and found it of good quality.
Trimline Canopies:
The very high quality professional Trimline Canopies are made by Flourish at http://www.flourishdisplays.com.
These tents take a while to put up because they are not the pop-up type. This tent will hold up in strong winds and bad weather better than most tents. These tents would be best for those who do many 2 or 3 days shows, full-time professional artists, participating in many art shows, or do art shows in locations in which it rains a lot or often runs into bad weather.
Video of TrimLine Canopy, along with Flourish mesh display panels, being put up in fast motion:
The high-quality professional line of Caravan Canopies can be seen at http://www.caravancanopies.com. The Caravan tents are also easy to put up. Note: One tent in the Caravan line that seems to be popular on Amazon is listed above. You will need to buy the sides separately which are also sold at Amazon.
Undercover tents:
The Undercover 10′ x 10′ tents are easy to put up and come with a variety of tent quality versions suitable for different needs such as standard models for light use to professional quality models for heavy use. I started with an EZ-up tent and switched to an Undercover tent.
See the Undercover tent review, showing details on three models further down the article.
EZ-up tents:
The reasonably quality and very popular EZ-up tents can be seen at http://www.ezup.com.
The EZ-up type tents have a variety of prices based on quality and sell for about $200 – $300. I do not recommend you buy a tent from Costco or Sam’s club unless you can verify the tent’s specs to make sure they meet your needs. When purchasing from a store, the specs or features should be written on the box side. There are different quality levels of EZ-up type tents and even though many models look similar, they are not all the same. With online vendors, you usually get a list of information about the different tent’s specs, features and accessories offered in the box.
When the manufacturer says that this line of their tents is “Professional” or “Commercial”, then these are usually the higher quality tents.
The word “Shade” in a tent description usually means a lesser quality and may not be suitable for art show use. Some shade type tents have legs that angle outward and not straight down which makes them not fit in a standard 10′ x 10′ art show area.
I also would look at the denier number which is how thick the tent top material is. I do recommend getting a denier of at least 300 or higher. If you are doing many shows in a rainy State, I would go for a higher than 300 denier such as 500 or 600 denier and also coat the top with a rain guard spray. If the tent specs do not specify the denier, then just skip that tent model. You can get a general idea of the quality of a tent by the price, but you should still review the specs.
I started out with an EZ-up Encore II tent and used it for many years. The weather is usually good here in Arizona and I do not run into a lot of bad weather. I mostly worry about wind. You will not get the same protection from wind and rain from an EZ-up tent as a higher-end Trimline tent, but they are much less expensive and faster to put up.
The standard walls for an EZ-up are not as high quality as what would come with the Caravan or Trimline tents but are used by most artists with good results. You can also purchase thicker and higher-quality walls for your EZup later at an additional cost.
When I look for a tent or art canopy, my choices are listed below. Your preferences may vary. You may find that looking at the different tent models at a local art show and seeing what features you want. You may be able to get a tent brand and tent model number from the seller if needed.
White roof
Top of 300 denier or higher
Legs that go straight down and do not angle outward
Comes with four solid white sides with larger zippers (not small plastic ones that jam up)
Comes with a carrier bag with wheels, larger wheels are better
Does not say the tent is for shade
Should say on box, treated with fire retardant, but most all should be
Pop up type tent, but some other professional tents are not pop up
Reasonable cost for the features I am requesting
I prefer the leg height adjusters to be finger pinch free, so not the simple little small button to press in
Note: The Eurmax Premium Canopy shown above does not include four sidewalls, but can be purchased separately.
Another tent that opens like an EZ-Up tent is under the brand name “Undercover”. I use this tent now and find it a good value for the many extra features it offers not on the EZ-UP tent models.
I saw this tent at a local art show and was impressed with the quality and unique CRS Curtain wall hanging system for the side walls. I also wanted a tent with pinch-proof release levels to raise the legs. The zippers on the Undercover tent seemed to be larger and stronger than the smaller zippers I had on my EZ-Up. I feel that the larger zippers will make it easier to zip up the tent.
The roof and also the side walls have an inner silver reflective undercoating which is designed to keep the tent cooler. It should also help me from getting sunburn from the sun passing through the tent. While the inside of the tent has a silver look, the outside of the tent’s top and walls are white so it should pass as a white tent for art shows that require a white tent.
The image below shows the Undercover tent with the polyester sides wrapped around the legs when open for business. The polyester sides seem to be more like flowing fabric where my EZ-Up came with thinner vinyl sides.
The first image shows the Undercover tent with the polyester sides wrapped around the legs when open for business. The polyester sides seem to be more like flowing fabric where my EZ-Up came with thinner vinyl sides.
The second image shows the unique curtain-type wall hanging CRS system for the sides as well as the silver undercoating on the inside of the walls.
You put up the walls by simply attaching clips, located along the top edge of the walls to the hanging wire shown in the second image. This makes putting up the walls fast and easy. The hanging wire is incorporated as part of the tent.
Note: With this type of CRS wall system, it seems that you do not put the 10-foot wall section up on the one 10-foot tent side with the connecting wall zippers being in the corners of the tent as done with other tents. You place the 10-foot wall with five feet being on one side of the corner pole and the other five feet of the wall side on the other side of the corner pole. The actual location of the zippers used to attach two walls together will be in the middle of the tent side as shown in the second video and also in the first picture if you look for the vertical line in the wall’s center.
The third image shows the pinch proof method of raising or lowering the top sides.
The fourth image shows the legs having a separate pinch proof method on raising the legs.
The fifth image shows the silver undercoating on the tent top (facing inside).
The fifth image also shows a method of adjusting the top fit which they call “dial a fit peak pole extender” which could come in handy to make the top stiffer if it rains. Inside that shorter pole piece is a spring that pushes up. If you turn the dial, you can tighten the spring tension. Seems clever to me.
The six images show the Undercover UC-2R10CRS tent with all four walls up.
The seventh image shows the Undercover UC-2P10WCRS tent with all four walls up showing tent skirts over the corner legs in this model.
The eighth image shows a vented peak on the top to let out hot air but not let in rain.
These features are what I was looking for on a tent at a reasonable price, that my older EZ-Up did not have. Your own preferences may be different. This tent may not always be in stock on Amazon, but you can search for “tent UC-2R10CRS” and find one at another store.
I purchased the Undercover tent UC-2R10CRS tent and am happy with it. It is available for purchase on Amazon at (Undercover UC-2R10CRS) .
Undercover Tent: Purchase of the three different models
The first two Undercover tent models listed below have a 300-denier thick roof with the third listing a more expensive professional model having a 600-denier rooftop, as well as higher quality, honeycombed tubing.
Undercover Tent 1:
(Undercover 10×10 with CRS sides model UC-2R10CRS medium quality tent and the tent that I use)
This UC-2R10CRS tent is good for those that do numerous art shows.
This UC-2R10CRS tent is available for purchase at Amazon.
Undercover Tent 2:
(Undercover 10×10 with CRS sides model UC-3R10CRS basic quality tent).
If you do occasional local art shows, this tent may be enough for you. This UC-3R10CRS tent is available for purchase at this Walmart link Undercover Tent 3:
One thing bad weather such as cold, excessive heat, rain or heavy overcast will do is lower the number of people who visit the art show. This will most likely lead to lower sales. On a multiple-day show, you can only hope that the weather will be nice on the next day.
I check the weather for the art show a few days before to see what the temperature will be, what the estimated wind speed will be, and also what the chance for rain is. I also do this the morning of the show for a more current weather forecast. If I feel it may rain, I bring all 4 sides of my tent and keep them in my vehicle just in case. Artists may want to have an emergency disposable camping poncho or raincoat, also available at sporting goods stores, in your supplies box or bring a regular rain jacket when it looks like rain.
It is really a good idea to always bring tent weights with you to an art show even if you do not think you will need them. This will give you the option to bring them out if needed for one-day shows. I would always recommend using your weights or stakes all the time your tent is up for safety reasons. For multiple-day shows, you need weights or tent stakes. Attaching the walls that you hang art on to your tent, will give you additional weight on windy days.
Here in Arizona, I found that it does not rain that much but the wind is what causes most of the problems and damage. Since most art tents up at an art fair are only water-resistant and not waterproof, heavy rain during the show or overnight can cause much damage since water can pool up in the lower corners of your tent resulting in damage to your product or even a crushed tent.
I have seen many artists use free-standing easels and I have used them myself at times. From my experience, they will eventually lead to damage to your art from wind and I no longer recommend them for outdoor use. Flat art tends to pick up the wind like a sail and fly off. If you do use an easel, then I would use a string or zip ties to more securely attach the art to the back of the easel. Another option is to put a weight such as a sandbag at the base of the easel to give it more weight.
While I have weights, when I know I will be setting my tent up on grass or dirt, I usually just bring four long tent stakes and a hammer. I buy these 10″ metal tent stakes at Walmart or at Amazon and they fit through the holes at the base of my tent legs. The tent stakes do not take much room so I always have them with me even if I decide not to use them.
Tent stakes, Cable Zip Ties, and a few different lengths Bungee Cords:
Sometimes you have items such as trees or a bench next to your tent that you can anchor onto if necessary. I use white cable zip ties all the time to anchor the sides of my walls or my weights to the tent’s side polls. I prefer the 10″ size which is not too short or long. If I need a longer length, I use two zip ties in which a second zip tie loops on the first one allowing for a longer reach. Be sure to bring a pair of scissors, knife or another method to cut the zip ties when done. For better presentation, you can cut off the extra zip ties length not using.
You can also always bring a few white tent sidewalls even if you do not plan to use them. The walls can also be used to block the sun from hitting you directly and reduce your sun exposure or in case of rain. If you have artwork hanging on only the inside walls, placing a white sidewall up also presents a less distracting background if you have your art hanging on walls you can see through.
On numerous art shows, I have heard walls from nearby tents fall over due to wind and you hear glass from frames breaking. This happens more often than you would think. When possible, it is best to attach your walls to the tent with cable ties or other methods. Having sections of the walls bent on an angle will give additional support. Falling walls can be a liability to yourself or your customers and nobody likes to pick up the glass and have their product damaged.
The first time this happened to me when I first started showing, I lost seven frames and most of the mats and photos inside the frames were cut by the glass. I learned my lesson and am now very careful on this issue.
In case of rain, move your artwork closer to the center of the tent and put up your walls. You can never have too many extra clips and they come in handy to quickly put up walls. Be sure to watch for the accumulation of water on the lower tent roof corners and use a long stick-like object to push up on the inside of the roof from inside and let the waterfall off the sides. If lighting is in the area, you may think you want to stay dry under your tent, but you should also consider that your tent may also be a big metal lightning rod and an alternate shelter location may be prudent.
I store and transport most of my flat matted art in large plastic tubs with water-resistant tops. You can put the matted art back in the tubs during a large downpour if needed. If you feel it may rain, be very windy, or storm overnight you will need to determine which items in your booth you want to store in your vehicle and bring home for the night. If overnight bad weather is possible, keep everything off of the ground. If you have boxes, artwork, or supplies stored under your table during show hours, place them on top of your tables overnight with a waterproof tarp over them and secured with clips.
I keep a few clear very large bags with me. Folded up with a rubber band they take up little room. They can be used as a bag to pack up a large framed artwork for a customer. If you think it may rain, you could store your art show supplies or art in these bags overnight off of the ground level.
If you pack your tent while still wet when you get it home take it out and open it up to let it dry. This will prevent mildew from forming on the fabric.
If you think it will be windy overnight on multiple day shows, you can lower your legs on your tent a little, giving it a lower profile and then raise them back up the next morning. While I have never tried this, you could lower the height of your tent during the show if the wind is a problem.
On days/overnight in which rain is probable, placing foam swim or pool noodles in all four roof corners of EZ-up tents to “bend up” the tent corners will help if you have rain. This would reduce water gathering in the lower tent corners which could lead to leaking or collapsing of your tent overnight. The noodles can be purchased inexpensively at many local stores when needed. You can find white pool noodles at Amazon which will match your tent top better.
One thing I do is to purchase a product I have used to put on camping tents and is available at sporting goods stores. This can be sprayed on your tent roof with a few extra coats on the roof seams. This will help the water run off your tent when it rains. This spray will not make your tent totally waterproof or stop water from gathering in your tent corners. You need to spray these products outside with proper ventilation. I have heard that using some of these waterproof sprays will counteract the fire-resistant coating that is on the tents so I would not do this if you are cooking or using flames under your tent. I did see one tent roof catch on fire from a food vendor. It was mostly a melted part of the vinyl tent roof (large hole) and a lot of smoke.
Tent weights:
https://amzn.to/2SI1Tqg
I highly recommend bringing weights or stakes that are permitted to hold down your tent during days with wind. If you leave your tent up overnight, you must weigh down your tent or it may not be there in the morning. Most, if not all, art show requirements state that you must have weights and some even say how much weight you must have in each corner. I have never seen anyone from a show come around with a scale to check weights. Many sellers do not bring weights and when it gets windy, they have to hold the tent down with their hands. Some people make their own weights such as from PVC pipe and cement. You can see instructions here (Click to see weight instructions) or another option is to purchase weights from a store (Click to see tent weight samples)
I feel you need a weight of at least 35 lbs. or more on each tent corner. You can use adjustable truck straps or tie down straps with a S hook on each end to hang the weights to the tent corners. A set of four straps can be found at Amazon (Click to see strap samples) asense-Ratchet-Tie-Down-Straps/16651533″ span style=”font-size:1.2em”>(Click to see strap sample) .
If you have weights that stand up high such as the weight shown to the left, you can wrap a small bungee cord around the weight and tent leg to keep the weight from moving.
When your tent is on the grass or another soft surface, you can also use metal stakes. Some shows do not allow stakes on the grass and state this in the art show instructions. When allowed, I use the Coleman tent pegs available from Walmart (Click to see stake sample). The (Coleman 10-In. Steel Nail Tent Pegs) stakes can also be purchased at Amazon shown below. I bring a small hammer to pound them in and also use the hammer claw to get the stakes out of the ground. If you do not hit the green plastic part with the hammer, they last a long time. When you break the plastic part, they are so inexpensive, you can just purchase more.
You may want to see if the holes in your tent leg base will allow your stakes to go through them. I also carry a small hammer with me to pound in the stakes and to pull them out at the end of the art show.
Must watch the scary video of a dust devil sending tents up in the air. This gives you the incentive and reason to weigh your tent down. I have personally seen a tent fly up in the air spinning about 60 feet and come down hard.
How to find art shows:
Look for shows being marketed to the public, go to them and check them out to see if they look like they are any good. Find out who to talk to so when the next show comes, you are on the artist notification list. Sometimes you just see them while driving and can stop to check them out and talk to the organizer.
Ask your artist friends which shows they do and have good sales at.
Read the artist section on Craigslist in the city closest to you and also in other more distant cities in your selling areas to find smaller local art shows.
Search on-line for local art shows.
Join art clubs that put on local art shows that you can participate in.
The magazine Sunshine Artists list many festival locations around the nation. Once you get the magazine for a year or longer you will have accumulated many of the better art festival names, locations and times.
Some companies sell lists of known art shows such as the Art Fair Source Book at www.artfairsource.com or Festival Network at http://festivalnet.com. This will list more shows than you could possibly participate in. The number of shows that will be right for you may be based on costs, distance, attendance, or if your art may be especially suited for that show if it is theme orientated.Also, sometimes art can sell at events that are specifically art-related events such as “Home Tours”. In general, art shows that are mixed with other events such as music events are not usually good as art only events but some festivals can be good if they bring in a good crowd.
Over time, you will get re-invited to art shows you have done before.
Pricing Art:
This is a really tricky subject but you should price to make a profit. Take into consideration your costs beyond just your material costs, gas and art show fees. The artist has a lot of overhead and should be compensated for his time and talent.
When setting your prices, a lot depends on a variety of factors such as:
1. Your experience
2. How you value your time
3. Time spent on a specific piece of art
4. Quality of your art
5. Material Costs
6. What the competition charges for similar artwork in your area
7. What your artwork has sold for in the past
8. If you are more well known, the demand for your work
The subject of pricing is so tricky, that 10 different people could come with 10 different methods. Some shows are geared for higher-priced artwork and with small local shows, this may not be true. Also, the show’s customer attendance, demographics, and location play a role. Different artists have many different theories of what pricing strategy works best and it comes with experience.
Many photographers seem to charge by the size of the image and not how difficult or costly the image was to take or the time it took to produce. The price can vary based on other factors such as the associated costs of how the photograph is framed or printed on special paper or canvas.
As a photographer, I tend to see what other photographers are charging for their art on their websites. Many of these photographers are charging two to four times the amount I do for what I consider the same quality of photography. When determining what you are going to charge at an art show, please remember that there is a difference between what people charge online and if they are selling at that price.
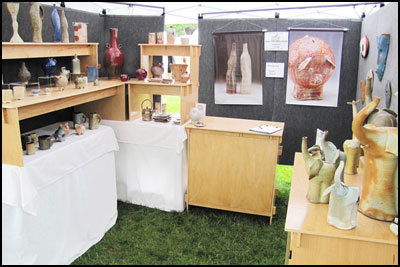
(Photo to right) You will notice carpeted Pro Panel walls, large title card labels with easy-to-see prices, and a sign stating which credit cards are accepted. This booth also has a work desk for taking orders. I recommend hanging title cards at least 1 inch from the framed or canvas artwork. This prevents the shadow from the above artwork from falling on the title card making it harder to read some of the printed information.
Many painters charge by the square inch but this can vary widely between different artists. Even the same artist may have a different cost per square inch for different sizes such as a higher square inch cost for very small paintings or less per square inch for very large paintings. Also, the artist should not determine prices based on their own personal or emotional attachment to a specific art piece.
For commission work such as in paintings, many recommend charging a larger fee than your normal amount. A commission can be more work and sometimes a pain with some clients and this should be incorporated in your pricing.
When you are selling photography or prints, a customer may ask you if you offer larger sizes. This is a good sign since most customers think art is only offered in the sizes that they can see in your booth. I recommend that you have a printed sheet listing the different sizes that you offer along with prices to show your customer. I have a sheet listing the various enlargement print sizes I offer as well as wrapped canvas sizes. This allows the artist to create custom prints on demand for the customer without the need to carry large sizes in inventory. You can offer to ship, the made to order product, directly to the customer.
Some people feel you must keep your art prices the same everywhere you sell. Other artists may adjust prices to fit different shows or areas where artist costs may be higher. I feel that you should be flexible. If you have a gallery nearby that represents your art in the area of the art show; then your prices should be the same as the gallery for that art show. The previous advice is my recommendation for the new artist that this article is geared for. For the more experienced artist that has their art in many galleries and is successful enough to bring in a steady income from those galleries, then I do not recommend that artists have different prices at art shows or on-line from the type of pricing levels at those galleries.
To me the bottom line is that if your art is not selling; you need to lower your prices to where it will sell at a price you are comfortable with. If you are selling a lot, you can try to raise your prices until you are losing sales. You will eventually set a balance that both the artist and customers are happy with.
Depending on the economy being good during some years and bad in some years, this can affect how much art, in general, is purchased in all art selling venues. A bad economy can also affect what customers will currently pay for the same art they may have been happy to pay more for in a past good economy period. Sometimes, the seller may have to adjust prices based on larger outside influences out of the seller’s control.
Since I am updating this article, in 2020 due to the Covid virus, the art show market has been basically canceled and there will be fewer outdoor type shows in 2021, as the world slowly goes back to normal. I am not sure, but fewer people will have discretionary income to purchase items they absolutely do not require at this time. The smaller local shows that this article is more geared for may sell more lower-priced items than the larger multi-day art shows. The smaller art shows may recover faster having more lower-priced options. Only time will tell when customers will start showing up in the large crowded gatherings that are part of the art show business.
I suspect that many of the smaller shows may not show up for a while due to not physically meeting to organize such events or the show organizers will just stop having the shows. I know that many of the larger art shows had financial issues and have chosen to not do shows anymore. We will have to wait to see how things go later in 2021 and into 2022. This could be an opportunity for some to start new local art/craft type shows and bring in many new artists that have not done shows before.
I do not recommend lowering your prices to compete with other artists that are really undervaluing their art. This is a no-win situation and you cannot compete on price with someone who does not mind selling for a little over the cost of his materials and not based on the total costs of running a business.
These are some thoughts from three online sellers on dealing with other sellers who charge too little, but I thought it also applied to the art show world.
Do you guys ever feel like because most artisans undersell themselves and their products it affects how people perceive you’re pricing? I like to check myself when it comes to pricing by comparing to other sellers on Etsy or Amazon but for the life of me, I don’t know how they can charge so little!
I think many that are priced low aren’t running as a legitimate business, not paying taxes, etc. My advice would be to price where you can make a profit you are happy with and then offer amazing customer service. When you offer a great product and service, buyers will be happy to pay your asking price.
The other part is that these people honestly have no idea how to price their goods to make a profit. And, because they “sew from home” or are “just a little person” or “because it is just for pocket change” – they do not invest in themselves enough to price it right. It is a mentality that I have seen in many different venues. People need to learn to value both themselves and the work they create.
I don’t worry about the ones that are priced low. I refuse to sell at Walmart prices. I value my time too much for that.
Daniel Rozmiarek wrote: “As the artist, if I want customers to give me money in exchange for my art, I don’t get to assign value to my work. My customers are in control of valuing my work. My “price” is nothing more than a guess at an amount that I believe somebody else will agree to. I have every right to assign a price higher than that of other artists, but customers have no obligation to purchase.
Fine art is a pure luxury good. It is not a commodity that people need to survive. Every sale of fine art is about the perceived value the customer has for my work, and that customer’s willingness to exchange their cash for my art.
But the reality is that nearly all potential customers at art shows are willing to pay something between $50-$500 for my work. They set the price. I’m only trying to guess what it is. If I guess too low, I’m not recovering the full value. If I guess too high, I don’t make a sale. When I guess correctly, I make a sale at the best price that customer is willing to offer.”
Additional articles and videos on pricing artwork:
I find you encourage and get additional sales if you mark your items such as matted artwork with a single price and then a discounted price for multiple purchases. An example would be a matted print price of $65.00 or two for $110.00. You can also do this on small items such as note cards for $4.50 or two for $8.00. While discounting will lower your profits on that specific sale, I feel it is better to sell to that customer for a reasonable profit than not at all. My overall pricing will average out between the initial asking price and discount sales to a fair balance. The multiple price option is available for many items that sellers have.
Some customers are afraid to ask you for a lower price. If they are looking at a piece for a while trying to decide to purchase it, I usually offer them a discount such as a set amount or a percentage discount. Many of my sales are when I offer a discount. I sometimes think I should raise my prices and then offer all my customers a discount.
If the item costs $69.00, I may say “I can offer you that item for $60.00” or “I can give you a 15% discount on that item”. If the customer is looking closely at two items to determine which one, they would like to purchase, I may say that “I can offer you a 20% discount on the second item purchased”. Sometimes they purchase both items. Unless the discount for multiple purchases is printed and displayed at the booth, I do not have a set discount I offer and pretty much make it up based on my mood at the time.
Some artists do not offer price discounts to the customer as they do not think they should discount their items. If that works for them, then they should price as they seem best. I feel that when we are in a down economy or having a show with slow sales that not offering a discount as a hard rule will just cost you sales. Even the most high-end galleries in great locations offer discounts upon request even on more established artists.
Offering a discount is different than having a sale. I do not recommend having a sales sign in your booth or a sign that says 50% off. These types of signs will bother the other sellers. Signs that say “Sale” make it more of a lower-end show and give it a flea market type feel. The customers may feel that they can also expect large discounts at other seller’s booths.
I will offer a set discount without the customer asking if I feel they are hesitant to purchase one of my items if I feel that the price is an issue for them. I feel that most sellers should be open to offering discounts to customers, even if it is a small one to encourage sales.
While the seller should not sell an item at a price they are uncomfortable with, I do not feel that handmade type items have a set price such as purchasing a toaster at Walmart. With a little negotiating, you can end up with a happy customer bringing home one of the items you sell and some money in your pocket. If you have not tried offering a discount, try it out a few times and see how it works for you.
Quite often, I am in a situation in which either the husband or the wife is in the booth. The customer is interested in purchasing one of my items but wants to bring their spouse, who is in another area of the art festival, back to the booth to approve of the purchase. Many times, they never come back. I decided to try to offer the customer an incentive before they leave to encourage a return. I recommend that you try different sales discount techniques and see what works best for you.
Pricing Labels:
I find that you need to price all your items. The price on the labels also needs to be larger than you would think would be needed. It seems that many people just cannot find the price even if it is right in front of them. You do not want customers to walk away because they do not see the price and do not want to ask. Price labels can be handwritten or printed off. My basic suggestion is if you hear numerous times the customer asks you what the price of an item is, you should adjust the location of your price label or make it larger.
For individual items, such as those lying on a table, I would price them all separately.
I price all my framed work on my walls with a separate price label. I display my matted prints grouped by size which have the same price. If they are in a print rack or boxed container on a table, I generally have one larger price label on the front center of the print rack or box.
I have seen some artists not price the more expensive framed or original paintings displayed on the walls. Like any other business, different business owners make different decisions based on their own experiences.
For artwork that has a title card you have room to display more than the price such as the artwork title, medium, and size. I feel that if the artwork is not the original, you should state on the title card that it is a print or other term you wish to use. This basic information might be obvious to the seller and does not need to be stated, but this information is not always obvious or known to the buyer. As one example, a buyer may not know if a watercolor painting behind glass is an original painting or a high-quality print unless you state that on the title card.
Name Tags:
I see most artists do not use a name tag or (Name Badge) but they seem to wear them if the art show supplies them. I feel the artist should always wear a name tag. The customer is not only buying art but also part of the experience is meeting with the artists and the forming of an emotional bond beyond just the artwork. Just because you know you are the artist, the customer may have no idea if the first person they meet in the booth is the creator or not.
Often customers ask me if I am the artist even if I am the only person in the booth. If you have more than one person in the booth and one is not the artist, then I feel it is even more important to have name tags. Also, if your booth is crowded and someone wants to ask the artist a question or make a purchase, they may not be able to tell the artist from anyone else in the booth.
Many times a customer sees my name on my name tag, relates it to my signature on the artwork, and seems to be surprised that the artist is in front of them. I am not sure why this happens so often. Perhaps they are so used to purchasing items made in factories or faraway places that it does not occur to them that some items are still made by hand and sold by the maker.
Competition:
In life, I like to think that I am competing against myself to always make myself better or become a better artist. In the art show business, you have a concentration of many other businesses in your same art medium as close as 20′ away. Many art shows have a higher percentage of booths that sell jewelry and photography. There is much more competition in these art mediums but I am sure everyone feels the same way about their own art medium.
It helps if your art is of higher quality, unique and you have a good presentation. In art mediums that have more competition, the customers are more likely to be more sensitive on pricing.
It is my viewpoint that much of the purchasing decision for the customer comes down to price. They may love what you sell and even tell you so but it still comes down to price. It is fine to competitively price your items but you cannot compete, and do not even try, with the other sellers that undervalue their artwork and who do not care if they make a profit based on the real costs of running even a small business.
For art shows that do not take into consideration limiting the number of sellers of the same medium that I sell, I tend not to go back for future shows. I figure that there are only so many people that will purchase in my product category. If 15 – 20% of the artists at this show are selling in your medium, then those dollars need to spread out to more artists making it much more difficult to have a good sales day. Another factor is how many customers attend the art show; more customers can support more artists of the same medium. This is specifically more important for those selling jewelry and photography.
Some art shows are more of fundraising events for local art clubs and they may have more artist booths than the number of customers that they bring in can support. You generally know how many booths will be at the show from seeing the show in previous years. But at the time of the application, you do not always know how many booths are selling similar types of items as you will be displaying. If a specific type of item that I sell is oversaturated in the show, I would feel that better show planning could have avoided this. If an art show does this a few times and I feel it is affecting sales, I just do not come back to that show since most of the sellers in those oversaturated groups sell very little.
How important are credit cards?
I say that if you do many art shows or if you sell items for more money than customers usually carry around, you should take credit cards. The loss of only a few sales due to not taking credit cards is not worth it since it is easy to set up an account to take credit cards and the cost for entry is very low if you already have a smartphone. I feel that the days of only taking cash are gone.
Companies such as Square up (The Square reader shown on right), PayPal, and Etsy have come out with small credit card readers that attach to many Apple or Android smartphones.
Not too many years ago, many artists that took credit cards, with similar capabilities to what the Square does now, used expensive stand-alone machines with heavy monthly service charges even on months that no credit cards were run. These credit card machines were not financially practical for the artist or small shopkeeper at outdoor events that did not sell in enough quantities to justify the cost. Most vendors at art shows are now using the small readers that work with their existing smartphones. The percentage rates to the credit companies are very competitive so even vendors that take only the occasional credit card can justify the cost since you are only charged when you use the reader.
For all of these card readers, I recommend getting at least two from your vendor of choice. If you have trouble running a customer’s card, you can try using the second reader. There is no need to lose a sale for not having a second free or low-cost card reader. You may want to from time to time, see if your readers need any free software updates. Since these hardware readers deal with money and are security-related, it is good to keep the software from not getting too old. You should also charge up your card readers that have batteries so the battery does not die during an art show.
If you take credit cards, be sure to place a sign such as Visa/MasterCard/AMEX logo on your table or wall in plain sight. You can purchase Credit card signs at reasonable prices. You may want to purchase a few signs such as for on tables or art show walls. If the customer is wondering if you take credit cards and cannot find the signs, you may lose a sale.
The Square credit card reader: Magnetic strip, embedded chip and Apple Pay
Below I describe the three different credit card readers from Square. The first one is the reader that most people were using when I first wrote this article, that only reads the credit card’s magnetic strip. I am not sure they even sell these anymore but do not currently recommend any credit card reader that does not use the chip.
The second reader can read the credit card’s embedded chip as well as the credit card’s magnetic strip. If your phone or another device can use this new reader, it is recommended that you switch to this chip reader from the reader that only reads magnetic strips.
The third type of reader allows you to not only read credit cards with the embedded chip in them but additionally allows you to take credit cards wirelessly using Apple Pay.
The Square credit card reader (card reader type 1), shown in photo to left, is the “Square” which is available at www.squareup.com. The Square is what I see most people use and has reasonable percentage fees with no other monthly service costs. This Square reader will read the magnetic stripe on the credit card.
Once you run your charge using the Square device, you will receive an email letting you know that they have received your charge. You will receive another email when they transfer the money into your bank account.
Many credit cards currently in use already have the more secure chip embedded in them, as shown in the photo to the right. My understanding is that due to a law change, all new credit cards sent out after October 2015 will be required to have the new chip in them.
This new reader has two slots that will read both the magnetic strips on older cards and also be able to read the credit cards with the chip in them.
The new Square chip reader does have a small battery in it that will need to be charged with a USB charger slot found on the bottom of the reader. I believe that the reader comes with a recharging cord. You may want to charge up the reader before any major show or at least have a spare reader.
See how to use the new Square chip reader 2 in this short video.
Square also has a third reader model (card reader type 3), shown to the right. This much larger reader will read Apple Pay and EMV (Europay, MasterCard and Visa) which in English mean cards with chips in them. I do not think this reader has the ability to read the credit card magnetic strip, so you will have to keep your older Square reader for this.
See how to use the new Square chip reader 3 in this short video.
This card reader type 3 purchase. This device also runs off of a battery.
You probably can get away with using the card reader, shown at the top left, for a while since the new cards that contain the chip will also have a magnetic strip on them. If you do many charges, the better security of card readers that can read the chip, which will have some advantages such as better fraud protection and not needing to scan the magnetic strip multiple times to get it to work.
Starting October 1, 2015, that liability for fraud shifts from the bank to the store. Because of this, another reason to get a card reader that reads the chip is that eventually, the bank may hold the artist responsible for any credit card fraud if you accept a credit card charge by using the magnetic strip.
The following information was found on the Squareup web site (link here) . Tax law requires that we provide account holders who process over $20,000 and 200 credit card payments per calendar year with a Form 1099-K before January 31st. We are also required to file a corresponding tax form with the IRS Whether you reach $20,000 in payments and more than 200 payments will be determined by looking at the SSN associated with your Square Account.
Paypal does have a customer service phone number if you have any problems. I feel that their rates are also reasonable.
PayPal update: PayPal also has a new chip reader, shown to the right, for credit cards with chips and Apple Pay. See information at (Product link here) .
Etsy also has a credit card reader. More information in (this article link) . An art show vendor told me you could call up your Etsy shop on your phone with an app. The customer can view your Etsy store items and can then order the item if you do not have that item available at your art show at that time.
This magazine is the main magazine used by professional outdoor art show artist and includes show location information as well as articles of interest to the art show artist.
This magazine is for professional artists with good art business articles but geared mostly for painters.
Submitting to art shows:
Each art show’s application is a little different. For most applications, you will be asked to send in contact information, art medium description, website, and State business license number as well as samples of your work. Many applications contain rules for the show and you need to read the rules and sign the application. It is best to read the application carefully and give them all the applicable information they have requested and digital files in the requested format and size. You do not want to give someone at the show a reason to disqualify you over a technical issue or missing information.
It is best to send in your application early if possible and consider the application deadline the date the art show wants to receive your application by. If it says, the application must be postmarked by a specific date, then send before that date.
Some local non-juried art shows may just accept the artist as they review them when the application is received. They may get full before the application deadline so there could be an advantage to applying earlier. At your smaller local art shows, if you missed the deadline send them an email or give them a call. They may have unfilled spaces available and accept you.
Some small local art events or shows do not have an application or jury fee and just a fee to participate in the event once selected. Most art shows that are bigger or have a jury select the artist will have a small application fee associated with it. If you do not get into a show, you do not get this application fee back. Once accepted, they ask you to send in your art show fee by a specific deadline. You do want to send in your art show payment before the deadline. Some art shows have an artist waiting list that they may give your booth space away to for non or late payment.
Some smaller local juried have no application fee but ask you to send in a check for the art show amount with the initial application. If you do not get into the art show, then they just destroy your check. If you do get in the show, they cash your check.
You can mark in your calendar which shows you applied for on the show date and then change the calendar message that you have been accepted or not when notified. I also mark down the acceptance notification dates for each show in my calendar. If not notified, I would wait a week or so after the notification date and then contact the show to check if you were accepted.
Keep track of the shows you have done in the past, especially the ones you have done well in. If you do not receive an automatic application the next year, contact them or visit their website to get the application.
Sometimes when you do not get in, it has more to do with too many artists applying in your same art medium and not always about your art quality. Many times, the jury will change each year for a particular art show and have their preferences on the type of art they like. Another reason you may not get accepted even after participating in the art show in previous years is that the jury may want to give some variety to the art show and let some new people in. Not being accepted can be hard if you have been accepted to this show before. Try to not take this personally, if you do not get in, as this is part of the art show market. Even with the same jury images, you may get in one year and not in another to the same art show.
When selecting new art shows to apply to, it is difficult to tell how a particular art show will be in sales for you. One option is to just visit and walk the art show one year and check out the number of visitors, the number of booths in your same art medium, and how your artwork compares in quality.
I also look for customers carrying art around that they bought at the art show. You need to determine if this is an event people go to just look for the free entertainment or buy at. Many times, you need to do a specific art show once or twice to see how well you do and if it is worth doing again.
An important general rule is that if an art show is harder to get into due to the competition of numerous artists applying every year way over the number of spaces available, this can indicate that this art show has much better sales.
For the smaller local shows, you usually have a good chance of getting in. These shows usually have no application fee or a small application fee and less expensive art show fees such as $20 – $65 for a day or slightly more for a two-day show.
Some art shows, although less common, have a smaller art show fee but charge you 12 – 20% of all your sales. When these types of shows ring up all the artist sales at their register, they will absorb the credit card fees as well as send in the State and local sales tax that they collect from the customer for you. The artist is still required to claim the income for taxing purposes.
For the larger shows, even ones locally that have many professional artists from other States can be much more difficult to get into, especially for the first time. The application fee will be larger and the art show fees may be up to $550.00 for a three-day show but will bring a much larger and qualified crowd. The process of selecting the right images for the jury and the quality of your booth shot is much more complicated for the larger shows than for the small local shows that this article is about.
How I determine which art pieces to show:
For my photography, I produce more pieces than I can show. Because of this, I try to reduce the number of even finished pieces down to what I think is just my best work. To do this, I place new photographs on Flickr and see what the viewer’s response is. I also ask my friends which ones they like to reduce my selections even more. Eventually, these selected new images are displayed in my booth to be seen by the customer. In the end, the customers select which prints will be popular. The images that do not get as much a positive response or sales as the others get moved to the back of the print bin. These prints are eventually removed and replaced with new images. The most popular selling images have a long life and the remaining prints end up in storage. I usually remove the old print and replace it with a new print image allowing me to reuse the mat. By adding a new Clear Bag, the image presentation looks new.
With some other art medium that is not reproducible as photography, you should display all your art pieces since so much time might have been put into their production. In this case, I would rotate the artwork you have at different shows since it may not fit all in your booth at once. If a show has a particular theme or location associated with it, you may want to bring artwork that best matches the customers that may come to that event.
Sometimes it is difficult for the artist to tell what will be popular with the public. The artist is sometimes more emotionally attached to a particular piece due to a related experience during creation. The customer will see the artwork based on their own experience and emotional response. I do not show any artwork that I am not happy with, but when selling art, with limited wall space, you need to display the artwork that has a history of selling on your display booth walls. I leave some of my more personal pieces for art exhibits or the print rack.
Now after I said that I would like to point out that I see some artists fill the majority of their wall space with the same art pieces for 3, 4, or more years in the same general area or at the same art shows. For me, this could give the customer the feeling that the artist is no longer producing new work or perhaps feel that they can pass by this artist booth since they may have nothing new. I suppose that this is a personal decision that needs to be made by the artist.
I reserve my limited wall space to images that will draw attention to my booth and have customers stop and look longer instead of just walking by. Sometimes these images are not the best sellers but do draw the customer’s attention. Your walls should include artwork that has been sold in the past. I also hang a few newer pieces so that visitors that attend my exhibits repeatedly see that I am still producing new work.
Most of the art displayed in your booth will be in your standard or most popular sizes. For photographers, I suggest that you have at least one larger framed or canvas photograph to give the customer the idea that you can print larger sizes. Let your customers know that you can print any of your images in larger sizes since it is not always obvious that you offer this customized service.
Who are the buying customers?
One thing I picked up is that people who are on vacation or traveling seem to be more likely to purchase art. They like to bring back something to remember their trip or purchase artwork in a style not available where they live.
If you are selling in a tourist area or area in which tourists visit, you will have more sales on average than one with just locals visiting. When people travel, they seem to be more in a buying mood. Perhaps they are just having fun with an impulse buy or feel that they cannot always come back later to purchase the item.
Travelers are concerned with how to get art purchases back with not only smaller pieces that will fit in their suitcase but larger art purchases. Customers are always looking for excuses for not purchasing at this time and it is the artist’s job to offer solutions.
In this case, if the customer does not know how to get the art back home, offer to ship it to them at your cost or a reasonable rate. For the majority of the artist, you do not need to add sales tax if shipping across State lines which can make the shipping option affordable to the customer. It does not hurt to also put a sign on your table or wall that states that shipping is available.
Younger people are more likely to purchase items under 20 or 50 dollars. Seniors who may have downsized their homes or already have their wall space filled with art are less likely to buy. With this in mind, I still treat every customer the same. Many people in Arizona come for the winter and are in smaller homes with little wall space but will buy art to bring home with them. I have found that selling art in more wealthy areas can also increase art sales but does not guarantee better sales or the ability to raise your prices for these locations.
My average buyer is between 30 and 55 years old and both men and women evenly. With artwork that hangs on the wall, it is sometimes a harder sell since both husband and wife need to approve and their tastes are not always the same. With items geared more to one sex or small enough to store in a drawer such as jewelry, you do not have this problem as much.
Selling matted prints:
I sometimes print new images in smaller sizes, mat them and place them in the print rack. I then see what the customer response is. If a specific art piece gets a good response or sells in a smaller size, I then print that image up in a larger size.
You do not want to make 2 or 10 of the same images and size with the idea that if you sell the one you have a replacement so you do not run out. Start with one or one of the same images in two sizes to see if it is popular with the customers. If you have a selected group of photographs that sell more often, then I would have a spare replacement print for just those images. For the full-time-traveling artist, you need to have more duplicate prints.
If the customer is looking for a smaller or larger print of a photograph they see, let them know you can custom print it for them and mail them the print. In this situation, I charge a reasonable shipping cost. Many people traveling do not want to carry larger artwork with them. If they live out of State and you mail it to them, you most likely do not need to charge sales tax which makes up for the additional shipping costs. You just cannot keep every image in stock of all sizes. The availability to print on demand and this mailing option is how I handle this. Larger prints can be rolled up in a tube for mailing and do not need to be mailed flat.
On special orders sometimes custom packing and mailing can be time-consuming and expensive for larger flat prints. If the customer is local, I find it more convenient to make an appointment and just drop it off at their house. The customers do not seem to mind and still pay a delivery fee that is equivalent to or less than any shipping costs.
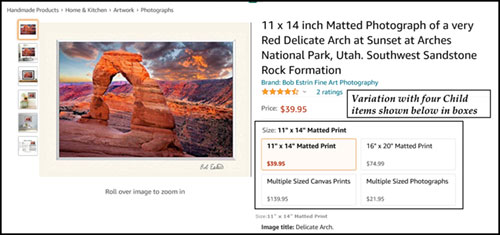
How many different sizes for matted prints: The general rule is that you do not want the sizes to be too close to each other or the customer will most likely select the lower cost smaller size. For photography, the size usually refers to the outside mat size and not the print image size. Popular mat sizes are 8×10, 11×14 and 16×20 or 18×24 and larger. If you sell note cards, you may not sell many 8×10 matted prints since the note cards are cheaper and may be close in size.
If a customer wants to only purchase the larger matted print they see in a frame. I am happy to remove the frame and sell them the matted print only. Many customers know they can frame it themselves at a lower cost or they may prefer another frame color or style. Take the money for the sale and then let the customer know to come back a little later and you will have the matted print ready for them to pick up. It helps to have a few Clear Bags of various sizes for this purpose since most shopping bags are not designed or will fit large flat art items.
I see many artists display matted prints in a print rack or other container and have many of them on their side so the image is not upright. Many artists seem to be OK with this and even if they notice it does not correct the situation even when the container will fit the prints in both directions. I feel it is always better for the customer to see the artwork as it would be displayed on a wall. For some reason, this bothers me since I have never been to a gallery and seen work displayed on its side. I recommend as part of your final setup check that you go through your print racks and look for sideways prints.
Sometimes when I exhibit my art in alternate gallery locations such as a coffee house or other business, I may have two different prices on a framed art title card, one price for the artwork framed and a lower price for non-framed. I am in the job of selling art, not frames and I try to be flexible when it comes to trying to meet the customer’s needs and price points.
While most artists sell matted prints with the standard 4-ply matboard backing, some do use 3/8″ foam core as the backing behind a matted print. Foam core is thicker and with the total combined thickness of the top mat, print, and the foam core backing, the matted prints will not fit into many standard frames that the customer may purchase. The ability to not use a frame that the customer bought because the print matting is too thick, could upset the customer and cause them to purchase a more expensive custom frame.
I feel that using foam core backing makes the prints in the print rack seem more high-end for some reason and could be beneficial when just used as a support backing, in a clear bag, to an unmated print or original painting that is not attached to the foam core. Another issue with foam core is that you cannot get as many prints in the print rack since they take up more room.
For matted prints which could include photography or other mediums such as matted watercolors or prints of paintings, I try to keep the outside mat size to standard frame sizes. If they buy a matted print for $70.00, they may be upset if they need to spend another $135.00 on a custom frame at twice the price of a standard frame. A happy customer is more likely to be a repeat customer that might start collecting your art. As a selling feature, I often inform the customers that my mats are a standard size and this gives them the option to purchase a less expensive ready-made frame instead of a custom frame.
General artist information:
If you get a higher-priced custom order or commission such as a painting or photograph at an art show, collect at least 50% at the show and then get the remaining amount before you deliver the finished art to the customer. Except for corporate buyers, I no longer send out the artwork to individuals unless I get the final payment first.
You may be tempted to start on a special customer request for your artwork or print the artwork before you receive the initial 50% deposit if they are sending it to you later, but I suggest you do not. Sometimes customers change their minds and you may be spending money and time on a custom order that has been canceled. I sometimes take the deposit by credit card or Paypal using my website and then request the remainder by check if possible.
The artist should consider providing bags to customers to bring home art purchases. I do not have any shopping type bags since most of the art I sell is matted prints already wrapped in Clear Bags. It could be considered a form of promotion for the customer to carry around your art in a clear bag for other customers at the art show to see. For the artist to purchase custom larger flat bags from a manufacturer would be expensive since you need to purchase in larger numbers and artists generally do not have needs for that quantity of bags.
I have not had any complaints from customers who are usually parked close by and just carry the larger framed or canvas art to their car. Some artists at larger art shows may have some bubble wrap and tape a layer around the artwork. I have also heard of others who buy large clear garbage bags at Home Depot and use them to wrap art. I suppose they fold the extra bag area tight over the art and tape it neatly. If you sell larger prints that are not matted or framed, you could have some extra mailing tubes ready and just place the prints in the tube for the customer.
Gail Peck Says: “Talent is almost the least of it. To consistently sell you have to have images that people can relate to emotionally. Although I’m not the most talented photographer out there, I’ve sold from the very first day because of people like what I do. They care very little about the qualities that most photographers stress over. What you need is a winning personality that can engage well with the buying public. One young man who has wonderful images sells very little because he lacks conversational skills. I can’t stress this enough!!!”
Informative video on selling art at art festivals. While this video is 1 hour 47 minutes long, the incite and information this video offers is worth the investment in time to watch at this link: How to Successfully Sell Pictures at Art Festivals and Fairs
This is a very informative article on how to sell photography at art shows that is geared more to larger professional art shows but has good advice that would also pertain to artist doing smaller local art shows”: How to sell photography at art shows
It is a fact that art generally does not sell itself. You may find that places that sell your art for you do not do as well as when you are in front of your customers as an artist selling yourself. Part of selling art is the promotion that can be approached from many ways at once.
Promotional Emails or Newsletters:
When at an art show, have an email sign-up list for visitors to fill out. When you have a new art show or any art-related event in that area, send out a simple email blast inviting them. Many artists design and send out regularly a more sophisticated newsletter with this information included in it. Many artists use a reasonably priced bulk email company such as www.icontact.com or www.constantcontact.com to send out these emails. One nice thing about these services is that you can have separate email lists under different titles and you can target only those lists you want for a specific event. Also, the customer can easily unsubscribe from your email list automatically without any extra work on the artist side.
Using postcards:
For my art exhibits, I create postcards or print off 4×6 prints, as shown in the photo, and leave them around in local businesses close to the exhibit. These locations are mainly art or photography related and customers pick them up. The remaining prints are placed at the exhibit as a fancy business card for those attending to take home. I find the 4×6 prints on sale to be cost-effective in smaller quantities versus 500 or 1000 postcards. This can also be done for art shows with the option of mailing them to past customers. Most artist create custom postcards which can be purchased in various sizes and quantity at Vistaprint. They are cost-effective on group shows.
Using Fine Art America to promote your exhibits or art shows:
I found signing up with www.fineartamerica.com and entering your event in the event calendar, which is also free, has great benefits and is available on a national level. If your event is selected, they will mention your event such as an art show in their email newsletter to a great number of customers with an art interest. These customers are targeted to the general location of the event along with a link to a web page with additional event detail. I am really surprised that more artists do not take advantage of this free service, but now you know about it and you can with a little effort. Once you spend the initial time to figure out how to enter an event, all your future events will only take about 10 minutes to submit.
General Promotion:
When more serious art collectors see your artwork at different events such as art shows, displaying at galleries, public art events, solo shows, and group shows around your area they may be more likely to purchase some of your art at art shows. I feel all of this promotion adds up to give you more credibility as an artist. I feel collectors would rather buy art from an artist that they feel will be around in 5 to 10 years more than someone they see on and off for a year and then disappears from the art scene.
My theory is that even if you live in a very populated and spread-out area such as I do near Phoenix, AZ, the number of people that visit art shows is much smaller. These people will visit many art shows as something they enjoy doing and not just to look for art to purchase. They will get around and if you do enough shows or other types of public exhibits, even in different areas, they will start to recognize your artwork. It is something like print ads where some customers need to see your product (artwork) numerous times before they make a purchase.
One thing I do is have numerous public art exhibits. While I like to show my newer work mostly, for larger exhibits of my art, I always include a few older classic images that I have shown at shows in the past. I do this so people who may not remember your name may remember one of the older images if they liked it. They will then realize that this is an artist they have seen before and that this is new work from you that they have not seen. This is part of my need to see your work numerous times to get credibility to some collectors who do not like to show their classics.
Banners:
One way to get art show visitors to notice you is to put up a custom banner. Visitors tend to walk by the artist’s tents at a fast pace and something needs to catch their eye to slow down or stop to look in more detail. One thing that can do that is a banner since it is usually in a place that is very viewable from a distance. You can have a banner on the top inside of the back wall or at the top inside of a side wall, at the front of your tent high up as a few examples. I have a 6′ x 3′ vinyl banner that I have even hung from the front of my 6′ table inside my tent.
I recommend vinyl banners with four grommets in the corner, as seen to the right, so you can use rope or bungee cord to place them in your tent area. Many local office supply stores can do banners. You normally need to pick a size and then custom design one before you have it printed. Most online printing companies have a step-by-step process that you go through. You can even upload your own text and images in your design.
Business Cards:
At first thought the artist may think that this is a no-brainer, having business cards easily accessible at art shows is a good thing. At art shows, for customers purchasing art is more of an “In the moment decision”. Once the customer leaves your booth, they will most not likely be back. Sometimes taking a business card is just a nice way for the customer to leave your booth without purchasing.
Artists handle business cards in different ways. Someplace them in the front of the booth that is easy to find and take. Other artists may place them within the booth area but in a section more inside the booth in which a more serious customer looking for a business card could find. I see the artists at the higher-end shows sometimes have business cards in the back out of sight and supply business cards to the customer upon request. This has the advantage of having the customer requiring a brief personal contact with the artist to receive the card.
Although it is unlikely that people who take business cards will contact you later, it does happen and the cost of business cards is so small that I feel they are worth having. Having a well-designed business card also has a more professional look. I recommend that your business card have more of an artist look and can have one of your art images or a custom business logo on it. Some business card information you may include is the artist’s name, business name, business address, website, email address, and phone number. In my case, I have all this information on my website’s contact page. If you feel that many of your customers do not use the internet, then I would have a phone number on the business card.
Many places from local print shops to the popular Vistaprint can print business cards for you. If you go the online route, I recommend getting on the mailing list first so you will get discount offers before ordering. The more business cards you purchase at the same time, the less expensive each card becomes. One suggestion on business cards is to not have both sides coated unless you are having print on both sides. If you only coat the text/image side to give it a glossier look and leave the blank side uncoated, you will be able to write on the blank side. It is nice to use the blank side of the card to write down for the customer the title, sizes, or prices of the art pieces that they are interested in for later referral.
For an artist, I do not think that the pre-designed business cards that you can choose for free at these sites and just add your contact information will be best since artists should show in their business card that they are creative and have custom looking cards. If you just want to get some business cards starting out and use a more basic card design, that is fine but for the long term, I suggest a more impressive business card.
What should I do? I used to have business cards, but now I produce 4×6 photo prints at Costco that act as my business cards. I have some set forms that I add 3-4 photos on and the customers seem to like them. At this time, I have five different versions with different themes such as landscapes, doors, or cars and if a customer is interested in a particular subject matter in my booth, I give them a related theme card. You can see an example of one of my cards here. I tend to change out my card images every year and see them as more of a trading card that customers who visit me often may collect.
I do not always wait for a customer to pick up a business card. If a customer seems serious by looking at many of my images and taking their time but not ready to purchase at that time, I will offer them a business card by handing one to them as they are leaving the booth. The artist should not give a business card to the customer without the customer asking for one until the artist is sure that the customer is not going to purchase at that time and is leaving the booth.
Another reason to have business cards is if you have an exhibit in a public place such as a library or store. Having business cards available is a way for customers to take some information home with them to be able to contact the artist. Business cards are also handy to hand out to fellow artists or others as part of your normal artist business activities.
Another alternative option or addition to handing out business cards is to offer to send the customer an email showing the art they are interested in. If the customer is interested in a specific image or seller item, ask for the customer’s name and email address. Then send out later that day or the next morning an email to the customer including the following information.
1. Thanking them for visiting your artist booth.
2. Perhaps something personal that you talked about.
3. Include the image or images of artwork or item that the customer was interested in. These should be inline images and not as attachments if possible.
4. Artwork or item information such as title, size, and price.
5. A closing statement to contact you to further discuss or purchase. Include your contact information.
Do not be afraid to resend a similar email out a few weeks later. Having an interested customer’s email address can also be used to send invites to future art shows.
Custom business cards from Vistaprint are available through Amazon. Prices are reasonable with quantities of 500 or 1000.
Web Sites:
I feel that every artist today should have a website or web presence. You can put your art on-line at many sites such as www.fineartamerica.com and many more without needing to know much about computers. If you do not know how to create high-quality digital files of your art, you can have someone scan or photograph your art that will be used to upload to these sites. Many of these online gallery sites will even make a print from your submitted digital file and fulfill the order by sending the print directly to the customer for you.
There are many of these art-related website galleries around and many are free to display your art. Others may be free but charge you a fee if you sell any art. Some of the more sophisticated sights may charge a monthly fee, just to display, depending on how many art images you have in your own personal gallery. These sights may look more like your own individual website and not just one more artist grouped into a large group of artists. There are many choices to choose from and no reason you cannot select more than one.
If you can manage your own website or pay someone to do this for you, it is always best to have your own website for flexibility and customization for your specific needs. When you sell off of your own website, you do not need to share a commission. Most commercial websites are geared to selling original artwork or a photography print of one size. They do not handle multiple-sized prints which are best for photography or painters wanting to sell prints besides the originals. With your own customized website, you can display multiple print sizes and prices such as I do
Another advantage of having your own website or multiple gallery websites is that many online gallery websites have been going out of business and all your hard work setting them up is then gone. For this reason, always keep a copy of all your digital art files on your computer for later use. I have my art on my own website www.bobestrin.com and also on a variety of other online gallery sites that bring in additional views of my artwork. On some of these other websites that may have only 3 -10 images shown, I then list my own personal website for customers to visit to view additional art images.
Artists can use their website to market future art shows. I have a specific web page on my site just for this. I list the event, date, hours, address, and show website and contact information if available. This information, if done in advance, can be picked up by search engines. Recently, I have started to send out tweets on Twitter about my art show events as well as other art-related events and new images. With Twitter, you have a limited number of words you can use so I give a link to my website’s www.bobestrin.com/shows.htm page to show more detailed information about the art event if they are interested. While I do not use Facebook myself if you do this can also be a powerful marketing tool to promote your art and events.
The website is also a good place for customers to look up more information on you as an artist. I have a page that shows articles that have been written on my art, a page that lists my past exhibitions, and a page that lists an artist statement/bio and general information about the artist. I tend to think of my website as an online resume/portfolio and not just for selling my artwork.
My experience is that websites will not bring in sales that often but when they come in; tend to be much larger orders. A website is also a good place for Interior Designers to find you as well as an online portfolio for people to review that may want to exhibit your art. A website has many benefits beyond its sales potential.
Be careful of large or strangely written email order inquiries that you get from people looking at your website. Most of them are just people trying to scam you using email. You will start to recognize them easily once you get a bunch of them. You can read the article How artists can protect themselves from internet scam orders for more information and examples of scam emails I have received.
Labeling / Artist Bio or Artist Statement:
For most artworks I find that the title and price are always needed with size as an option. For photography, many customers want to know the location of the subject matter.
For painters, as a customer, I prefer a label that says if it is an original or print/Giclee especially if the painting is printed on canvas or framed. It also is nice to list on the label the more specific painting type such as watercolor, acrylic or oil since not everyone is as art knowledgeable as the artist.
Many artists place a printed page of information about themselves such as an artist statement or bio and a small artist headshot on the back of the matted artwork.
I see no reason you can not do this on original or framed artwork also. Customers seem to like this as I see them turning over the matted prints looking at the additional information.
This artist bio/artist statement page also gives a stronger bond between the art piece and the artist which helps in an overall stronger relationship between the customer and the artist. As I have said before, the customer is not just buying the art but also part of the purchase is related to the connection to the artist.
With a picture of the artist on the bio, it helps the customer relate and recognize that the artist is in the booth. To my surprise, many customers do not always understand that most of the time, the artist is the one in the booth. One of the most asked questions I get is “Did you take these” or “Are all these photographs yours”.
I place a business card in the packaging of every order I sell. I also have a stamp with my name and website that goes on the back of each matted or framed print. If they wish to order another piece of art in the future, I try to make it easy for them to find me. My website is also my name and will come up on top during a web search of my name.
Limited Edition Prints:
This is up to the artist to decide whether to do this and to define what they want their definition of a limited edition is since many artists do it differently. A few of the larger nationally known art shows require limited edition prints to participate in that specific art show.
Some artists are very sensitive on this subject and either are very for it or very against it. I just chose not to do it anymore.
I personally do not think it is a good idea and worth the paperwork for most artists to keep track of for photography for the art show market. I have never had a customer tell me he was not going to purchase a piece because it was not a limited edition. To me, it is more of a gallery marketing thing and since photography prints can now be duplicated with exactly the same quality when printed in bulk or at a later date, I am not sure it applies to the original reason for limited edition printing. For some States such as artists selling in California or New York, more specific rules are set up for limited edition paperwork and should be reviewed.
If you sell photography to more of a serious collector’s market or through an art gallery, I can see a benefit to selling limited edition prints in smaller editions. Some photographers limit their editions to smaller amounts such as 15 -50 prints per image. Many times, these smaller edition prints are much more expensive to purchase and maybe each individually hand done such as in a darkroom or using an alternative photography process.
When I first started, I did have selected prints marked as LE of 100, 150, or 250. When reality hit and I saw that even if I had a popular print, it would sell in such a high number to reach my edition numbers due to the limited amount of shows I did. Because of this, I decided that limited edition numbers were not for me. I have seen an artist put very high LE numbers such as 1000 or higher and I wonder if it is really limited to those numbers. You should always stick to what your limited-edition agreement was in your printed statement for those artworks sold under a limited-edition agreement. I see very few artists selling limited edition prints at art shows nowadays as compared to what I saw in the past. It is really a personal choice for the artist and in some mediums such as bronze sculptures, it could be the norm.
Certificate of Authenticity:
Some artists do place a sheet called a Certificate of Authenticity on the back of matted or framed prints. In addition to the artist’s name and contact information, the certificate may also give print information specific to that print such as art title, size, a special type of paper it was printed on, the ink used along with the artist’s signature. These are similar to what would be on a limited-edition certificate without any edition size listed.
Shown to the right, you can see a sample COA from California photographer Roy Kerckhoffs. Some States require COA with your prints and you should determine if this applies to you. A few articles with additional information on Certificate of Authenticity can be found here in article one Some examples of COA can be seen here.
Some artists print these out on fancier certificate colored paper with nice borders that adds a personal touch and value to the artwork. Here are some samples of Certificate Paper which can come with a fancy border. I use an ivory colored 110 lbs. thick card stock paper, shown below, that I purchase at Staples and can print two to an 8 1/2 x 11 sheet.
Shown is one of my COA sheets which is printed on thick 110 lb paper. I have a slightly different version for my vertical and panoramic images. I give this COA sheet filled out to the customer when they purchase a photograph of any size or type. I used to not have a COA for my matted prints but have changed to give out COA for any purchase to make things consistent.
Signing of Prints: (Or not signing your art)
I have visited numerous indoor group photography exhibits, not art shows, that do not have the artist’s signature showing on the front of the prints or mats so that it is visible. At these photography exhibits, the artist’s name is displayed on the accompanying art title card. This is now becoming very common with the reasons I have been given by photographers is that the signature distracts from the viewing of the art. This reason does not make sense to me but I have heard it multiple times. For me, adding an original signature of the artist to the artist’s artwork is traditional and also serves a purpose that is not distracting. I originally said a few years ago in this article “What’s next, are the painters no longer going to paint their signature on their art”, but since then I have seen this with different painters.
On my recent trip to California, I saw some paintings without a signature on them at a few different small galleries. These are mostly young artists and the artist tells me that their teachers are telling them not to sign their paintings since it distracts from the art. I do not understand this trend since when I see paintings in higher-end galleries or museums, they seem to be all signed. I have never heard a customer complain that the signature distracts from the viewing of the art. I hope these artists are placing their names on the back of the artwork.
I personally do not understand this trend, since if I ask a customer if they would like one of my photographs with an artist signature on the mat or not, I would think close to 100% of customers would want the artist signature. I feel that the artist’s signature should display in some manner from the front either on the print or mat. I now additionally sign the back of the photographic print, in the white border area, with an archival thin line pen even though this artist’s signature does not show when displayed. The reason for this is in case the photograph has its mat replaced in the future, the artist’s signature is still associated with the print with the idea that the artist personally approved this print and this is not a later reprint.
Now that I said my viewpoint, I sometimes do not sign some of my photographs under certain conditions. When a quantity of larger-sized prints is ordered for a commercial client and they are framing themselves, I will ask them if they want the photographs to be signed. If they do, I will pick a place in the lower right image area that the entire signature will show up on, such as in a lighter area. I also do not put the signature at the very bottom of the image, so the framer does not cover part of the signature up with the matting. I also drop ship my larger canvas prints directly from the printer to the customer since postage twice of a 32″ x 48″ canvas can be expensive and I do not want to pass these costs to the customer. In both these situations, if the customer does not get a signature on the front of the art piece, I send along with a separate printed Certificate of Authenticity of each piece of art that has the artist’s signature on it. The customer can then attach the certificate to the back of the wrapped canvas print or for prints, to the back of the frame. While I do not currently add a digital signature to my art, this would be one way to handle these situations.
For painters, in addition to the artist’s signature, I see some of them paint a copyright symbol and date on the front of their paintings. I personally think having a copyright symbol on a painting is unnecessary and I see no purpose for this. You already own the copyright by painting the art piece. Most buyers of artwork understand that they are only purchasing the artwork to display as art and the purchase does not include any other rights to copy or reproduce the artwork for any reason.
On the subject of painting a date, of the painting creation year, on the painting front, why would painters do this?
If a buyer sees a painting with a date 5 years old, they may not buy it even if they liked it because they may feel that the artist could not sell it before over numerous years and wonder what is wrong with it. Never give a buyer a reason to not purchase your painting. If you must supply this information, place the date on the back of the artwork as information for those that value this information such as museums. The wood bars or paper backing makes a great surface to add this information.
Art Show Lighting:
Some shows will be at night and lighting is required. Many times, new artists do not think to bring lighting and show their artwork in the dark or with a flashlight. If a show is going on after sunset, you should ask if they will be providing electricity. If they do provide electricity, ask them if there will be an additional charge.
You will need to bring lights, a Power Strip with a surge protector and phone charging slots and extra extension Cords. I also bring extra bulbs in case one breaks. Many smaller shows do not supply or offer electricity. Most shows will not allow generators since they make a lot of noise. I have a simple system for power that consists of the following items. One item you may need is a 12v deep cycle battery or marine battery or AGM battery that you can purchase locally. Power Inverter with 2 plugs (12-volt battery to 120-volt plugs) and lights of your choosing that use CFL or LED bulbs. The power inverter should also have a charging option for your phone. Optionally you can purchase a Battery Box which makes it easier to transport the heavy battery with a strap handle. You would also need a battery charger that charges deep cycle batteries (AGM 12v)and also your 12v car battery so it can be used for both when needed.
Different 12v deep cycle batteries have different amounts of power they can store such as 35ah to 100ah batteries. It depends on how much you want to spend and how much power you need to get you through the entire art show. If you get a battery that lasts longer, you may be able to avoid bringing the heavy battery home to charge each night. Batteries are heavy so you would need one with a handle built-in or purchase a battery box that fits your battery, to carry it around in.
Deep cycle batteries are different from regular car batteries, so do not get the wrong type. One battery option is to get the sealed type that you do not have to check to see if they need water and then fill them from time to time. Also on batteries (non lithium), it is best not to drain them over 40-50% of their power or you can lose some life of your battery. You can buy batteries at various local stores.
The bottom selection shows some sample items but Amazon has numerous choices. Many of these items can be used for home use also.
The compact flash bulbs put out 60w of light but use about 15w of power. One charged marine battery will run 6-10 lights the whole night but you do need to remember to charge the battery before the show. I also find lights with an arm that has a large clip on the end very useful (Clip Lamp with Adjustable Arm Link). You can attach these to many areas of the tent on the bars or a table edge and point them to light up specific areas.
When choosing CFL or LED bulbs, you now have the choice of selecting bulbs with the color temperature that your art looks best at. Some CFL or LED bulbs put out light similar to regular incandescent bulbs with others looking warmer or daylight balanced. The LCD bulbs used to be expensive but are now cost-effective when you need to draw minimum power from your battery. I recommend using the LCD bulbs.
The picture shows the color difference between daylight 5000k lighting on the left side and soft white 3000k lighting on the right. The Kelvin (k) color of your lighting can affect the color of your product on display.
I have seen so many different lighting methods from ineffective Christmas lights, flashlights, and candles to well-designed lighting arrangements. I suggest you check out some nighttime local art shows and see what other artists are doing. If your booth is lit well and other booths near you are not lit as well, the customers may be more attracted to your booth like moths to a flame.
Note: If you have an art show-related question for an artist at an art show, the artists are usually very helpful and will share their experience with you. If they have a customer, you should let them help the customer before continuing your questions with them.
Unsold Matted Prints and What to do with matted prints that do not sell:
How I handle matted prints that have not sold: I currently have three sizes of matted prints and refer to my 11 x 14 mat size here in this example. I currently carefully take the prints out of my 11 x 14 mats that have not sold for a while. The actual image is 7 x 10.5 being printed on 8 x 12 photo paper. I then reuse the old 11 x 14 mat (top and backing board) by placing a new print image in the mat and protect it with a new 11 x 14 Clear Bag. I use archival double-stick tape to hold my mats together and it is possible to just run your finger between the two parts of the old mat and separate the two pieces without harming the mat. Since the cost of the mats is more than the actual print image, I can save a lot of money by reusing my older mats that are in perfect condition.
I used to write, with a pencil, the image title on the lower-left section of the mat below the image. This caused a problem in which I could not reuse the mat with a new image so I no longer do this. I now have the image title on the Bio information sheet on the back of my matted prints. I still have my signature on my mat fronts but that only limits the image replacement to be of the same vertical or horizontal format.
What I do with my old removed prints: In this case, the outside photo paper dimensions are 8 x 12 with a 7 x 10.5 image showing with a white border. I ordered some Clear Bags in the specific size of 8 x 12 and also ordered some 8 x 12 mat backing board. I simply take the Clear Bag and put it on the backing board and print and seal the bag. I place these prints in a separate bin and sell them for $19.95 instead of the matted version which sells for about twice the price.
I find that this helps sell my older prints and also gives the customer, on a lower budget, another price point that might work for them. You can also use this method of selling prints with no top custom cut mat and just a backing board and Clear Bag for odd-sized prints such as panoramas or just larger prints such as 16 x 20 size or larger. Some customers purchasing larger unframed prints would be interested in handling the framing themselves.
Customers photographing art at the art show:
I recently had someone ask me about customers photographing the artwork at art shows using cell phone cameras. While this was asked by a photographer, some of the same would apply to other mediums. I rarely see photographers put up a no photography sign but I do see it on other booths for painters and other mediums such as jewelry. In my opinion, the bottom line is that I think that it is rude to take a picture of someone’s artwork without first asking permission.
Photographers may have concerns that the customer may want to print out a photo to place on their walls and painters, jewelers and others may feel the customer may be stealing their ideas or designs.
Many artists have their artwork online where anyone can copy the image but are more concerned with people taking photos at art events.
As for cell phone cameras taking images of your artwork, here are some reasons not to worry so much.
1. The matted prints are behind plastic and framed prints are behind glass which will reflect or blur some of the images.
2. They are also usually photographing at a steep angle and not straight on or from a distance which will not give a good result for printing purposes.
3.
Cell phones will not give most people the quality they are looking for in a “Printed” print when photographing other people’s art.
4.
A cell phone image is not usually taken to copy or steal a print in my opinion. It could be a way to just remember the moment such as one does when on vacation.
5. The people who take photos are not your buying customers and you do not really lose any sales. At best, they are taking the image home to determine if they like the image to purchase it later.
So how do I handle this situation? Sometimes my reaction is based on who the customer is and how they are taking the photo.
I generally do not do anything, but on occasion, I do ask them not to photograph the artwork mostly as an art education thing if I see them taking a second photo.
If they have a higher-quality digital camera and I see them taking a photo, I may ask them to not photograph the art. One thing the artist can do is offer to email them a photograph of the art pieces they are interested in if those art pieces are already available on a public website.
I see some painters put up a sign on the art show walls such as “No photography”. This wording would not make sense for a photographer to do, but other wording such as “Please do not photograph the artwork” may work. With a sign or not, people will on occasion photograph your artwork because they did not see your sign or do not know it is best to ask permission from the artist first.
One painter I saw had three small signs on her walls of a camera with a red line over the camera to state no photography. She did not appreciate it when people photographed her paintings. Her viewpoint was that she sold notecards of her paintings and that the customer could just purchase them.
Customers handling art roughly:
With my matted photography prints in my print bin, I see customers handle the prints very roughly. I understand that this is not a museum or inside a gallery setting, but customers should treat the art with respect and not do anything to damage the work. I feel that many customers feel that the very thin plastic sheet that covers the matted prints protects it under all conditions. The customers tend to take their nails and repeatedly tap on the image area or take their nails or fingers and rub up and down the image area when pointing out different image sections. I recently showed some of my matted prints to a gallery and she was leaning on the counter with her hand pushing down with her weight on it on the image areas of my matted prints and this was a gallery owner.
I am not sure why this happens so often. Years ago, I put some small signs on my print racks but had no effect. Now if I see a customer really pressing hard or using their nails repeatedly on the image area, I nicely ask them to handle the prints by the sides which is the mat board area. That usually makes the point that the customer understands.
Licensing / Sales Tax:
Most cities want you to pay for a tax license even if you only do business in their town for a few days a year. This license varies per city but is in the $50 – $70 range a year. You would fill out the paperwork and send a check to the city every month. If you have no sales for that city that month, you still need to send in the paperwork with a zero’s sales number. Once you have been doing this for a year or two, the city may let you fill out the paperwork every quarter for small sales amounts.
Some cities do special arrangements with small art shows so you do not have to pay for a whole zero’s license for a one-time event. Most towns have temporary event permits that cost less than a yearly license that will last the duration of the art show. If you wish to do a single show in a town, call the town and inquire about a special fair license, its costs and how long it lasts.
I would like to do a single or a few local art shows in different cities in my area but I do not find that it is worth it to do the paperwork for a year and perhaps pay $50-60 a year per city in fees for doing 2 shows that maybe only cost $50.00 to participate in with low sales possibilities. I feel that I need to just pick one or two cities per year and stick to shows in those areas. When I show in galleries or art exhibits in other cities, that business collects the sales tax for me and I do not need to have a city license for each of those cities. This allows me to exhibit and sell my art in a wider area without the need for multiple business or tax licenses.
I do not recommend including sales tax in the price, but in States where this is allowed some artists do this.
See your tax advisor for further information.
Bob Estrin
Feel free to enter comments (without links). The last 10 comments will be on display with the option to view previous comments if you want.
Feel free to link to this article from your website.
Bob Estrin Photography is a participant in the Amazon Services LLC Associates Program, an affiliate advertising program designed to provide a means for sites to earn advertising fees by advertising and linking to amazon.com.
Computer fitting format of this article: Click Here.
Article by Bob Estrin
2021 Handmade at Amazon – Guide to the New Handmade Edit Procedure including using Variations with Parent / Child Items and Customization Changes
So what is a Variation compared to a Handmade Customization?
Handmade sellers listing in the handmade category have the customizations feature as shown in the example page with the windmill. This sample page also shows the new optional thumbnail photos associated with the customization options. The marketplace sellers have the ability to use variations and the handmade category did not. Now handmade sellers have been given the feature of using variations shown in the sample page with the red arch. The new variations do not replace the customizations, as it is just a new option. Variations are much more complex than customizations, so if you do not understand what variations are at the end of this section, that would be normal. I advise watching the three Amazon Webinar/Videos listed in the next section below for a more visual presentation.
It is advised when discussing Variations or Customizations such as on a forum, that you do not use the two terms Variations and Customizations as interchangeable since they are quite different.
Most handmade sellers are already familiar with item customizations as they have used them in the past. An item can have a base item configuration and then the customer can select, optionally or not, some item configuration choice to that base item. A seller can have a base or default item of a white hat and then offer the seller a customization option of changing to a yellow, red or blue hat. Customization options did not require separate physical item listings.
Parent / Child Variation Relationship:
Variations (also known as parent-child relationships) are sets of individual physical product listings, each with a separate SKU number, that are related to one another. The new feature variations that have been available to the Marketplace for years are now available for handmade sellers to use. A seller can use variations on a group of items that are related to each other such as in terms of size, color, scent, flavor, etc., and take advantage of having those items connected as variations.
Variations are really a Parent listing and multiple Child items under that parent. Note: I refer to in this article the term ‘Parent listing’ but the Parent is not really a physical item that the customer can buy, the Parent is really just a header or virtual item that has the separate physical Child items listed under.
If you already have separate SKU items that would work together such as four hat SKUs of different colors, then it is simple to create a Parent listing and then place those four existing items under one Parent listing. Once you place those four items under a Parent listing, the four items could be referred to as Child items. You have then set up a Variation of one Parent listing and four Child items.
Those Child items you place under the Parent listing can be both FBM and FBA items. As before, the FBA Child items can not have customization options, but the FBM Child items can optionally have customization options.
Many sellers are looking at the new edit menu option ‘Variances’ and thinking that this is the item customization option they have been working with for years. It is further confusing since this Variation menu edit option only opens up, without an error message, for new items never saved or for existing Parent listings. This Variation menu edit option will not open for an existing regular item which is most of what sellers currently have. For some reason, Amazon now makes us go to another menu option in the Manage Inventory screen to add or change an item’s customization.
Customization option:
The sample screen page with the windmill is the way the customer sees the current customization options. Using customizations is nice since you can set up multiple options without the need to set up separate items with their own SKU numbers. This saves a lot of item maintenance by not having multiple item listings and also allow personalization options chosen by the customer to be entered. One issue is that this customization screen is not shown to the customer at first and the customer has to select the ‘Customize Now’ button first to see this customization page. With customization options, you can not set your inventory levels.
Variation option:
The sample item page shown with the red arch displays one of my art pieces and in four different size option boxes to select from. Each size is a separate Child item SKU. You will also see a sample Variation edit/entry screen shown below filled in to create the Parent listing for the variation. The results of this Variation Parent listing is the item page (variation) showing the red arch that the customer sees with four size options. One advantage to using Variations is that all the item options are displayed on the first item display page and the customer does not have to select any additional ‘Customize Now’ button. This makes your item listing one step closer to an order. One issue is that you have to have separate item SKUs for each child item, so your maintenance is higher if you change your listing often. With each variation (Child item) having its own SKU number, you can set your separate inventory levels not available with customizations.
When one of your Child items gets selected to be viewed by a customer, on that same item detail page the customer will also be able to see a brief listing of the other Child items to select from. This is in some ways similar to how handmade customization options are in which you can choose from multiple item types from the one item page. When a variation item page is set up, the customer can choose other Child items right from the main item page. With customizations, the customer must first press the ‘Customize Now’ button, which is an extra step, to see the other purchase options.
If you have one handmade item as described above with customizations of three additional colored hats, that one item itself cannot be a variation. You need at least two Child items to have a Parent listing / Child items variation relationship. That being said, when you set up a new Parent listing using the variations screen page, you need to enter at least two existing SKU numbers. If the seller chooses to create another new item specifically for a yellow hat and add new items for a red and blue hat, then in the end you have four separate hat items with one being a white hat (without any customizations) and a yellow, red and blue hats.
The seller can now easily create a Parent listing and then add to that Parent listing four SKUs relating to the different hat-colored items.
So basically with Handmade customizations, you can give the seller different choices of an item under one item SKU listing. With variations, each Child item must be its own individual item SKU. It is up to the seller to determine which items they have and how they might work together to form Parent/Child relationships to take advantage of some of the offerings of using variations. I have listed later in the article, some advantages of using variations but the main one is that all the Child items share the combination of all the Child items Rating, Stars and Reviews under that same Parent listing. The customer will see the accumulation of all the ratings on each Child item displayed to them. Also, since each Child item has its own SKU, you can keep track of the item inventory for each item. This was not possible for customization options.
What items will work together as a Parent-Child Variation:
Not all items need to be converted into a Variation with a Parent listing and Child item relationship. The seller can pick which item may work out better together under a variation. You can use the four general guidelines listed just below. If you already have multiple SKUs of the same item and only the size or color or scent is different, you may be better off placing those separate SKU’s under one Parent listing variance.
Some handmade items may be better off just leaving them as one item with multiple customizations. Other handmade items that have multiple customization options may be better splitting up into multiple separate items with a different SKU for each customization option. It is an individual choice.
This is what Amazon says about if your items will work together as a Parent-Child Variation:
– The products are fundamentally the same.
– The products vary only in a few very specific ways.
– Buyers expect to find these products together on a single product page.
– Products could share a single title.
If the products need to have different information within the main title is better not to add them as Variations, however, if you will like to add them, you are welcome to do so. Keep in mind that ratings, stars, and reviews will be shared among the other listings within your Variation.
Below is additional information from Amazon about what products work together for variations. It is up to the seller to determine if their products will work together. Amazon has the ability to adjust your listings or inform the seller to adjust the listings if they feel the items do not work together as a variation.
Error message “Variations are not available for this category:
If you get the error message “Variations are not available for this category”, that just means that you are trying to view the variation edit page after bringing up to edit an existing non-Parent listing record. It has nothing to do with any category. You can only access the variations edit page when creating new items or editing an existing Parent listing. This variations edit page is only used for Parent listings. More on this error message later in the article.
———————————
Do not expect to fully understand variations from reading just one source. Listed below some videos on variations in which I highly recommend that you watch the first three. This will give you a better understanding of the rest of the article.
This article covers both the new variations and also the new edit screen changes as well as many of the new changes to how customizations work.
Use this guide’s first section as a starting point to assist you in entering your first Parent / Child items.
Use this guide’s second section to see the many changes made to the customization system.
This list gives sellers some good Amazon created documentation worth checking out and how-to videos on adding Variations to your Amazon listings:
Webinars on Variations – *** I highly suggest that you watch these first three videos so you can better understand this article ***
3. Here is a more advanced video on Variations – I suggest you see the first section and ignore the advanced section on Variation bulk updates: (Click link here to see Webinar).
4. For more advance variation sellers in which you may have two variation options such as both Size and Color, you can watch the YouTube video here: (Click link here to see Webinar).
Many new changes have come to the Handmade system in April 2021. Some of the main ones are listed here.
1. The item edit screen has been changed to look more like the item edit screen used by other categories in the Marketplace. The familiar item edit selection shown on this gravestone is gone.
2. The item customization screen has changed. The customization screen is separate from the main item edit screen. You can still add, edit and delete individual item customizations using the updated edit drop-down menu (Shown in Exhibit A).
3. The Manage Inventory edit drop-down menu is different with a few new selections listed.
4. The most dramatic change is the ability to have item Variations. This has been available before, but not for handmade items.
Variation Advantages: Should you give it a try?
Do your own research to determine if Variations are right for you and the type of items you sell. Initially, you may not want to start Variations with your best-selling items.
1. One advantage to using Variations is that a customer can find multiple items of the color, size, material, scents, or additional theme distinctions of your products on a single detail item page. Before Variations on the Marketplace, you would have to have only one item display on a single detail page for each size or color. Note: Handmade sellers did have customization options that produce a similar but not the same operation.
You can also combine two different item descriptions under one Variation theme such as size and color. You can have the customer select on a single detail page by the size of a shirt and then select what color of the shirt. The system will not allow the customer to purchase the item if the seller does not have the shirt in that size and color combination in stock. With handmade customizations, sellers could not keep track of inventory for each customization option. Each Child item, that does not have a customization option for it, has its own inventory quantity under its own ASIN number.
2. One of the advantages of having your items using a Parent/Child Variation relationship is that you can show multiple items (different ASINS) on one item selling page to the customer. The item selling page shows customers other products you sell, even though they did not initially search for them. This helps customers that are looking for one product that you sell to discover additional versions of a single product.
Also, by using a Parent/Child Variation relationship, the SEO for one of the Child items can bring you to the item display page for that specific item, at that time the customer will see that you have all of the Child item choices additionally to look at. This gives the customer a better chance of finding the specific item choice such as size, color, or material on one item display page instead of on different pages or hidden inside your customization options which is an extra step for the customer to review before they press the Add to Cart button. This can result in more sales.
3. The total number of all customer reviews for all Child items displays on each individual Child item selling page. So, if you had a Parent listing and 2 Child items, and one Child had 2 product reviews and the other Child had 3 product reviews, each Child item displayed to the customer will show a quantity and star rating for the 5 product reviews. If you had 20 items under one Variation and each one had an average of 4 product reviews, when each of the 20 Child items displays to the customer, it will show 80 product reviews. When I refer to combined reviews, that would include both product review star ratings and the written product reviews.
My understanding is if a customer searches for a red shirt, I believe it will only bring up a thumbnail in search of one of your Child items under that Parent listing. So, if the search might have brought up more than one of your item’s thumbnails during a search before listed with that Parent listing, it would only bring up one now. Of course, if the customer selects your thumbnail, it will bring up the closes one related to the search and show the customer a product page with shirts showing the red shirt and also multiple Child item shirt colors to choose from.
4. Utilizing product Variations on Amazon can help increase sales by giving the seller a higher conversion rate.
5. Variations do not show up to the customer if they’re out of stock.
6. You can always remove one of the variations from the Parent listings. Basically, removing one Child item from the Parent listing can be done, and then the item is then just an independent item as before.
Once your Parent listing is completed, you always have the option of going back into that Parent listing and adding additional Child items at a later date.
7. Unique to the handmade category, sellers can have Variations Child item records and those Child item records can optionally have customizations. Handmade sellers can have the best of both.
8. Since Child items under a parent Variation have their own ASIN number, you can have Child items on FBA. Your FBA items can have the advantages of how the Variation item selling pages display the seller’s items. Child items can also be merchant fulfilled. You cannot have FBA items if any of the Children also have handmade customizations associated with them.
9. A major advantage of using Variations is that all the individual Children, under the one Parent listing, share the same ratings, stars, reviews, and keyword relevancy that were connected to the ASIN. I could not find out any information on how individual item ranking from good item sales affects the individual Child item or related Child items under the same parent.
I did notice that the sales rank listed in the Manage Inventory screen for each Child item under the one Parent listing was all the same. The sales rank for these four different items in my example had different sales ranks before and now they are the same as seen in the photo just below. I noticed that the item rank given to all the Child records (with a previous rank) was the lowest rank of the Child items associated with that Parent listing. I found this interesting, but I have no idea how this item rank change has any impact on item search ranking for individual Child items. It took a day or two for the sales rank to change, so it does not happen right away.
Variation Update Delays
1. I read it is better to set up your new Parent listing with your Child items and then wait for all the text, variations, photos, and ratings to finish updating to where they show to the customer correctly and match what was saved to the items edit screens. These updates do not happen right away and do not show up all at once. If any of your Child items have ratings, they will eventually merge.
2. I have read that you should not edit the listings, move images, etc. until you see that all the items have initially fully updated. These updates may take 3, 6, 12, or 24 hours to actually propagate through the Amazon database and you need to be patient. I feel this is the reason that Amazon seller support wants the sellers to wait at least 24 hours before contacting them on Parent / Child / Variation item listings. I assume they mean 24 hours after your last update to the item.
3. If the seller is making numerous changes on the Parent listing or Child items, then Amazon updating multiple changes at once will cause many delays in updates to how it shows eventually to the customer or seller online and this makes things very confusing to the seller. The changes to the item they made will not display correctly to the customer online for a long time that could be up to 24 hours. From what I have been reading from multiple sellers is that they feel that they don’t understand what is happening and what they are doing wrong. When really patience is all that is needed to wait for the updates to propagate throughout Amazon to update the items so they show to the customer with the latest updates. This makes it very inefficient for the seller, but this is also out of the seller’s control.
4. I noticed the last thing that updates are the combination of the ranking number that displays in the Manage Inventory screen and that seems to take days to combine. I know one time, this update took about 3-4 days.
5. I have also read that the combining of the Child items ratings, stars, product reviews are determined by the Amazon algorithm bot and it may not happen if the bot feels the items are not related or similar enough to be part of the same variation. In this case, the ratings, stars, product reviews will stay the same for that Child item and that Child item will not show the combination ratings of the other Child items. I have read that sales history is merged regardless. I would not worry about this issue of not combining ratings unless it starts happening to you first. Since variation updates take sometimes 24 hours or more from your last update, give your listing time before you decide that one or more of your child items ratings did not combine.
Variation Changes: How to create Parent / Child items:
Here is a very brief step by step summary of one way of creating a new Parent listing / Child item Variations:
This step by step does not cover every condition and was only intended to give a very brief guide once you have read more about creating a Parent listing / Child item variation in the article below. The following steps not only create the Parent listings but changed the regular items to Child items after they are associated to the Parent listing. Let me know in the comment section at the end of the article if this worked for you or which step you had problems with. Many of these general steps are for creating an entire Parent record. The steps to fill out the Variation screen are just a section of the following steps.
1. Determine which existing items you wish to be part of a Variation and take note of the SKUs.
Note: Some preliminary decisions need to be made before you create your Parent listings. The seller needs to determine which existing items are simular enough to be considered by Amazon to be a valid part of a Parent/Child relationship. The seller should also pre-determine which Parent Variation theme will be used. The instruction below assume that you have the items already created to add to the Parent listing.
Note: While the seller can create a Parent listing before the soon to be Child items are created by filling out the Parent listing fields without initially filling out the Child item SKU numbers, it is recommended at first to have the items already available with their SKU numbers to add as Child items while first creating the Parent listing. The seller can always add additional Child items to an existing Parent listing at a later time.
2. Take one of those existing items you are going to have as a Child item for this Parent listing and in the edit drop-down menu, select copy listing. This starts a new item with the same data that may match to a certain point of many of your Child items chosen to be under this Parent listing. You also have the option of creating a new item from scratch and then fill in all the needed fields manually to create the Parent listing.
If you call up an existing item in edit mode and try to go to the edit Variations screen, you will just get an error message. To create a Parent listing, you have to start a new item from scratch or go into a copy of an existing item that has not been saved yet to create a new Parent listing. The Variations page can only be used in the creation of a new Parent listings or modifying an existing Parent listing. The new Variation edit screen has nothing to do with going into an item’s customization options.
3. You are now in edit mode and you will turn this copy record into a Parent listing. Click on Advanced View to see the full page menu.
I highly recommend that you look at the different edit pages live when you read these notes. You can fill out the fields as if you are creating a new Parent listing. If your are actually creating a Parent listing, then you will save it in the end. If this is just for practice on creating a Parent listing, then do not save in the end.
4. Select edit menu ‘Vital Info’ and adjust fields as needed. You may want to make the title and description more generic to fit all the Child items. When the system creates the titles on your Child items under this Parent listing, it will take your Parent listing title and add the variation difference to the end such as size or color. Example Generic title here (8 x 10 inches). You can always adjust the Child item titles, descriptions, and other fields as needed later.
5. Select edit menu ‘Offer’. Fill in the SKU name for the Parent listing of your name choosing. Leaving this SKU field blank will cause the system to create a Parent listing SKU for you. One option is to place the name “-parent” to the end of your SKU name so it is obvious that this listing is a Parent listing and not a regular child item. Then fill or adjust all the Offer fields as needed.
For Handmade category listings, I would put in a Production Time value here on the Parent listing ‘Offer’ edit screen or the system may put a 1 day Production time on all the Child items under this Parent listing. This has caused me problems and is unique to this field. I think if you do not fill in the Production Time field on the Parent listing, it defaults to Production Days of 1 on all the Child item listings under that parent even if the Production Time field was previously filled in on the Child item with a higher value. I highly recommend that you check the Production Time on all Child Items after any Parent listing update.
6. Select edit menu ‘Images’ and place just one photo in the first area. It does not matter which Child item photo you choose but the photo should be first image compatible.
7. Select edit menu ‘Keywords’ and adjust the displaying fields as needed.
8. Select edit menu ‘More Details’ and fill in or adjust the displaying fields as needed. Remember that all or most of these fields will overwrite the same fields on each Child item you have listed under this Parent listing. If you leave any of the ‘More Detail’ fields blank, the system may blank out any of these same fields on each Child item even if that field was filled in on the Child item previously. Each different Handmade category may display different fields here specific to your category.
9. So far, most of this is the same as creating a new item listing from a copy except for the one photo in step 6 and the SKU number in step 5.
10. Select the edit menu ‘Variations’. What makes a Parent listing is filling out the Variations edit page. If you get an error message calling up the Variations page, it just means you are not on an existing Parent listing or new item (Not yet saved). You are probably on an existing item (Non-Parent). The Variance page can only be filled out for Parent listings. To fill out the Variations page, you must start a new item from scratch or start with a new item creation from copying an existing similar item.
11. See more detail later in the article on how to fill out this Variations page but you first need to pick a Variation theme. For many of the same types of listings, you will probably use the same Variation theme over and over again. In this example, I am choosing the Variation theme “SizeName” from the drop-down menu as shown in the sample Variations screen.
12. You will now see an empty box appear that says “Size” in this example. Fill the Size field in with your first item size such as XLarge and then another empty box shows up. Fill out all your sizes in the boxes such as Large, Medium, and Small. Each size should represent a single Child item SKU. Make sure what you fill in these boxes is short and descriptive for your Child items as this information is shown to the customer. When done filling the boxes, press the Add Variations button. Note: For each different Variation theme, you may have a different box name to fill out other than size.
13. In this sample, on the lower section of the Variations edit screen, you will now see four rows to fill out. The first column is already filled out with your sizes entered previously.
Note: The first column relates to the Variation theme selected above. Because this example Variation theme is ‘SizeName’, the first column heading is called ‘Size’. If you had chosen another Variation theme such as ‘ColorName’, the first column heading would be called ‘Color’ with color names, previously filled out on this Variation page, listed below in the first column.
14. Fill out the second column with the SKU numbers of all the existing Child items you want to be listed under this Parent listing. I just copy/paste the SKUs over from the Manage Inventory page, opened in a separate tab, to make sure I got the entire number correctly. Be careful to place the correct SKU number next to the matching first column wording.
After you enter an SKU number, a separate pop-up box will display that shows the SKU item photo and two selection buttons on the bottom as “Return to form” and “Yes, this is my product”. I just select the “Return to form” button option which takes me back to the Variations edit page. This only shows up once and not for any additional SKU numbers entered.
15. Now fill out the Condition from the drop-down menu, Standard Price, and Quantity on the next three columns. If the Child item SKU is an FBA item, you do not have to fill out the quantity. For FBA items, the system will automatically update your FBA inventory in the quantity field.
16. If other Variation themes have additional columns to fill out, fill them out now.
17. When all the Variation edit pages are completed, you can press the Save and Finish button. You can still go to the other menu edit options and review first since you do not lose your different edit changes when you go to other edit pages. If you do go to the other edit pages, you may want to press the ‘Apply Changes’ button on the Variations page to be safe. You must press the Save and Finish button once before exiting the edit menu.
When creating a new Parent listing, I would fill out all the edit pages and then just save the new Parent listing once at the end. The reason for this one save is that the updates take a long time to show to the customer for Variations and creating multiple updates to your Parent listings or Child items will increase the time it takes to show your final changes to the customer.
18. Wait for 5 – 15 minutes and then view the Manage Inventory page to see if the Parent listing with the multiple Child items is listed. You may have to find the Parent listing and click on the “>” symbol to display the Child items now under that Parent listing.
19. Even if it looks like the information has been saved in Manage Inventory, the item listings that show up for the customer could take up to 24 hours to display correctly. You may see some of the information display to the customer very quickly but over time, additional information will show that matches how it will look eventually. You may think you entered something incorrectly, but it is just a long delay for all the information to propagate to all the right places for the customer to see. You may have to wait a day or longer for all the combinations of all the ratings, stars, ranking, and product reviews to combine to show to the customer for each Child item.
20. You will now need to go into each Child listing and adjust any detailed information fields that have been blanked out or overwritten from what was entered or not entered on the Parent listing. This is the only hard part and most time-consuming. This is why I generally start the creation of the Parent listing by doing a copy of one of my Child item listings under that Parent so that many of the Parent listing fields are filled out similar to what I want as stated in step 2 above. Do a special check to verify that the Production Time value is correct. I basically go into the Child items with the attitude that even though I did not ask for my Child item fields to be wiped out or overlayed with different information when I asked that Child item to be part of a Parent relationship, those fields may have been changed and I need to verify that they end up as I wanted and usually contain the same information before the Parent/Child relationship.
It will take less time if you follow the recommended step 21 below. You may need to verify all this child information and change the title, description, keywords, tax code, production time, item sizes, how your products are made, Bullet Point fields, and other fields as needed to display to the customer as you want. This is more difficult because your changes to the Child items may not display to the customer to verify what you entered for hours or until the next day. I recommend that after 24 hours after your last change, you go into each Item child displayed to the customer and do one last verification that everything is how you wanted. I highly recommend that you read the section below called “Variations: Very Important and Should Read”.
21. Before I create a Parent listing, I save all of my Child item detail information in a special Catalog Listing report so I have it ready to copy back if needed. If you want, you can run a regular inventory report to save much of this information and then copy the field information, not in this report such as the Bullet Points or keyword fields as an example to a Word document or something to have this information available to copy back to the Child items if needed. While I feel that most sellers reading this will skip this part and not do this, many of you will find out you need this information and now this Child item detail information is overwritten by the Parent listing creation. Information on how to request the Catalog Listing report from Amazon to use for a week is explained later in the article.
Managed Inventory screen showing one Parent and four Child items
1: This first screen shows the Managed Inventory screen. If you have a new Variation Parent listing, you will see it with its related Child-level items shown directly under the Parent listing. The Parent listing has its own ASIN number but it is not a selling item itself. I think about the Parent listing as more of a header record for the related Child ASIN items. Each Child-level item has its own ASIN number and is an actual item that shows to the customer. Since each Child item has its own ASIN, you can keep separate inventory quantities for each item even if it is another size or color showing on the item selling page with other similar items. This does not happen if the Child item has customizations in which may have different quantities in stock for different colors or sizes as part of a customization option.
Each Child-level item can optionally have customizations set up for it. In my example shown here, I have a Parent listing with four Child items. Two of the Child items have no customizations (Matted prints) and two of the Child items do have customizations for different sizes (canvas prints) and (Individual photographs).
You can have Variations which are a Parent and one or more Child items with no customizations. You can also have Variations which is a Parent and one or more Child items with some Child items having a customization option.
On the screen, on the left side, you will see a down-facing arrow next to the word Variations and the displayed Child items just below. The Manage Inventory screen may display a right-facing arrow ‘>’ and the seller can select this arrow to visually display the Child item listings below the Parent listings.
If one of the Child items is out of stock, that item may show to the customer, but the customer will not be able to purchase that Child item that is out of stock. The other Child items on the page with stock available will still be available for the customer to purchase.
You can also see on the Manage Inventory screen the updated edit drop-down menu. The edit selection option will take you to a new edit item area. Also new on this drop-down menu is a method to add or change existing item customizations.
When first starting with Variations, you may want to use some of your less important items before doing anything with your best-selling items.
On the Manage Inventory screen next to the ‘Status’ is a radio button you can fill out to display the ‘Incomplete’ listings. When you select this, the page only lists out the Variation Parent listings. I have no idea why this is but I do not feel that this means that the Variation listings or the Child items are not correct or incomplete.
This shows a representation of this example use of the Variations with the Parent/Child relationship with one Parent and four Child items. In this case, two of the Child items have customizations and two of the Child items do not have customizations.
2: You can see how this chart below relates to the way the Parent/Child items are grouped in the Manage Inventory screen above.
Variations menu option entry screen for the Parent listing
3: You only need to fill out the Variations screen for the Parent listing and leave this section blank for all the Child items relating to this Parent listing. Later on in the article, I cover some of the other menu options Vital Info, Images, and More Details. While our previous edit screen allowed us to enter customization information at the time of the other item information, customization information is entered in a separate area now.
You can also see how to fill out the edit screen fields creating a Variant listing in my step-by-step instructions earlier in the article.
If you are creating a new Parent listing, besides the Variations edit screen, you will also need to fill out the other five edit screens Vital Info, Offer, Images, Keywords and More Details with at least the minimum required field values. I have been creating a new Parent listing by selecting a regular item that I would be using as one of these Parents Child items. I then copy that regular item and when I bring up the edit screen, many of my fields are already filled in for my Parent listing. I generally fill in the Variant edit screen and add one photo to the Images edit page. I may also adjust the title or product description if needed before saving and creating the Parent listing. After the Parent listing is created, I go into all the Child items under that Parent listing and see what Child item fields need to be adjusted since some of them have the Child item fields overwritten by the information from the Parent listing. I specifically check the Child item’s title, product description, and keyword fields and modify as needed.
If you are in the new edit screen just adding or editing an existing item, you can skip this Variations menu option. You only need to fill this out if you are specifically setting up a new Parent listing or editing an existing Parent listing.
In this example, from the Variation theme drop-down menu, I chose the theme ‘SizeName’. There are many choices of Variation themes and this will determine what your items require. If you have a Parent listing that has different Child items with different colors, your Variation theme may be ‘ColorName’. Where it says (B) Size, I entered four sizes, one for each of my Child items. This places the four lines below, one name for each size/name shown as (C) (F) (D) and (E) under the Size column header (Q).
At this time, I filled in the four seller’s SKUs for each Child item under the Seller’s SKU column. The SKUs will already be available from the Manage Inventory screen under the Child item line. I copy the SKUs from the Manage Inventory screen and paste them into the Variation screen. You do not want to get the SKU numbers mixed up. When you enter SKUs in the Variation screen, they must already exist as items. Do not enter an SKU number that does not exist yet and plan on creating a future item with that SKU entered.
Next, the Condition column is filled out. In my case all my items are New. Next, you fill out the Standard Price column (L). This can be taken from the item’s regular price. If that item has customizations, the item’s regular price will be the base price. Next, you will fill out the Quantity column (M). This would be zero if the item is FBA. If merchant fulfilled, this would be the inventory listed on your manage inventory item line.
When done filling in the Variations information, you can press the ‘Save and Finish’ button. There is also a button called ‘Apply Changes’ which if you optionally fill in the top line entry field boxes such as condition, price, or quantity and then press Apply Changes, those values entered will propagate to the below field boxes. You can change all six edit screens as needed and then press the ‘Save and Finish’ once when you are done with all your edits. You do not have to save for each page change.
While this Variations menu option for the Parent listing is new, it gets easier to understand once you use it a few times. If you do not see all six menu options, make sure that the ‘Advanced View’ toggle switch is on.
While I refer to a Parent as an item, in this article, such as ‘Parent listing’, the Parent is not a physical item that a customer can order. I think of the Parent as more of a header title that all the Child items fall under. The Parent listing does show up in the Manage Inventory screen as a line, but since it is not a physical item, no customer will see it.
After you create the Parent listing, you will notice that the titles on all the related Child items will be the title as stated on the Parent listing with the addition of the Variation theme wording such as what is listed under Size (Q shown above), ColorName or whatever Variations theme column name you have for this Parent listing. In this example, the title on the Parent listing is “11 x 14 Inch Mat Photograph”. The Child item title would end up being “11 x 14 Inch Mat Photograph (11 x 14 Matted Print)” in which “(11 x 14 Matted Print)” (C shown above) is added to the end of the Child items titles. You can change the title on the Child items afterward to what you want.
Variations choices available:
Depending on what items a seller sells and the options available to the customers that are offered, the seller must select the best Variation theme for the Parent listing. Some themes are more simple such as if your items only have a size difference, you may choose to use the Variation theme ‘SizeName’. If only an item color difference you may choose to use the Variation theme ‘ColorName’. On more complex customer choices, the Variation theme may contain two choices such as both size and color in which the Variation theme ‘Size & Color’ is used.
If you sold hats and you had three sizes (small, medium and large) and those hats came in four colors you may use the Variation theme ‘Size & Color’. When using Variations, each hat and size combination needs to have its own item SKU, so you end up with twelve different Child items each with their own SKU number under the one Parent listing.
If you are not sure which Variation theme may be best for your handmade items, you can look in the Amazon marketplace categories outside of handmade for similar items to yours. Then see which Variation types show up and what Variation theme those other sellers are using. You should be able to visually see what will work best for the items you sell in the handmade category.
Here are the choices for Variation themes in the drop-down menu:
Color & Metal Type,
Color & Pattern,
Color & Ring Size,
Color & Style,
ColorName,
Color & Item Display Length,
Item Display Length & Style,
Gem Type,
Gem Type& Ring Size,
Material Type,
Metal Type,
Metal Type & Ring Size,
Pattern,
Ring Size,
Ring Size &Gem Type,
Ring Size&Item Display Width,
SizeName,
Size & Color,
Style,
Style Pattern & Size,
Style & Ring Size. You select the Variation theme that best fits your item.
I have read that not every Variation theme is available in every category, so some Variation themes listed here may not be available for all product categories.
Sample Variation theme of both Size and Color:
As you can see, when you have a Variation theme that list two options, you add to the complexity and additional Child item SKUs are required. In this sample, 12 lines would need to be filled out under this Variation listing.
Variations are not available for this category error message:
If you receive the message while editing your existing item “Variations are not available for this category” in the Variations edit screen as shown in the image below, the error message is misleading. It should probably say something like, ‘Variations can only be accessed by the Parent listing, you are editing a regular product item’ (Non-Parent). Basically, the Variations menu option in item edit will only open up on existing Parent listings or new items that have not been saved yet.
The ‘Variations’ edit screen can only be filled out for Parent listings. When you take an existing item and edit it and then go to the edit Variations screen, it will not let you enter this screen option. The Variations are not to be filled out for regular product items, only Parent listings.
Because of the recent changes to the Handmade customizations, some sellers may see the edit Variations menu option and think this is related to customizations. While the new Variations and the existing customizations have some similarities, they are separate features. Going into the Variations edit screen will not bring up your item customizations.
You can still edit this existing item, whether they are regular items or Child items with any of the other edit screen pages, just not the Variations edit screen. You create a Parent listing from the Add a product menu option first and then fill out the Variation edit screen. This will add your chosen existing items as Child items to your Parent listing.
You can also create a Parent listing by copying one of the existing regular items and that should also allow you to access the Variation screen. When you copy an existing regular item, you will have to adjust all the fields as needed since many of them will be filled out from the copy.
It is required to have your Child items created before you add their SKUs to the Parent listing.
Variations: Very Important and Should Read:
While this article and many of the videos on Variants seem a little tricky until you get used to the process, I found adding existing items to a parent record, making a Variation, pretty straightforward. The part that was confusing to me was the changing of the information in many of the fields of the Child item when you attach that Child item to a Parent listing. I have no idea why Amazon has it set up that way. My viewpoint is if I do not fill in a field on the Parent listing, then do not overlay that field on the Child item and just let what was in that field on the Child item as it was.
Of all of the videos I watched, I do not remember hearing about this aspect of changing the Child items field values.
This is why I recommend sellers request from Amazon the ability to run the Catalog Listings Report. This report will give you a backup of all your item fields, except the customization fields and the production time field, that you can save to your local hard drive. The regular inventory reports do not show you the style keyword, search terms, the new Variation fields, or the new Bullet Point (Additional features) fields and the Catalog Listing Report does. You can read how to request this report here Request Catalog Listing Report / Bulk Upload Instructions.
You can use the Catalog Listing Report’s spreadsheet file to restore some of the item information onto Amazon by using the bulk upload. A detailed article link on how to do bulk uploads is also on the previous link reference.
When I create a new Parent listing, I copy one of the items from one of the Child items I will add to that Parent listing. That way many of the fields on the Parent listing are already filled in.
When creating your new Parent listing, most of the information added/entered to the new Parent listing will populate over to the Child items. This will overlay the same fields on all the Child items related to that Parent listing.
When creating your new Parent listing, most of the information fields left blank on the new Parent listing will populate over to the Child items. This will overlay the same fields on all the Child items related to that Parent listing clearing out all those Child item fields.
You can enter fields on the Parent listing to be transferred over to the Child item but the information may not be what you want in those Child item fields. If what you enter on the Parent listing that you would like to populate over to the Child item such as Shipping method, Gift message, Gift wrap, Bullet Points, Style keywords, Search terms, Size and How are the product made to name a few, then it is a good idea to enter that information on the Parent listing.
Take a special look at the Production Time field on the Child items to verify it did not revert to 1 day. It is best to fill out the Production Time field on the Parent listing so that the Child item does not get set to a default low number.
After the Parent listing has populated over to the Child items, you can go in and individually change any of the fields in the Child listings so they’re not all the same. Each Child item will be different in some way and those differences should reflect in the fields of the Child item. These could be the title, product description, size, color, product material, keywords as some examples.
It is important to know that after the Parent listing / Child items relationship is formed (Initial creation of the Parent listing), the Child items information will no longer be affected or be changed by the information in the Parent listing. In other words, the Parent listing will no longer change or propagate its information down to the Child item information (for most fields) after the initial creation of the Parent listing. You can now change the information needed on the Child item and those changes will stay.
Update: I have read that updating an existing Parent listing may still change some of the fields on the related Child items such as the Child item description field as an example. If the seller makes a change to an existing Parent listing, they may want to check certain field values on the Child items such as the title, description, or fields relating to the Variation theme such as color or size. I have no idea of what fields may be affected.
If you add a new Child item to an existing Parent listing, I am not sure if the Parent listing will then propagate its information down to the new Child item since I had not done this to see. If it does not, I may in the future create a Parent listing with just one Child item, then wait a full 24 hours for all the updates to be finalized, and then go into the Parent listing and add the remaining Child item SKU numbers. This would stop the Child item fields from being changed due to the propagating of information from the Parent for most of the fields for these new SKU Child items just added. I have not tested this yet.
The Parent listing information trickles down, the Child item information does not trickle up. Changes on the Child item should not affect the related Parent listing.
I read that if you remove the Parent listing, the detail field information in the Child item will not be changed from its current state. The Child item will no longer be part of the variation and no longer have its rankings combined with the other Child items.
Note: With one Variation, I entered a Parent listing with three Child items. I adjusted the fields on the three Child items as needed and waited until the three Child items updated completely.
Next, I went into the same Parent listing and added two new Variation Child item SKUs. After the Parent listing was saved, the two new Child items fields needed to be adjusted. The previous three Child items fields from that Parent listing were left alone or did not get modified even though I changed the Parent listing.
If you find that your Child’s items fields change unexpectedly, it could be that some of the information of the related Parent listing overwrote or cleared out some of the information in your Child’s item records. I believe this happened to me with no idea why it happened.
This is what Amazon says about this but I do not think this is worded well “Note: When adding existing ASINs to a variation family, you must edit any information in Keywords and More Details in the parent ASIN, as these will not carry over from the existing child ASINs when you create your parent-child relationship. After successfully creating your variation, be sure to confirm your child ASINs have the correct information under Keywords and More Details.”
Catalog listing spreadsheet report showing how variation information is stored:
If you plan to make numerous changes to your items due to converting many items to use Variations (Parent/Child), it may be a good idea to request from Amazon the ability to run the Catalog Listings Report. This report will give you a backup of all your item fields, except the customization fields and the production time field, that you can save to your local hard drive. You can read how to request this report here Request Catalog Listing Report.
For advanced users, you can create Variations using Inventory File Templates and bulk upload the spreadsheet file to Amazon. For me, I will use the Variations edit menu screen and create my Parent records one at a time manually. See the video on this (Click here for more information).
Here is a small section of the Catalog Listing Report spreadsheet showing the new Variations fields and the ‘Color’ field. Note that the color field is different than the color map column field. When the item is not part of a variation, then these four variations fields would be blank. You can see the variation relationship type, the variation theme in which in this case is ColorName, the parent SKU name, and the Parent/ Child field showing if the item line is a parent or child item. In this situation, due to fact that the variations theme is ColorName, the Color column comes into play and is shown in this example. If the variation theme was SizeName, then the column Size would come into play. Depending on what the variation theme is will determine what other field or fields are used in conjunction with these variants. Not shown in this example, but if the variation theme was ‘Size & Color’, you would need both the Size and Color column fields filled in for all the child items.
In this situation, due to fact that the variations theme is SizeStyle, the Size column comes into play and is shown in this example.
Variations: General Notes:
When you first create your Parent listing and enter a product title, the Parent listing title entered overlays your titles in all the Child items under this Variation. At the end of each Child item title will be extra wording such as (size title) or (color title). Basically, what was entered into the first Variable column for each Child item. The seller can later change the Child item title as they wish.
I noticed that when you initially create a new Parent-Child relationship, the system updates pretty quickly. My experience is that if you update after (or update multiple times) that for these Parent-Child items it can take a very long time to update. I had to wait until the next day to see the results that showed up for the customer. If you feel that the system is not updating your new information, you may have to wait up to 24 hours to see your results. Your update time may vary.
I have also noticed that your changes do not update all at once. Your Variation Child items showing to the customer may have various areas, such as wording to images, change all at different times throughout the day and into the next day. This makes it difficult to verify your changes and you may just have to wait until the next morning to check your Variation Child item listings to see if they are as expected.
My understanding is each Child item Variation has its individual keywords for Amazon to use in search. While the search terms may be very similar between the Children under the same Parent, each Child should have some unique search terms, specifically ones that indicate size, color, or whatever distinguishes this Child from the other Child Variation.
My understanding is that the Parent listing is not indexed and therefore is not searchable. You can enter search term keywords to the Parent listing and if you do those keywords will be transferred to all the Child items. You may need to go into the keywords for the Child items and add any specific keywords that directly relate to the Child item such as color or size as needed. From what I read rankings are tied to each individual Child Variation and the rankings of multiple Child items do not accumulate in the Parent listing.
The order in which you enter your Child items in the Variation edit page is not necessarily the same order the items display together on the item page the customer sees. From what I have read, the seller cannot set the Child items to show up to the customer in any specific order.
I have read that a single Parent listing can have both FBA Child items and FBM Child items on it.
Since a Parent listing can have both FBA and FBM items, if the customer did not select show me only Prime items, the item displayed may show other variations in which some are Prime items and others are merchant fulfilled items. The customer may not realize that the merchant fulfilled choices may not arrive at Prime item speed even if the item listing page shown to the customer should state the estimated delivery times for each variation separately.
There is a Variation Wizard, but I heard that it is not advised to use it for items in the Handmade category.
Child items under variations can still have their own individual production time (number of creation days) value for fulfilled by merchant items.
If you want to delete one of the Child items under a Variation, you just go to the Parent listing line under Manage Inventory and do an item edit on the Parent Listing. Once in edit mode, you can go to the Variations edit screen and check off the box to the left of the Child item SKU number you want to remove from this Parent listing. Then press the ‘Delete selected’ button on the screen and then save the changes with the Save and Finish button. This should just remove the SKU number from the Parent and not delete the SKU number item. You are only deleting the Parent/Child relationship for this one item and not the actual item itself.
—————————–
Amazon item detail page displayed to the customer showing four-item Variations (Child items)
4: This is the regular item selling page that the customer sees. In this display below, you can see the four Child items. They show up as four selectable text boxes C, D, E, and F.
This page displays a lot of letters. These letters point to the new edit screens, displayed above and below, showing where your entries go to show up for the customer. In most cases, the new edit screen fields are the same but just in a little different format. The fields that are related to the new Parent/Child Variation fields may have more of an interest hereof where you enter the data and where it shows up for the customer. Fields B, C, D, E, F, and Q, on the display below, relate to the Parent / Child Variations.
While having Variations on our handmade item selling page may seem odd, customers have been using item selling pages with Variation Child items for a long time and are used to them. It may be true for many items that work well with Variations that the seller may have an increase in sales.
When the customer clicks on one of the four Child boxes C, D, E, or F, you will notice that the photos change and the item description changes. With two of my Child items that have customization options, those customization options only display to the customer when the customer physically clicks on one of the Child boxes that have customizations associated with them.
When you add existing similar item SKUs to a Parent listing that has a Variation theme associated with it, all your Child SKUs will be available to be seen by the customer under that Parent. When one of the Child items displays, such as a result of a customer search, the customer will see the detailed information, such as different titles or photos, of the current Child SKU related to the search. The customer will also see multiple boxes with each box a different item SKU. One for each Child under that Parent to be clicked on as shown in C, D, E, and F areas in the sample screen below.
If the customer clicks on one of the other Child SKU item boxes, then the title, description, photos, and other information will change and now the customer is seeing another Child item and its specific information. See the example of four items (C, D, E, and F) under one Parent listing.
If the customer just places the mouse of one of the Child item boxes, then only the item image will be changed but not show the item detail information.
Variations can be used when appropriate and are similar items. Sellers are still allowed to use customizations, so I feel you should only switch to Variations when it makes sense.
One of the advantages of using Variations over customizations is that the customer can see different choices for a similar item all on one item detail page without needing the extra step of having the customer go into the Customization page. If your items have numerous different customization options, then listing with customizations may be a better choice than converting to use Variations. If you had to take each customization choice and make it into a separate SKU, that may add a lot of extra SKUs which would be harder to maintenance.
If you combine existing similar item SKUs, that already exist separately, using a Parent listing with Variation Child items, you have the same advantages without needing to create separate new SKU items.
You can view the screen below to match the letter to the screen above to give you an idea of where the data shows to the customer.
This detail page shows when the Box E (Multiple sized canvas prints) is selected. This is one of the other Child items under the same Parent listing. You will notice that the title, description, and photographs have changed for the customer since another Child item SKU is displaying. You can see that the customer has originally brought up one detail page which was originally the Box C Child item shown above and because Box E was selected by the customer, now the page displays the Box E Child item shown below. You will notice while the Box E item is showing, the customer still has easy access to the other three Child box SKUs on the same display page. This will probably look cooler if Amazon adds the ability to substitute the Child SKU text boxes to actual small photos.
You will also notice that Box E (Multiple sized canvas prints) is also showing customization options (See Customize Now button). This item offers multiple sizes. Even Child items can optionally have customizations.
On my testing, the Variation theme ‘ColorName’ will display small swatch thumbnail photos of your product Child items in the text box as shown below. Most of the Variation themes do not show the small swatch thumbnail photos but only text box wording. Note: The different Child items shown here may not be typical items that belong in a Variation relationship, but I used them as an example to show a common Variation theme of ‘ColorName’. More typically, you would use this theme selling a hat in four colors.
The new item edit screen ‘Images’ showing the product’s images
5: This is the new ‘Images” edit screen for entering item images. It looks different since the screen has images on top and below. The upper section shows the images currently on the item. The lower section is where you can add or adjust the images and then rearrange them in the order wanted.
This example screen shown is the image page for a Child item. The edit image page for the regular items or Child items looks the same. For the regular and Child item images, they would be entered as usual.
For the Parent page, it is required that you enter at least one photo. I could not see any need to enter more than one photo. This photo shows up when you are editing the Parent listing pages but I do not think this photo gets transferred to the Child items.
The new item edit screen ‘Vital Info’ showing the product’s vital detail information
6: This Vital Info edit screen shows some letters (A, G, C, and K) next to the fields and where they show up on the item display screen shown above. These fields can be filled in as before on the old item edit screen.
On this Vital Info screen, you have the Size field (C). This relates to the wording that shows up to the customer in the Child item text box so it directly relates to items that have Variations or part of a Parent/Child relationship. This Size field (C) may be specific due to the sample Variation theme drop-down theme I chose for the Parent listing of ‘SizeName’. I suspect that if I chose another Variation them such as ‘ColorName’, a color field will be filled out relating to the Child item text box.
When filling out this Vital Info edit screen on a Parent listing, your information may overlay the same fields on your Child items associated with this Parent listing. You may want to check to see if any information on your Child items has changed or overlayed and is not what is wanted in those fields.
Update: This Vital Info entry screen now has the new Bullet Point fields under the product description field.
The new item edit screen ‘More Details’ showing the product’s additional detail information
7: This More Details edit screen shows the letter (H) next to the field and where they show up on the item display screen, shown above. As with many of the new edit screens, the entry fields look the same. These fields can be filled in as before on the old item edit screen. I am not sure if all the previous field edits are the same. Some of the entry fields have been removed from this sample page for simplicity.
My understanding is that the ‘Privacy’ listing of an item is no longer available.
When filling out this More Details edit screen on a Parent listing, your information may overlay the same fields on your Child items associated with this Parent listing.
Sample item Offer page
8: This Amazon handmade Offer edit page shows a Parent listing with a blank SKU number. When you first create a Parent listing, this field is available for the seller to enter a Parent listing SKU. If you do not enter a Parent listing SKU, the system will automatically assign one. Once you save this Parent listing you will no longer see this SKU entry field but the Parent listing SKU name will display under the Parent listing number in the Manage Inventory screen.
The other fields on this Offer edit page are the same as before.
Sample item detail page showing item Variations by ColorName
9: This Amazon handmade detail page shows a Parent / Child Variations item with the Variation theme ColorName. You can see that for this item, the different Child items show up as small photos or swatches. The small photo thumbnails are not displaying for most of the Variation themes for handmade items at this time. Perhaps in the future since I feel this is one of the best features of using Variations. Note: This is not a typical use of the Variation theme ColorName. It is mostly used for the same item that has multiple colors such as selling a hat that comes in yellow, blue, and green.
————————————————————————————–
The item customization screen and the changes:
The new edit item drop-down menu shown with customization option:
The “Copy listing” function, to create a new item from an old item, in the drop-down edit menu no longer copies over the customizations.
For some reason, the item quantity has to 1 or greater to add a new customization.
Sellers now have to add the customizations separately after the new item is created. The seller needs to wait until the new item has been updated on the Amazon system before entering customizations for the listing. This requires more time and is not as efficient as before.
Sellers now can save previously created customizations, so customizations can be loaded into existing items. This process is done using a more complicated bulk upload feature explained below, so many sellers will just enter customizations manually for new items.
My understanding is that you cannot enter customizations to a listing when the quantity is zero.
While it may make sense that you should be able to get to your existing listings customizations from the new edit screen, you can not. There is an edit menu option called ‘Variations’ that looks like that is where you will find your customizations, but they are not there. Variations, which are new, are much different from customizations. To edit existing items customizations or add new customizations, you need to go to the Manage Inventory page and go into the edit menu for the item of your choice and select ‘Add/edit customization information’. You should then have the item’s existing customization options display or you can add new ones.
Sellers can still add/edit personalization (customizations). Look for a separate menu option in the manage inventory page under the ‘edit’ drop-down menu for Add/edit customization information (Exhibit A). For new items created, my understanding is that you need to create the item first and save it. Then you can add any customizations. When using Variations, the Child items can also optionally have their own customizations.
This is the new (04/2021) drop-down menu in the edit menu (Exhibit A) on the Manage Inventory page.
You can also see a menu option called ‘Merge duplicate product’ which I do not remember seeing before.
You can click on the ‘Add/edit customization information’ edit menu button (Exhibit A) which will bring up the customization screen (Exhibit B) for that item. You can then edit or delete any existing customizations.
If you would like to add new customization, then select the ‘Add customization’ button (Exhibit B) and this will bring up (Exhibit C). Then select one of the three customer entry options which are ‘Text’, ‘Option dropdown’ and ‘Number’ (Exhibit C).
You now have the new customization fields to fill out. If you already have a customer customization option set up for an existing item, it just shows up for the seller to modify or delete shown on (Exhibit B).
New handmade customization screen: Hidden surprise
The seller now has the option of saving a template of an item’s customization options. Once saved, you will be able to call up those same customizations to quickly fill up other items. You can save many different customization templates.
To save a customization template click on the up arrow next to the word Publish in the lower right corner (Exhibit B). Then click on the option to Generate Template (Shown in Exhibit B). You can now fill in the template name as shown on the box insert below called ‘Generate a template’.
Add / Edit Customization screen
Update 06/21: The Generate Template button, as shown below, has been disabled by Amazon. The seller can also not add a Customization Template Name as shown below. I am leaving this information in the article in case this option comes back.
Customization type options screen
Customization type options (Exhibit C) including ‘text’ entry as shown in the first box below. You can also add customizations for ‘Option dropdown’ and ‘Number’.
This Customization type options (Exhibit C) screen is brought up by selecting the ‘Add Customization’ button shown on Exhibit B above.
Customization edit screen showing the new thumbnail photographs for each customization option
The seller can optionally upload a different photo for each customization option that matches the uniqueness of the customization option such as color. The photo must be in a square format and be at least 400 pixels x 400 pixels, but can be larger. The photo only shows to the customer at 40 pixels, so really small. I am not sure if that size is useful to distinguish some options from the others. These photos are optional and your customizations will work without them as before. If you get an error message when you load up your customization thumbnail photos, verify that your photo is exactly square. If it is not square, add some white space around it to make it square.
Customization new thumbnail photographs as shown to the customer
————————————————
Add / Edit Customization screen
Update 5/2021 Amazon has disabled the product customizations in bulk using the Customization Template and Feed Spreadsheet file update feature. I have no knowledge if they will put it back.
Add product customizations in bulk using Customization Template and Feed Spreadsheet file
The screen page (Exhibit D) shown below shows my three saved customization templates. You can now press the download feed file button (small arrow) shown on this screen. This downloads a spreadsheet file to your local computer. You can see a sample downloaded spreadsheet file below (Exhibit E). This spreadsheet file can now be modified with SKU numbers and customization information to be later used to upload customization changes to your Amazon items.
It helps to have a good working knowledge of spreadsheets to do this customization template upload.
You can have one saved customization bulk update template for each unique set of customization options. If you have a template that would fit or match 20 of your item SKUs customizations and you decided to adjust your customization options in some way such as change a price or add or delete a customization, you could create a new adjusted template with these changes. Then you use this template to create a new download spreadsheet feed file. You can update the customizations for all 20 SKUs at once by having 20 spreadsheet lines in the data upload feed file (Exhibit G). Each spreadsheet line would have a different SKU number in the first column.
You can also just update each SKU customizations manually one at a time as done previously and not use this new feature. For changes to a few SKU customizations, it is probably faster to do it manually one at a time.
I was able to do a bulk upload update with this customization template spreadsheet. The downloaded feed file sample template spreadsheet is shown below (Exhibit E). To do a bulk upload of your customization template spreadsheet, there is a place on the page (Exhibit D) that says “Upload Customizations” that you can click on. When you first try to do a bulk upload, you should do it with just one item SKUs customization until you have the procedure working. Once you have the procedure working, you can have multiple SKUs in the spreadsheet template file.
Doing this procedure does require some skills in spreadsheets and it helps if you have done previous updates to your Amazon items using spreadsheet uploads. As with anything new, you may not be able to do this on the first try. If you put some effort into this, you may find it beneficial in the end by making your workflow more efficient when changing customization for many items at a time. The method that Amazon came up with is a bad design and vastly over complicated. I tried to explain it as best as I could and it should get you started in learning this new skill.
Step by step guide to create and upload customizations in bulk to multiple items at once.
1. First visit one of your items that already have customizations in Managed Inventory and the Edit drop-down menu (Exhibit A), select ‘Add/edit customization information’. This will display the customization screen (Exhibit B) sample screen shown above.
2. On the customization screen (Exhibit B) click on the up arrow next to the word Publish in the lower right corner.
3. Then click on the option to ‘Generate a Template’ also shown in Exhibit B above.
4. You can now fill in the template name as shown on the box insert (Exhibit B) called ‘Generate a template’ and click on the Save button.
5. Once you fill in a new template name and save it, this will bring you to the screen shown below (Exhibit D). This screen will show the line of the template you just created. This sheet may also show other templates you created previously.
6. You can now use the download the feed file option (Exhibit D) by selecting the little south-facing arrow, of one of the templates, to save your customization template to your personal computer.
7. You can now modify this feed file (Exhibit E) in your spreadsheet program on your personal computer as needed. If you copy the first spreadsheet line down and change the first column to another SKU number, you will add or update this customization information on additional SKUs listed on the spreadsheet feed file (Exhibit G).
8. The further step-by-step process (Exhibit F) to upload the bulk customization spreadsheet template file to update your item listings is listed later in the article.
Note: Once you save your customization template and you want to go back in and call it up again at a later time to select it, I found no way to get to this screen without trying to save another template first. You should be able to get into this screen of saved templates without faking a template save to access this page.
The seller would add a new spreadsheet line for every SKU item you want to update or add with a customization. This example (Exhibit E) has only one SKU line entered but you may add many more SKU lines. You can upload this spreadsheet using the “Upload Customizations” link shown on the above screen. Yes, this is more complicated than it should be but I did not design it.
When you first download the feed file from a specific saved customization template, you will get the spreadsheet that may look similar to the one below which contains the one SKU number and the contents of all the customization information for that SKU saved in a spreadsheet line format.
You can see in this sample below the relationship between the customization spreadsheet template (Top part of Exhibit G) and an actual item customization edit screen (Bottom part of Exhibit G) that was used to create the first spreadsheet line (Row 4). My line drawings try to show where the customization information is being saved to certain areas of the customization spreadsheet.
I determined in this sample that I wanted to add or change the SKUs to five different SKUs and I copied the first line down and just changed the first column which is the SKU number. After this spreadsheet is uploaded, all five items of the SKUs listed will have the same customizations.
This could be handy if you have 50 items with the same customizations that need to have one of the customizations change its price. If you knew which SKU number items were affected, you could update them all at once. If you only had a few SKUs that needed to be changed, then doing it one at a time manually would be faster.
Steps to upload the bulk customization information: (See Exhibit F)
Note: Not currently available
1. Create or adjust an existing update customization spreadsheet as explained above and save it as a regular Spreadsheet file.
2. Also save the same update customization spreadsheet file under a different name in a Unicode text file format.
Note: On one of my updates of about 100 items, the processing got stuck for 5 hours + before it finished. Amazon seller support suggested that we should close all our item listings from being open in edit mode before we run the update. This would include all item listings SKU’s listed in the updated spreadsheet. I am not sure this is what caused my issue, but I think it is a good idea. If your update gets stuck, you may want to go into the Menu Catalog and then Complete your drafts screen to see if any of your items are causing a problem and those suppressed items show up here. You may also want to see if you have any items, that you are updating, are listed as suspended or suppressed that may be causing a problem. It could also be that the item quantity needs to be greater than zero when updating the customizations in bulk mode also. Some things to try if your customization spreadsheet file being processing is stuck in processing.
3. Select the “Upload a Product Customization template” button.
4. Enter the spreadsheet name you completed in the Unicode text file format. Note: Not shown on screen sample.
5. Select the “Submit Customizations” button. Note: Not shown on screen sample.
6. At first the Upload status for your upload will say “InQueue”, then “InProgress”. This may take a while and you can reload the page by selecting the small “Refresh” label on the right side of the screen to see the current upload status.
7. Wait for the Upload status to say “Done”.
8. Look for any upload error messages and adjust the spreadsheet as needed by going back to step 1. If you do have any errors the screen will display “Error Report” with a downward arrow. Select this arrow and then call up the error report downloaded to your computer to manually review.
9. If you have no errors such as the screen says “Total # of records with errors: 0” and records processed successfully is what you expect, then continue.
10. When completed with no errors on the customization upload, go into some sample item listings to verify that the customizations for the SKU numbers listed in the spreadsheet had changed as planned.
Sample Customization Bulk Update Processing Page
Note: Not currently available
In this sample below, I uploaded a change to the customization of one SKU and did not receive any error messages. I recommend going into a small sample selection of the items you changed to check to verify that the customization changed as requested. If the upload results result in an error, you would need to determine what caused the error and correct it before trying the upload again.
In the sample screen shown above, you can see the results of another update. One shows the update in progress, one shows the updated completed with no errors and one shows an update that had errors and shows a download error report link.
————————————————
Note: For those who are doing Parent / Child Variation listings: I found this information on Amazon which relates to updating the Parent listing with the customizations even if you already are individually updating the Child item with the customizations. This could be a problem if not all of the Child items (only some of them) under the Parent listing have customizations since placing customizations on the Parent listing may copy this down to all the Children items even those without customizations:
“Should I provide the information for parent SKUs, child SKUs, or both?
Both. Provide customization information for your parent SKU as if it were one of the child SKUs. However, this configuration will not be represented to customers.
Note: Product variations will first need to be built using a normal product listing feed. The Custom enablement feed does not support the creation of variation families.
In the customizable enablement tool, what is the difference between editing the parent ASIN and editing the child ASIN?
If you edit the parent ASIN using the customization enablement tool, your edits will copy through to all of your child ASINs.
If you edit the child ASIN, your edits will only occur on the specific child ASIN selected.
If you are configuring color variations, we recommend you edit each child so your preview image aligns to the correct color of the product.”
————————————————
How to delete customizations from an item listing?
There is a page called ‘Manage Custom Product Listing’ shown below. This page list your items with an edit drop-down button. One of the edit options is ‘Remove customization information’ also shown below.
To get to the ‘Manage Custom Product Listing’ page call up the Manage Inventory page and look for and select the menu option ‘Custom Products’ on top. This may be new with the recent update.
You will see in the ‘Manage Custom Product Listing’ screen shown below an edit drop-down menu. One of the options ‘Remove customization information’ in this menu is to delete all of an item’s customizations from the item selected.
If you want to turn your Merchant fulfilled item into an FBA item, you will need to delete any customizations with that item first.
————————————————
New Bullet Point entry field that displays in the product description:
Sellers can now enter up to five new lines that show up to the customer in the item description area with Bullet Points placed in front of them. These Bullet Point lines show up at the end of the text entered into the description field. The information in these up to five lines can get indexed by Amazon to be used in SEO searching by customers to find your items. There is an advantage to use these new lines and a seller may choose to take some or all of their current information in their product description and fill in these five lines with that information. The use of the ‘Bullet Point’ field is optional. The Bullet Point fields do not have to be limited to one line or sentence. Of course, customers are used to Bullet Point type fields to be short, precise, and informative.
The sample screen prints show the edit entry fields for Bullet Points and also how the same fields would look for the customer in the item description area.
You can find these new entry Bullet Point fields in the Vital Info edit page right under the Product Description field. You will initially see one Bullet Point entry field line but can open up a total of five entry field lines. These Bullet Points will show up at the bottom of any other wording you have in your product description and cannot be placed higher.
The ‘Bullet Points’ field initially was called the ‘Key Product Features’ field but Amazon changed the name.
If you check some listings on the Amazon Marketplace, many sellers chose to have their entire product description from the Bullet Point lines with no additional product description lines above. Of course, you can fill in the Product Description field and have that information placed above the Bullet Point fields.
For many of my listings, I have been removing my existing HTML Bullet Points and converting that information to the five new Bullet Point fields. The Bullet Point fields will automatically place a Bullet Point in front of the information line without the seller needing to add any HTML Bullet Point code. The Bullet Points from this field will not count as HTML Bullet Points. Also, my understanding is that the information in this new Bullet Point field will be indexed by Amazon for SEO search benefits and this alone would be enough incentive to make the change.
Amazon wanting the sellers to remove the use of HTML in their item listings:
If Amazon does remove the option to use HTML Bullet Points and other types of HTML, then by doing this now, it is less to do later. I believe Amazon will not remove the < BR > line feed HTML ability in the future for the description field. The following link page currently says “Don’t use HTML, JavaScript, or other types of code in your product detail pages. As a special case, you can use line breaks < /br> in the description.”
I am also personally leaving in my “< b>Bold< /b>” HTML code. If Amazon chooses to specifically tell us to stop using this or automatically strips out some HTML from our listings, then I will remove it then.
————————————————
All main images for handmade items must have a white background:
Update: As of 06/30/21 Amazon will require the Handmade main images to have a pure white background to increase deal eligibility and ensure consistency across the Amazon experience and product detail pages. All item main images outside the Handmade category had already had this requirement and Amazon is stating that they would like this consistency in the Handmade category to match the other categories. Updating your MAIN image to a pure white background will increase deal eligibility and ensure consistency across the Amazon experience and product detail pages-RGB color values of 255, 255, 255.
The sellers should determine which of their items have main photos that are not currently on a white background and converting the main images to a white background by 06/30/21 or those items could be suppressed. It is recommended to not do this at the last minute due to the time-consuming aspect of this change. One never knows if Amazon is going to start suppressing items if your first image does not have a white background that Amazon considers pure white, but sellers can not take a chance. Amazon may not check the first image unless you change an item or create a new item.
You can still feature your images with a non-white background or lifestyle images as secondary images the customer will see on your detail page. You can read more about this subject on the Amazon seller forum in the handmade section at https://sellercentral.amazon.com/forums/t/new-main-image-requirement/661132. One thing to consider is if you have a white area around almost all of the photo and then have a small area of your item going to the edge such as a jewelry chain, this may cause Amazon to feel your background is not white.
One way to get pure white backgrounds as in RGB 255 255 255 is to do it manually if you know how to use one of the software products that look for your item area and place white on the background for you or use one of the many small or one-person companies that will give you a white background for a price per photo. The software products and hiring specialists in this area are both reasonably priced. The white background now needs to be done by 6/30/2021. You can do the white background for the main first photo in advance and place it as one of your alternate photos. Then in June 2021, you can move the white background image to your main image area. I believe there is an Amazon app on the iPhone that can check your images to see if they pass the white background test. I have been told that this main image white background check is not available on a personal computer or other phones.
White background software: 1) https://www.remove.bg/ (Link here) or 2) https://www.picmonkey.com (Link here)
One area that may be tricky on the main photos is the shadow. I feel that a smaller shadow under the images with some white space surrounding the shadow is probably Amazon compliant. Having a shadow go into the edge of the photo may cause some compliant issues. I would keep the edges white if you can and for example not have a piece of jewelry go out of focus off the edge of the photo.
My understanding is that the main photo does not have to have a white background or at least a larger noticeable white background if you can crop the image to only display the actual item itself.
You can see if you have any current suppressed listings if you review your Manage Inventory screen page and look for the menu option ‘Suppressed’. If you do not see the menu option suppressed, then you do not have any suppressed items. It might be a good idea to do a regular check every month to see if you have any suppressed listings since you may not notice it unless a regular seller stops selling. See the Managed Inventory screen showing the menu option ‘Suppressed’. There is also a report called “Listing quality and suppressed listing report” under the Inventory Reports menu option.
————————————————
Feel free to enter comments or ask questions. I can adjust or correct the article based on your comments.

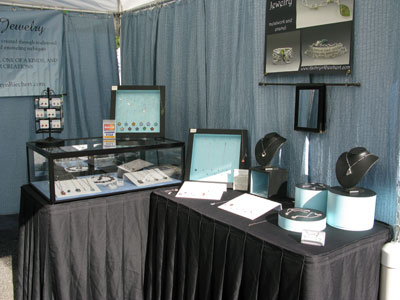


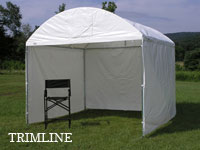
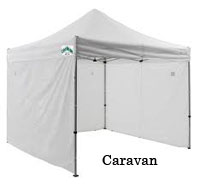
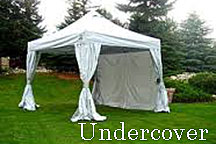
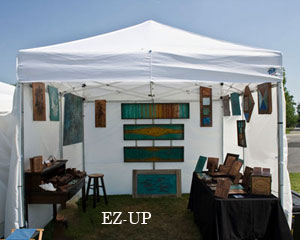


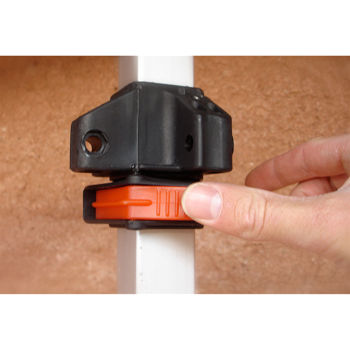


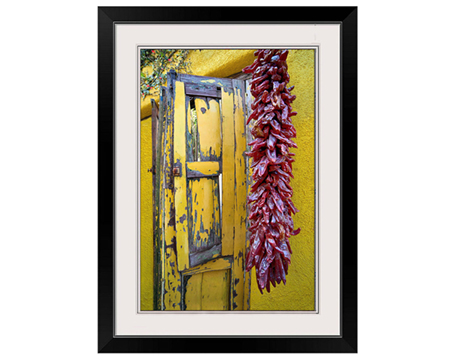


 If you think it will be windy overnight on multiple day shows, you can lower your legs on your tent a little, giving it a lower profile and then raise them back up the next morning. While I have never tried this, you could lower the height of your tent during the show if the wind is a problem.


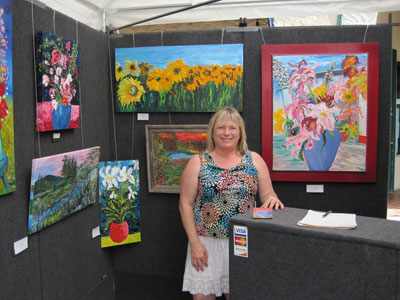


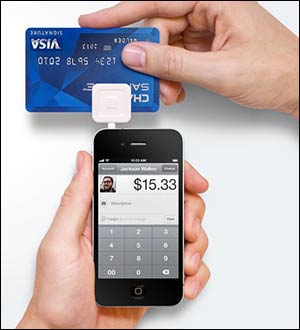


 Square also has a third reader model (card reader type 3), shown to the right. This much larger reader will read Apple Pay and EMV (Europay, MasterCard and Visa) which in English mean cards with chips in them. I do not think this reader has the ability to read the credit card magnetic strip, so you will have to keep your older Square reader for this.


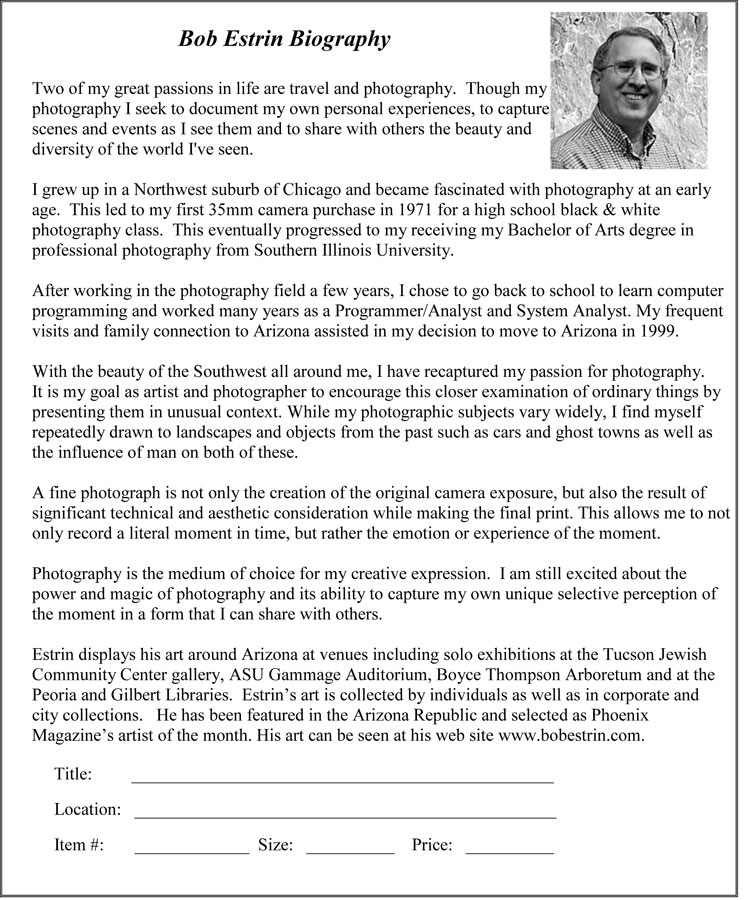 always needed with size as an option. For photography, many customers want to know the location of the subject matter.